SilverStripe CMS is an open source CMS/Framework written in PHP that allows users (small or middle sized business) to create and edit websites, and it offers developers the possibility to build web-based applications thanks to the SilverStripe Framework.
In this tutorial, we will show you how to install SilverStripe CMS 3.0.1 on Ubuntu 12.10/12.04/11.10 and Linux Mint 13 or older. For complete features of SilverStripe CMS, you can go here.
LAMP Installation
This tutorial will use the LAMP web server to install Apache, PHP, and MySQL. To install LAMP on Ubuntu/Linux Mint, open the terminal and run this command:
sudo apt-get install lamp-server^
Note: During LAMP installation, don't forget to enter MySQL root password two times, which is needed later for creating MySQL databases. For more information about the LAMP server, click here.
SilverStripe CMS 3.0.1 Installation
Once the LAMP server is well installed on your system, the /var/www/ folder will be created in which we will move the CMS files to. To do this, run this sequence of commands:
cd /tmp && wget -O SilverStripe-cms-v3.0.1.tar.gz http://goo.gl/DZ8pW
sudo tar -xzvf SilverStripe-cms-v3.0.1.tar.gz -C /var/www/
Let's now rename the CMS folder name to a more readable name using this command:
sudo mv /var/www/SilverStripe-cms-v3.0.1 /var/www/silverstripe
Change now the permissions of /var/www/silverstripe/ with these commands:
sudo chown -R www-data.www-data /var/www/silverstripe/
sudo su
cd /etc/apache2/sites-available
sed 's/www/www\/silverstripe/g' default > silverstripe
a2ensite silverstripe
Enable url rewriting with this command:
a2enmod rewrite
Restart now Apache with this command:
sudo /etc/init.d/apache2 restart
MySQL Database Creation
If you are familiar with phpMyAdmin, you can use it to create a new MySQL database for SilverStripe, or you can use the terminal as given below.
Note: The MySQL details that will be used are highlighted in red.
To sign in to your MySQL server (MySQL root password is needed, not your root password of your system):
sudo su
mysql -p
Create now a database with this command:
create database silverstripe;
Create now a database user and password with this command:
CREATE USER 'silverstripe'@'localhost' IDENTIFIED BY '12345';
Grant now this user all privileges with this command:
grant all privileges on silverstripe.* to silverstripe@localhost;
Exit now the MySQL server with this command:
exit
The details we have created can be changed to whatever you want and they are as follows:
- Database name: silverstripe
- Database user: silverstripe
- Datatbase user password: 12345
http://localhost/silverstripe
or
http://127.0.0.1/silverstripe
Note: replace localhost or 127.0.01 with your own server IP address if needed.
You will be re-directed automatically to the setup page. If you receive this error message:
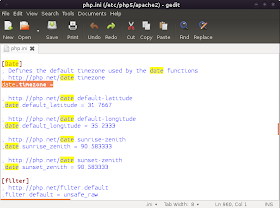
date.timezone option in php.ini must be set correctly.
You can fix it as follows:
Edit php.ini with this command:
sudo gedit /etc/php5/apache2/php.ini
For Linux Mint, run this command:
sudo pluma /etc/php5/apache2/php.ini
Find this line:
; date.timezone =
And replace it with this line (set your own region and location):
date.timezone = Europe/London

Save the file and close, then restart Apache with this command:
sudo /etc/init.d/apache2 restart
Enter the MYSQL details we have created above under the "Database Configuration" section:

After entering the remaining details, click "Install SilverStrip" to install the script:

If the installation went well, you can see this welcome page:

The admin area can be accessed from here:
http://localhost/silverstripe/admin
If rewrite rules are not set up correctly, you can access the admin area using this URL:
http://localhost/silverstripe/index.php/admin
Your admin area will look like this:

SilverStripe CMS Home Page

No comments:
Post a Comment