Saturday, October 13, 2012

Install Linux Kernel 3.6.2 On Ubuntu 12.10/12.04/Linux Mint 13


Linux Kernel 3.6.2 is the second maintenance release of the stable version of Linux 3.6 kernel series that has been released recently, and all users must upgrade.

Here are some of the changes and bug fixes in this latest release taken from the Changelog:


Fix Unmount Regression
Fix Module Loading
Fix A Memory Corruption
Fix Crash When Accessing /proc/mounts Concurrently
ext4: Fix Potential Deadlock In ext4_nonda_switch()
ixgbe: Fix PTP Ethtool Timestamping Function
Powerpc: Fix VMX Fix For Memcpy Case
lguest: Fix Occasional Crash In Example Launcher
Drivers/scsi/atp870u.c: Fix Bad Use Of Udelay
Slab: Fix The DEADLOCK Issue On l3 Alien Lock, etc.

For full changelog, click here. In this tutorial we will help you install Linux Kernel 3.6.2 in the following Linux distributions:

  • Ubuntu 12.10/12.04/11.10 or older
  • Linux Mint 13/12 or older
Linux Kernel 3.6.2 Installation

Open the terminal and run the following commands:

cd /tmp

wget http://dl.dropbox.com/u/47950494/upubuntu.com/linux-kernel-3.6.2 -O linux-kernel-3.6.2

chmod +x linux-kernel-3.6.2

sudo sh linux-kernel-3.6.2

Reboot your system to finish the installation. To check if the kernel is well installed, run this command:

uname -r

To delete Kernel 3.6.2 and revert back to the previous kernel, run this command:


sudo apt-get purge linux-image-3.6.2-030602

For any trouble encountered after upgrading to this new kernel, you may find this article helpful in case your system is unable to load or having instability issues.

Twitter joins the Linux Foundation - another thumb up for Linux servers

 
If you use both Linux and Twitter, you should surely tweet this, following the footsteps of other giants like Broadcom, Nvidia and Samsung, Twitter has joined the Linux Foundation confirming the growing stature Linux in the world of dedicated web servers and global data centers.

“Linux and its ability to be heavily tweaked is fundamental to our technology infrastructure,” said Chris Aniszczyk, manager of open source for the social networking giant. “By joining the Linux Foundation we can support an organization that is important to us and collaborate with a community that is advancing Linux as fast as we are improving Twitter.”

And, Twitter needs an operating system that can handle intensive computing, especially since it now serves 40 million active users and 400 million tweets per day. It’s also available globally in 30 languages.

PC World reports that a full 80 percent of respondents to a new Linux Foundation survey said that not only have they added dedicated Linux servers in the past 12 months, they also plan to add more in the next 12 months and over the next five years.

Click here to read more about this on PCworld. And dont forget to tweet this.

How To Configure Your Computer To Use The Tor Network System Wide - Ubuntu 12.10/12.04


In this tutorial we will help you configure your computer or laptop running under Ubuntu 12.10/12.04 to use the Tor network system wide instead of your actual internet connection. This will help you hide your real IP address to protect your online privacy.

1. Tor Installation

To install Tor on Ubuntu, open the terminal and run these commands:

sudo apt-add-repository ppa:ubun-tor/ppa
sudo apt-get update
sudo apt-get install tor privoxy

During the installation, you will be required to add your username to the debian-tor group. Check on your username using the spacebar and press Enter:


You can start now the Tor network with this command:

sudo /etc/init.d/tor start

2. System Configuration

Via the Unity dash, open Nework Manager:


In the left pane of the window select "Network proxy," then enter the following settings:

Method:         Manual

Socks Host:   127.0.0.1          9050


You must leave other settings empty, then click "Apply system wide" to apply the new changes (root password is required). Via your web browser (Firefox or Google Chrome), open now this link to verify if Tor is well enabled on your system:

https://check.torproject.org/

If enabled, you may see this:


3. Configure The Terminal To Use Tor

Although we applied the Tor network on system wide, you will find out that only your web browsers are working with Tor. If you check for example your current IP address from the terminal with this command:

curl icanhazip.com

It will detect your real IP address not that generated by Tor. To be able to use the Tor network from the terminal we need to use the "proxychains" package which will allow us to force the tcp connection to follow through proxy. You can install it under Ubuntu with this command:

sudo apt-get install proxychains

Edit now the proxychains config file with this command:

sudo gedit /etc/proxychains.conf

Make sure these two lines are available:

# defaults set to "tor"
socks4 127.0.0.1 9050


Save your file and exit. To make sure  proxychains is well configured with Tor, check again your current IP address with this command:

sudo proxychains curl icanhazip.com

Here are now some other examples of using proxychains with Tor from the terminal to hide your real IP:

   a. Installing A Package:

sudo proxychains apt-get install pidgin

The Pidgin package will now be downloaded via the Tor network.

   b. Updating/Upgrading Packages

sudo proxychains apt-get update

sudo proxychains apt-get upgrade

   c. Force Applications To Use Your Tor Connection

To force for example Rhythmobox to use the Tor proxy, run this command from the terminal:

sudo proxychains rhythmbox-client

You can now use any commands from the terminal with proxychains.

Install Tor Browser Bundle (v2.2.39-1) From PPA On Ubuntu 12.10/12.04/Linux Mint 13


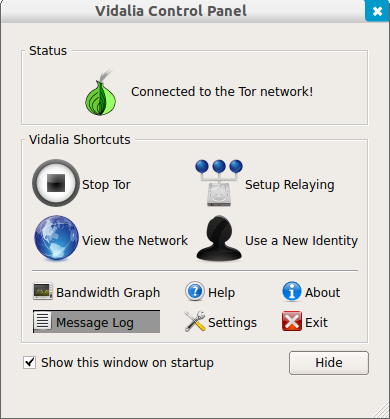
Tor Browser Bundle is a standalone package that allows to browse the web anonymously that will protect your online privacy from traffic analysis and network surveillance. This package includes the Tor application, a GUI called Vidalia, and a customized version of Firefox having various add-ons to ensure better online anonymity.


 The latest version of Tor Browser Bundle is 2.2.39-1 which fixed many bugs and security issues compared to the previous version. If you prefer to download and use Tor Browser Bundle manually, you can download it from here. To install it from PPA, you can use the commands given below. The PPA is compatible with following Linux distributions:

  • Ubuntu 12.10/12.04/11.10
  • Linux Mint 13/12
Tor Browser Bundle Installation

Open the terminal and issue these commands:

   1. 32-bit Systems

sudo add-apt-repository ppa:upubuntu-com/tor
sudo apt-get update
sudo apt-get install tor-browser
sudo chown $USER -R ~/.tor-browser/

   2. 64-bit Systems

sudo add-apt-repository ppa:upubuntu-com/tor64
sudo apt-get update
sudo apt-get install tor-browser
sudo chown $USER -R ~/.tor-browser/

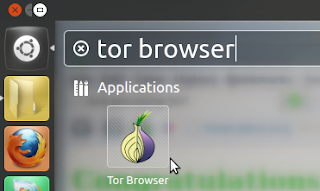
You can later start it via Unity dash:


Or from the terminal with this command:

tor-browser

Zenwalk Linux 7.2


Jean-Philippe Guillemin has announced the release of Zenwalk Linux 7.2, a Slackware-based desktop Linux distribution with Xfce as the preferred desktop environment: "We are happy to release Zenwalk Linux 7.2. After several months of rescheduling we think it's time to let this new jet fly. Zenwalk 7.2 is loyal to its design - providing 1 application per task, everything needed to work, play, code and create, in a single 700 MB CD image, through a 10 minutes automatic install process on any recent computer. Zenwalk 7.2 runs on kernel 3.4.8 with BFS scheduler. The Zenwalk desktop is based on the Xfce 4.10, GTK+ 2.24.10 and 3.4.4, with unique look and feel and perfect ergonomic integration of the application set - LibreOffice 3.6.2, Firefox and Thunderbird 15.0.1, GIMP 2.8.2 and much more. The Netpkg package manager has been improved with multiple mirrors support and better performance." Here is the full release announcement. Download: zenwalk-7.2.iso (679MB, MD5).