Showing posts with label Wireless. Show all posts

Saturday, October 27, 2012

How To Fix Unity and Wireless Problems After Upgrading To Ubuntu 12.10 (Quantal Quetzal)


In this little guide, we will introduce solutions for some problems related to Ubuntu's Unity interface (Dash and toolbar), window frames, and wireless connections that occur after upgrading to Ubuntu 12.10 (Quantal Quetzal). Before we start, you should know that these solutions may work for some users and some not.

1. Lost Unity Dash, Window Frames, and Top Panel

If Unity is not responding to user inputs after upgrading to 12.10 and window frames disappeared, you can try these fixes:

- For Nvidia graphics cards, try to reinstall nvidia-current with this command:

sudo apt-get install --reinstall nvidia-current

For  NVIDIA Optimus laptops, try to reinstall bumblebee with this command:

sudo apt-get install --reinstall bumblebee bumblebee-nvidia

Then reboot your system:

sudo reboot

- For ATI AMD graphics cards, try to remove the fglrx package with this command:

sudo apt-get autoremove fglrx --purge

Then reboot:

sudo reboot

If the fglrx package is not installed in your system, you can use these commands instead:

sudo apt-get autoremove fglrx-updates fglrx-amdcccle-updates --purge

sudo reboot

2. WiFi Stops Working After Upgrading To Ubuntu 12.10 (Broadcom Wireless cards)

You can fix wifi problems using two methods:

- Either connect to the internet via wired connection and run this command:

sudo apt-get update && sudo apt-get upgrade

Then reboot your system.

- Or use the following commands:

sudo apt-get install linux linux-headers-generic kernel-package

sudo apt-get install --reinstall bcmwl* firmware-b43-lpphy-installer b43-fwcutter

Finally, reboot your system.

If that didn't help, try these commands:

sudo apt-get remove bcmwl-kernel-source

sudo apt-get install firmware-b43-installer b43-fwcutter

sudo reboot


If you have something to add, please use the comment form below.

Saturday, September 29, 2012

[FIX] Ubuntu Keeps Forgetting My Wireless (WiFi) Connection Password / Key - Ubuntu 12.10/12.04


Whenever I restart my computer, Ubuntu asks again for my wireless connection password / key. This also happens even when I set the password to be remembered. If you want to solve this problem under Ubuntu 12.10/12.04, then follow these simple instructions:

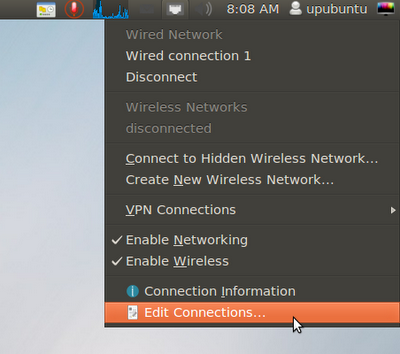
- Click the network icon displayed on the upper panel of Ubuntu and select "Edit Connection":


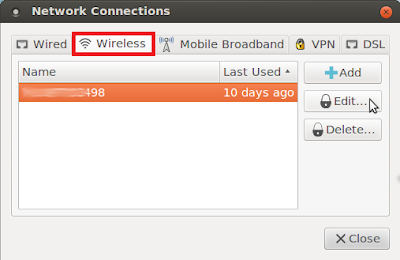
- Open the "Wireless" tab, select your wifi connection and click Edit:


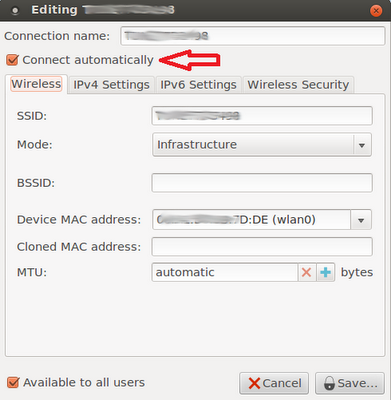
- Make sure now that "Connect automatically" is checked on:


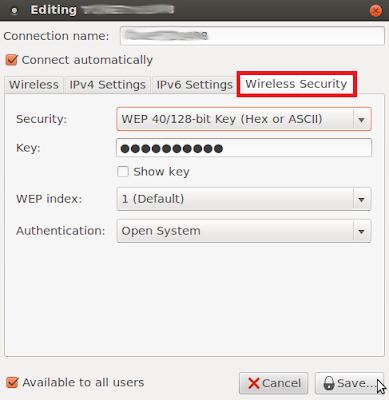
- Next, open the "Wireless Security" tab and enter these details, then click Save:

Security:   WEP 40/128-bit Key (Hex or ASCII)

Key:   Enter your wifi password


From now on, your wifi password will be remembered whenever you reboot your system.

Monday, September 10, 2012

[SOLVED] Wireless Network Detected But Unable To Connect Under Ubuntu 12.04/11.10


If you can't connect to wifi networks and the buttons for connecting/enabling a wireless network are grayed out in your Network Manager indicator under Ubuntu 12.04 (Precise Pangolin) or Ubuntu 11.10 (Oneiric Ocelot), this means that your wireless network is disabled by hardware/software switch. This problem is common for users of laptops.

To check if there is a block on hardware/software of your wireless network, we need to run this command from the terminal:

rfkill list wlan

or

rfkill list all

Here are the outputs returned for my example:

~$ rfkill list all
1: phy1: Wireless LAN
Soft blocked: yes
Hard blocked: no

As you can see from the example above, I can't connect to the wireless network because software is blocked. To unblock it, you need to use one of these two commands:

rfkill unblock wlan

or

rfkill unblock all

Finally, restart your network manager with this command:

sudo service network-manager restart

You can now connect smoothly to WiFi networks.

Saturday, June 23, 2012

How to Make Your Laptop Choose a Wired Connection Instead of Wireless


Have you ever connected your Laptop to a wired network point in your house and continued to get wireless  network speeds ? Here’s how you can quickly fix that, the easy way.

Giving Your Wired Connection Higher Priority

Press the Win + R keyboard combination and type ncpa.cpl into the run box, then hit enter.
When the Network Connections window opens you will need to hit the alt key to display the classic menu bar.
Once its available click on advanced, and then choose the Advanced Settings option.
Here you will see the preference of your network connections. In order to make your laptop use a wired connection, if available, even when connected to a wireless network, you will need to select Wi-Fi and then click on the green arrow pointing down.
This will automatically bump Ethernet to the top.
That’s all there is to it.