Showing posts with label Linux Mint. Show all posts
Sunday, November 19, 2017
Linux Mint 18.3 Beta
The Linux Mint team has announced the availability of a new development snapshot for Linux Mint. The new testing snapshot, Linux Mint 18.3 Beta, features several overhauled applications. The software manager and backup utilities in particular have been given a new look. Linux Mint now makes it easier to install third-party software, such as Google Earth and Steam, and Flatpak packages can be installed through the software manager. The new beta also features operating system snapshots using Timeshift. "Linux Mint 18.3 features Timeshift, a tool dedicated to system snapshots. Timeshift is the perfect companion to the Linux Mint Backup Tool. It doesn't save your personal data, it saves everything else. Thanks to Timeshift you can create backups of the operating system itself. You deleted system files by mistake? You can recover them. You upgraded to a newer release and something isn't working well anymore? You can go back in time." Further information can be found in the project's release announcements for the Cinnamon and MATE editions. Download (pkglist): linuxmint-18.3-cinnamon-64bit-beta.iso (1,815MB, SHA256, signature, torrent, release notes), linuxmint-18.3-mate-64bit-beta.iso (1,836MB, SHA256, signature, torrent, release notes).
Etichete:
Linux,
Linux Mint
Monday, November 18, 2013
How to Check 3D Acceleration (FPS) in Ubuntu/Linux Mint
In this guide, we will see some commands needed for checking 3D Acceleration / FPS for both Nvidia and AMD graphics cards under the following distributions:
- Ubuntu 13.10/13.04/12.10/12.04 or older
- Linux Mint 15/14/13 or older
Getting Started
First of all, install this dependency via the terminal:
sudo apt-get install mesa-utils
Before running the commands below, make sure 3D acceleration is enabled or not by entering this command:
/usr/lib/nux/unity_support_test -p
1. Glxinfo
You can use glxinfo to check 3d acceleration and rendering. Here are some commands you need to run from the terminal:
glxinfo -i | grep render
or
glxinfo -i | grep direct
or
glxinfo -i | grep openGL
The output returned will give you information about your graphics card (AMD or Nvidia).
2. Glxgears
You can also use glxgears to test 3D Acceleration (FPS). Simply run this command:
glxgears
or
glxgears -info3. xvinfo
You can also use "xvinfo" to check information about your video card. You can run it with this command:
xvinfo
4. For owners of AMD (ATI) graphics cards, you can use this command to check your graphical performance:
fglrxinfo
or
fgl_glxgears
5. Glxspheres
To be able to use Glxspheres under Ubuntu/Linux Mint, you need first to install it as follows:
Installation (64-bit)
Via the terminal, issue these commands:
cd /tmp
wget http://goo.gl/L7rsGZ -O virtualgl_2.3.3_amd64.deb
sudo dpkg -i --force-depends virtualgl_2.3.3_amd64.deb
sudo apt-get -f install
Then run it with this command:
/opt/VirtualGL/bin/glxspheres64Installation (32-bit)
For 32-bit systems, install Glxspheres with these commands:
cd /tmp
wget http://goo.gl/O5AyjX -O virtualgl_2.3.3_i386.deb
sudo dpkg -i --force-depends virtualgl_2.3.3_i386.deb
sudo apt-get -f install
Then run it with this command:
/opt/VirtualGL/bin/glxspheres
Etichete:
Linux,
Linux Mint,
Ubuntu,
Video
Friday, May 31, 2013
Linux Mint 15
Clement Lefebvre has announced the final release of Linux Mint 15, code name "Olivia": "The team is proud to announce the release of Linux Mint 15 'Olivia'. Linux Mint 15 is the most ambitious release since the start of the project. MATE 1.6 is greatly improved and Cinnamon 1.8 offers a ton of new features, including a screensaver and a unified control center. The login screen can now be themed in HTML 5 and two new tools, 'Software Sources' and 'Driver Manager', make their first appearance in Linux Mint. MDM now features 3 greeters (i.e. login screen applications): a GTK+ greeter, a themeable GDM greeter for which hundreds of themes are available, and a brand-new HTML greeter, also themeable which supports a new generation of animated and interactive themes." Read the brief release announcement and also the what's new page and release notes for further details. Download (SHA256): linuxmint-15-mate-dvd-64bit.iso (1,000MB, torrent), linuxmint-15-cinnamon-dvd-64bit.iso (915MB, torrent).
Etichete:
Linux,
Linux Mint
Monday, April 8, 2013
Curlew Multimedia Converter Install on Ubuntu and Linux Mint from PPA
You know there are many media converters in Linux that helps to convert video and audio files to any other formats we want. Curlew is one media converter that comes with an easy-to-use GUI written in Python. With the help of this converter via the Advanced menu options you can add subtitles to your videos.
Following are the some of Curlew supports media formats.
- MP3 - M4A - 3G2 - WAV - OGG
- AVI – MP4 – FLV – MOV – MKV – 3GP
- WMV - Google WebM, etc.
You can see how to install Curlew from PPA in this article. The distributions are:
- Ubuntu 13.04/12.10/12.04
- Linux Mint 14/13
- Enter these commands by open the terminal
sudo add-apt-repository ppa:upubuntu-com/multimedia
sudo apt-get update
sudo apt-get install curlew
- From the Unity Dash you can start Curlew
- You need to run this command from the terminal
curlew
Curlew Removal
- You have to enter these commands to uninstall Curlew from Ubuntu/Linux mint.
sudo add-apt-repository –remove ppa:upubuntu-com/multimedia
sudo apt-get remove curlew
sudo apt-get update
Etichete:
Install,
Linux,
Linux Mint,
Multimedia,
PPA,
Ubuntu
Sunday, April 7, 2013
Monitor Laptop Battery Life with LXDE on Ubuntu or Linux Mint
If you install and activate the LXDE desktop environment in Ubuntu / Linux Mint, you will notice that the status icon of the battery life is lacking, which prevents users from knowing the battery level of their laptops. In this article, we will see how to use fdpowermon – a simple tool for monitoring battery power of mobile computers with ACPI -. To view the battery status icon in the taskbar life To install fdpowermon 12.10/12.04 in Ubuntu or Linux Mint 14/13, open the terminal and run the command:
sudo apt-get install fdpowermonWe will now configure fdpowermon to start automatically after logging on to your desktop. To do this, edit this file (replace gedit with your favorite text editor):
gksu gedit / etc / xdg / lxsession / LXDE / autostartAdd this line: @ fdpowermon
Save the file and exit. The status icon will show the battery automatically at system startup:
Install Tor Browser Bundle 2.3.25-6 From PPA in Ubuntu/Linux Mint
Tor Browser Bundle 2.3.25-6 has been released recently bringing updates for the following features:
- Update Firefox to 17.0.5esr
- Update NoScript to 2.6.59
As a reminder, Tor Browser Bundle isa multiplatform software that allows users to browse the web in anonymity. You can check for more information about it here. In this tutorial, we will see how to install Tor Browser Bundle from PPA which is supported by these Ubuntu/Mint distros:
- Ubuntu 13.04/12.10/12.04
- Linux Mint 14/13
Tor Browser Bundle 2.3.25-6 Installation
Open the terminal and enter these commands for 32-bit architectures:
sudo add-apt-repository ppa:upubuntu-com/tor
sudo apt-get update
sudo apt-get install tor-browser
sudo chown $USER -Rv ~/.tor-browser/For 64-bit architectures, run these commands:
sudo add-apt-repository ppa:upubuntu-com/tor64
sudo apt-get update
sudo apt-get install tor-browser
sudo chown $USER -Rv ~/.tor-browser/Use now Unity dash to search and open the software:
Etichete:
Linux,
Linux Mint,
PPA,
Ubuntu,
Web Browser
Wednesday, April 3, 2013
Linux Kernel 3.6.7 run and Install it on Ubuntu/Linux Mint
Here we come to the issue of seventh version maintenance of the family
of kernel 3.6, version 3.6.7 . We arrived in a very short time, well
seven maintenance releases of the family 3.6.! Apparently the problems
never end, and it is essential to update the kernel to avoid running
into bugs found in previous versions. In all cases, the update 3.6.7
brings significant improvements in audio handling (ALSA), in particular
USB sound cards. We see, also, to solve some annoying bugs that plagued
the Radeon drivers and XFS filesystem.
This is following the news, you can also consult the page on the full changelog :
- ALSA: usb-audio: Fix mutex deadlock at disconnection
- ALSA: Fix refcount unbalance card
- ALSA: usb-audio: Fix races at disconnection
- DRM / Radeon: Fix legacy on primary DAC Load Detection.
- xfs: fix buffer shudown reference count mismatch
- xfs: fix reading of wrapped log data
- cfg80211: fix antenna gain handling
- drm / vmwgfx: Fix a case where the code would BUG When trying to pin GMR memory
- drm / vmwgfx: Fix hibernation device reset
- mmc: sdhci: fix NULL dereference in sdhci_request () tuning
- l2tp: fix oops in l2tp_eth_create () error path
- net: usb: Fix memory leak on Tx data path
- net: fix SecPath kmemleak
- tcp: fix FIONREAD / SIOCINQ
- ipv4: Fix flushing of cached routing informations
- sctp: fix call to SCTP_CMD_PROCESS_SACK in sctp_cmd_interpreter ()
- batman-adv: Fix broadcast packet CRC calculation
- NFS: fix bug in legacy DNS resolver.
- mac80211: fix IBSS SSID copy on JOIN
- drm/i915: fix overlay on i830M
Install Linux Kernel 3.6.7 on Ubuntu
If you want to easily and quickly install the new kernel
on your Ubuntu (12.10/12.04/11.10 the recommended versions), my advice
is to rely script found below. That’s all you have to do! Open a
terminal and type:
cd / tmp wget
http://dl.dropbox.com/u/47950494/upubuntu.com/linux -kernel-3.6.7-O linux-kernel-3.6.7
chmod x + linux-kernel-3.6.7
sudo sh linux-kernel-3.6.7
Now reboot the system and verify that the version is actually 3.6.6 using the command:
uname-r
As usual, in case you want to remove the new kernel, just follow this guide .
WARNING : If you have any problems (like black screen) and
you have an Nvidia card, open a terminal emergency (beating Keyboard
ALT + CTRL + F1 , or F2 … up to F8) and type the following commands:
cd / usr/src/linux-headers-3.6.7-030607/arch/x86/include
sudo cp -v generated / asm / unistd *. / asm
Of course, the path to you might be a little different
(if, for example, you have a 64, the x86 bit from the previous command
could become x86_64).
NB: after installing the new kernel, the possibility
exists that some drivers (eg. video and wireless) stop working . It’s
all about uninstalling and then reinstalling before rebooting the system
(you may find yourself unable to use the graphical interface or the
wireless network) or using an old kernel .
Etichete:
Install,
Kernel,
Linux,
Linux Mint,
Ubuntu
Monday, April 1, 2013
Install Chromium OS on USB Flash Drive with Ubuntu/Linux Mint
This article is for those who want to install and run ChromiumOS onto a USB storage device. Let us see how it can be done with the OS image.
Open the terminal and run these commands to download the ChromiumOS image to your home folder:
mkdir ~/ChromiumOS; cd ~/ChromiumOSRun the following commands and to identify the USB device:
wget -c http://goo.gl/ICSpt -O ChromeOS-Vanilla-3274.0.zip
unzip ChromeOS*.zip
mv ChromeOS*.img ChromeOS.img
fdisk -lIf you mounted the USB flash drive as /dev/sdb1 on your system. Use the command and unmount the USB device:
sudo umount /dev/sdb1Use your USB device name and replace /dev/sdb1
Run the following command to create a bootable USB device with the Chrome OS image. It will delete all data from your USB device.
sudo dd if=ChromeOS.img of=/dev/sdb1 bs=4MBoot from the Chromium OS USB flash drive after finishing the process. To boot from USB storage devices, you can use the Plop boot loader too. the ChromiumOS VM can download and use from http://goo.gl/G0ZSk when you fail to create a bootable USB stick.
Or
sudo dd if=ChromeOS.img of=/dev/sdb1 oflag=direct
Etichete:
Driver,
Flash,
Linux Mint,
Ubuntu,
USB
Wednesday, March 6, 2013
CPU-G and i-Nex Hardware info Utilities for Ubuntu 12.10/12.04/13.04/11.10/Linux Mint
CPU-G is useful utility to show hardware information. It detects hardware and display details about everything, it shows information about CPU(Processor), RAM(Active/Inactive, Free, Used and cached), Motherboard and Chipset, Bios Details, Graphic card details, and details of installed Linux.
To install CPU-G in Ubuntu/Linux Mint open Terminal (Press Ctrl+Alt+T) and copy the following commands in the Terminal:
- sudo add-apt-repository ppa:cpug-devs/ppa
- sudo apt-get update
- sudo apt-get install cpu-g
2nd: i-Nex Hardware information Tool for Ubuntu 13.04 Raring/Ubuntu 12.10 Quantal/Ubuntu 12.04 Precise/Ubuntu 11.10/11.04/10.10/10.04/Linux Mint 13/12/11/10/9
i-Nex is used to gather information on the main system components (devices) such as CPU, motherboard, video memory, sound and so on. The application allows through a tabbed interface to display information about the system hardware.
To install i-Nex in Ubuntu/Linux Mint open Terminal (Press Ctrl+Alt+T) and copy the following commands in the Terminal:
That's it
- sudo add-apt-repository ppa:eloaders/i-nex-daily
- sudo add-apt-repository ppa:nemh/gambas3
- sudo apt-get update
- sudo apt-get install i-nex
Source: noobslab
Etichete:
Linux,
Linux Mint,
Ubuntu
Saturday, March 2, 2013
Copyq Advance Clipboard Manager for Ubuntu 13.04/12.10/12.04/Linux Mint
CopyQ is advanced clipboard manager with searchable and editable history with support for image formats, command line control and more. Command interface and graphical interface accessible from tray. By default the application stores any new clipboard content in list in the first tab. Main window can be opened by either left clicking on tray icon, running command copyq show or using system-wide shortcut (configurable from Preferences).
Advance Features:
- open video player if text copied in clipboard is URL with multimedia,
- store text copied from a code editor in "code" tab,
- store URLs in different tab,
- save screenshots (print-screen),
- load all files from directory to items (create image gallery),
- replace a text in all matching items,
- run item as a Python script.
- Item list navigation >> PgDown/PgUp, Home/End, Up/Down
- Tab navigation >> Left, Right, Tab, Shift+Tab
- Move selected items >> Ctrl+Up, Ctrl+Down
- Cycle through item formats >> Ctrl+Left, Ctrl+Right
- Hide window >> Escape
- Exit >> Ctrl+Q
- Edit selected items (in place) >> F2
- Edit items in external editor >> Ctrl+E
- Open action dialog for selected items >> F5
- Delete selected items >> Delete
- Put current item into clipboard >> Enter
- Show help >> F1
To install copyq in Ubuntu/Linux Mint open Terminal (Press CTRL+ALT+T) and copy the following commands in the Terminal:
That's it
- sudo add-apt-repository ppa:samrog131/ppa
- sudo apt-get update
- sudo apt-get install copyq
Source: noobslab
Etichete:
Copyq,
Linux Mint,
Ubuntu
Monday, February 25, 2013
Install Net-Conky in Ubuntu/Linux Mint/Debian
Previously NoobsLab shared other Conky widgets for linux desktop to make desktop nice. So today brings Net conky for you, Basically this conky was only available for Ethernet but NoobsLab provide after modification also for WiFi. Net conky shows Network Upload and Download speed via graph, text and circles.
Install Conky in Ubuntu/Linux Mint open terminal (Press Ctrl+Alt+T) and copy the following commands in the Terminal:
- sudo apt-get install conky conky-all
First of all Download Startup script with following commands:
Now open Startup Applications > click Add > New Dialog box will open click on Browse > Now (Press Ctrl+H) see following screenshot.
- wget -O .start-conky http://goo.gl/6RrEw
- chmod +x .start-conky
First install relevant conky then change your net speed in this file (Line 3 & 5):
- sudo nano ~/.conky/NET_0.5.lua
1: Net Conky for Ehternet
To install Net-Conky in Ubuntu/Mint open Terminal (Press Ctrl+Alt+T) and copy the following commands in the Terminal:
- wget -O net-conky-eth.zip http://goo.gl/OpxW7
- unzip net-conky-eth.zip
- sudo rm net-conky-eth.zip
2: Net Conky for WiFi
To install Net-Conky in Ubuntu/Mint open Terminal (Press Ctrl+Alt+T) and copy the following commands in the Terminal:
That's it, Enjoy
- wget -O net-conky-wlan.zip http://goo.gl/uLU1r
- unzip net-conky-wlan.zip
- sudo rm net-conky-wlan.zip
Source: noobslab
Etichete:
Clock,
Debian,
Linux Mint,
Ubuntu
Install Mountain Lion Theme (GTK 3.6) and Icons from PPA in Ubuntu 12.10 (Quantal Quetzal)
If you prefer to make Ubuntu 12.10 (Quantal Quetzal) look like OS X Mountain Lion, I suggest that you try the Mountain-Lion GTK 3.6 theme, Mac OS X icons are also provided. The theme is compatible with Unity and Gnome Shell and can be easily installed in Ubuntu via our PPA. Here are two screenshots of Mountain-Lion theme under Unity:
Mountain-Lion Theme Installation
Under Ubuntu 12.10, open the terminal and enter these commands:
sudo add-apt-repository ppa:upubuntu-com/gtk+3.6
sudo apt-get update
sudo apt-get install mountain-lion-theme
Use now Gnome Tweak Tool to enable this theme.
Mac OS X Icons Installation
Via the terminal, issue these commands:
sudo add-apt-repository ppa:upubuntu-com/icons2
sudo apt-get update
sudo apt-get install ilinux-icons
Enable the set of icons with this command:
gsettings set org.gnome.desktop.interface icon-theme 'iLinux-icons'
Enjoy!
Etichete:
Linux,
Linux Mint,
Theme,
Ubuntu
Saturday, February 16, 2013
My-Humanity Icons for Ubuntu/Linux Mint/Debian
My-humanity icons designed by Magog64, Icons look elegant on desktop with every kind of light and dark theme. These icons are in active development, so if you found any missing icon you can report to author and hopefully they will fix it.
To install My-humanity icons in Ubuntu 12.10/13.04/12.04/11.10/Linux Mint 14/13/12 open Terminal (Press Ctrl+Alt+T) and copy the following commands in the Terminal:
To install My-humanity icons in Ubuntu 11.04/10.04/Any Ubuntu and Linux Mint version/Debian open Terminal (Press Ctrl+Alt+T) and copy the following commands in the Terminal:
- sudo add-apt-repository ppa:noobslab/icons
- sudo apt-get update
- sudo apt-get install myhumanity
That's it
- wget -O myhumanity.deb http://goo.gl/NYRif
- sudo dpkg -i myhumanity.deb && sudo rm myhumanity.deb
Source : Noobslab
Etichete:
Debian,
Linux,
Linux Mint,
Ubuntu
Monday, February 4, 2013
Install/Upgrade to Linux Kernel 3.7.6 in Ubuntu/Linux Mint
Linux Kernel 3.7.6 is the sixth maintenance release of the kernel 3.7 series that brings more improvements and various bug fixes. The installation of this kernel is very easy, you may download the appropriate deb packages from here and install them with Ubuntu Software Center. Or simply follow the instructions below which will help you install this new kernel with a few terminal commands.
Here are some of the fixes for Kernel 3.7.6 taken from the changelog:
- drm/i915: fix FORCEWAKE posting reads
- ALSA: hda - Fix non-snoop page handling
- ALSA: hda - fix inverted internal mic on Acer AOA150/ZG5
- ALSA: hda - Add a fixup for Packard-Bell desktop with ALC880
- ALSA: usb-audio: fix invalid length check for RME and other UAC 2 devices
- ath9k_hw: fix chain swap setting when setting rx chainmask to 5
- DM-RAID: Fix RAID10's check for sufficient redundancy
- xfs: fix periodic log flushing
- iwlegacy: fix IBSS cleanup
- xfs: fix _xfs_buf_find oops on blocks beyond the filesystem end
- x86, efi: Fix 32-bit EFI handover protocol entry point
- x86, efi: Fix display detection in EFI boot stub
- smp: Fix SMP function call empty cpu mask race
- NFSv4: Fix NFSv4 trunking discovery
- NFSv4: Fix NFSv4 reference counting for trunked sessions
- NFS: Fix error reporting in nfs_xdev_mount
- Bluetooth: Fix incorrect strncpy() in hidp_setup_hid()
- kvm: Fix irqfd resampler list walk
- drm/radeon: fix cursor corruption on DCE6 and newer
- drm/radeon: fix a rare case of double kfree
- drm/radeon: fix error path in kpage allocation
Linux Kernel 3.7.6 Installation
To install Linux Kernel 3.7.6 in Ubuntu/Linux Mint (12.10/12.04 and Linux Mint 14/13 or older), open the terminal and issue these commands at your own risk:
cd /tmp
wget http://dl.dropbox.com/u/47950494/upubuntu.com/kernel-3.7.6 -O kernel-3.7.6
chmod +x kernel-3.7.6
sudo sh kernel-3.7.6
sudo reboot
Nvidia Troubleshooting
For unexpected problems with the Nvidia driver, you may fix your system using the following instructions:
- Press CTRL+ALT+F2 and enter these commands:
cd /usr/src/linux-headers-3.7.6-030706/arch/x86/include
sudo cp -v generated/asm/unistd* ./asm
sudo apt-get install --reinstall nvidia-current
Kernel Removal
sudo apt-get purge linux-image-3.7.6*
Monday, January 21, 2013
Install Ubuntu Server Manager Utility in Ubuntu/Linux Mint
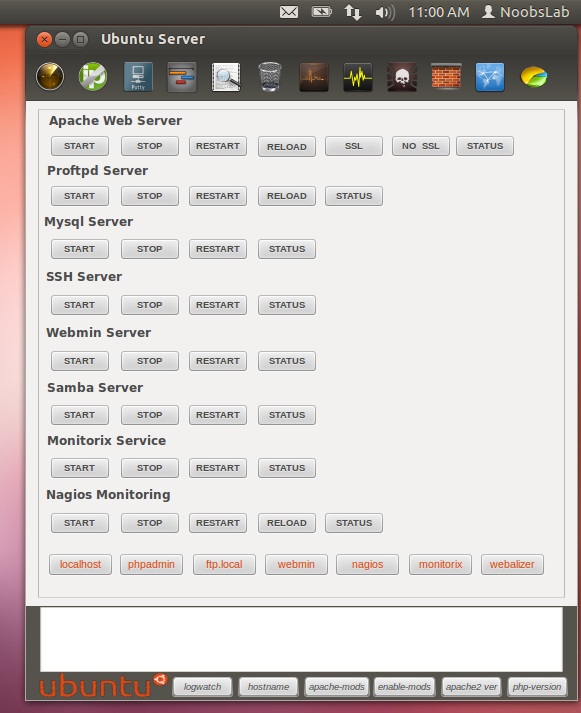
Ubuntu Server Manager is a Graphical-User-Interface to install and manage (Apache 2, MySQL, Proftpd, Samba, Monitorix, SSH, Nagios, Webmin) and to monitor the server log activity.
There are several other options for services like: Net activity viewer, Update dynamic IP, Putty for ssh, Open Ports to see server open connections, Logs, Clear logs option, Localhost scan using Nmap, Perform scan of IP/Domain name using Nmap, RKhunter to check if system is effected with rootkit, Firewall configuration option, Open apache www default folder as root, Webalizer to generate report of site.
This utility only manage local machine.
To install services Go to Help & Install > About & Install Servers
Installation and removal of services
To install Ubuntu-Server-Manager in Ubuntu/Linux Mint open Terminal (Press Ctrl+Alt+T) and copy the following commands in the Terminal:
That's it
- wget -O usm.deb http://goo.gl/QECjX
- sudo dpkg -i usm.deb && sudo rm usm.deb
Source: Ubuntu Server Mananger
Thursday, January 10, 2013
Install/Upgrade to Tor Browser Bundle 2.3.25-2 from PPA in Ubuntu 12.10/12.04 and Linux Mint 14/13
Tor Browser Bundle 2.3.25-2 has been released recently and all users are required to upgrade. This latest release has addressed problems with TurkTrust certificates and it brings the following updates:
- Update Firefox to 10.0.12esr
- Update Libevent to 2.0.21-stable
- Update HTTPS Everywhere to 3.1.2
- Update NoScript to 2.6.4.2
You can find the official release notes here. For manual installation, you can download Tor Browser Bundle from here. For easier installation via PPA, you can see below. The PPA is available for these Ubuntu/Linux Mint distros:
- Ubuntu 13.04/12.10/12.04/11.10
- Linux Mint 14/13/12
Open the terminal and enter these commands for 32-bit systems:
sudo add-apt-repository ppa:upubuntu-com/tor
sudo apt-get update
sudo apt-get install tor-browser
sudo chown $USER -Rv ~/.tor-browser/
For 64-bit systems, enter these commands:
sudo add-apt-repository ppa:upubuntu-com/tor64
sudo apt-get update
sudo apt-get install tor-browser
sudo chown $USER -Rv ~/.tor-browser/
Start it from Unity Dash:
Or from the terminal with this command:
tor-browser
Etichete:
Linux,
Linux Mint,
Ubuntu,
Web Browser
Wednesday, January 2, 2013
Task Coach 1.3.21 (To-Do List Manager) Fixes Icon Size in Unity - Ubuntu/Linux Mint
Task Coach has just been updated to version 1.3.21 which fixes various bugs. As reminder, Task Coach is a cross-platform to-do list manager written in Python that allows users to organize their tasks and to-do lists in a way that will help them improve their productivity.
With Task Coach, you can have these features:
- create/edit/delete tasks
- View tasks as a list/tree
- Sort tasks by subject/budget/date, etc.
- Attachments support for tasks, categories, and notes
- Track time spent on tasks, etc.
There are many features for Task Coach, you can review them in details here. Also, the app is available for some portable devices such as iPhone, iPad, and iPod Touch. Here are some of the bugs that has been fixed in this latest release:
- Changing the percentage complete would not cause the calendar viewer to refresh.
- Performance improvement in the edit dialogs
- Fix icon size in Unity
- Toolbar icons to show/hide tasks according to status now respect appearance settings, and are overlayed with a red cross.
- Fix wording for task statuses
- Startup and shutdown performance improvements.
- Autosave is now on by default.
- Toolbars are now customizable.
In this tutorial, we will help you install Task Coach via PPA which is available for the following Ubuntu/Linux Mint distributions:
- Ubuntu 12.10/12.04/11.10
- Linux Mint 14/13/12
Enter these commands from the terminal:
sudo add-apt-repository ppa:taskcoach-developers/ppa
sudo apt-get update
sudo apt-get install taskcoach
You can start the app via the Unity Dash or from the terminal with this command:
taskcoach.py
Task Coach Removal
To uninstall the application from your computer, enter these commands:
sudo apt-get remove taskcoach
sudo add-apt-repository --remove ppa:taskcoach-developers/ppa
sudo apt-get update
Etichete:
Icons,
Linux,
Linux Mint,
Ubuntu
Diodon 1.0.0 Adds Support For The XFCE Desktop Environment - Ubuntu/Linux Mint
Diodon is a powerful and fast clipboard manager for Gnome and Unity desktop environments that will help users store all items copied/cut in a list which can be accessed at a later time. Diodon has been updated recently to version 1.0.0 bringing support for the XFCE desktop environment and adding a new icon set.
In this article, we will help you install/upgrade to Diodon 1.0.0 from PPA that supports these Ubuntu/Linux Mint distros:
- Ubuntu 12.10/12.04/11.10
- Linux Mint 14/13/12
To install Diodon in Ubuntu/Linux Mint, enter these commands:
sudo add-apt-repository ppa:diodon-team/stable
sudo apt-get update
sudo apt-get install diodon
Start the Diodon clipboard manager from the dash or via the terminal with this command:
diodon&
For any bug encountered, report it here.
Diodon Removal
To remove Diodon from your system, enter these commands:
sudo apt-get remove diodon
sudo add-apt-repository --remove ppa:diodon-team/stable
sudo apt-get update
Etichete:
Desktop,
Linux,
Linux Mint,
Ubuntu,
Xfce
Tuesday, January 1, 2013
MediterraneanDark/FlatStudioDark: Two Amazing Dark GTK 3.6 Themes For Ubuntu 12.10/Linux Mint 14
Today, we will see two nice themes that were already ported to GTK 3.6 and are compatible with Ubuntu 12.10 or Linux Mint 14. The first theme is MediterraneanDark and the second is FlatStudioDark which will be enjoyed by fans of dark themes. You can use them with Unity or Gnome Shell.
MediterraneanDark
----
FlatStudioDark
In this tutorial, we will help you install them via PPA, you can add it with these commands:
sudo add-apt-repository ppa:upubuntu-com/gtk+3.6
sudo apt-get update
To install MediterraneanDark, enter this command:
sudo apt-get install mediterranean-dark-gtk
For FlatStudioDark, run this command:
sudo apt-get install flatstudiodark-gtk
Use Gnome Tweak Tool to enable the two themes.
MediterraneanDark/FlatStudioDark Removal
If you want to remove these themes, enter these commands:
sudo apt-get remove flatstudiodark-gtk
sudo apt-get remove mediterranean-dark-gtk
sudo add-apt-repository --remove ppa:upubuntu-com/gtk+3.6
sudo apt-get update
Etichete:
Icons,
Linux,
Linux Mint,
Theme,
Ubuntu
Sunday, December 30, 2012
20 Useful Terminal Commands and Tools that you May Need in Ubuntu/Linux Mint
Terminal is a text-based interface that grants users direct access to the UNIX system. You can use Terminal to run some specific commands, create files/folders, change system settings, and any other features that aren't available via programs with GUI.
In this article, I have collected 20 tools and commands that can be useful for Ubuntu/Linux Mint users. If you have more interesting commands or tools, you can mention them below.
1. Make An ISO From A Folder
If you want to make an iso file from a directory containing other files and sub-directories via the terminal, you can use the following command:
mkisofs -o image.iso -R /path/to/folder/
If you wish to backup the home folder, use this command:
mkisofs -o image.iso -R $HOME
2. Remove Non-Empty Folder
To remove a non-empty folder from the command line, you can use this command:
rm -rf /path/to/folder/
3. Checking Current CPU Architecture (32-bit or 64-bit)
To list your processor architecture in Ubuntu/Linux Mint, use one of these commands:
uname -m
or
arch
or
file /bin/bash | cut -d' ' -f3
4. Generate Random Passwords
To generate random passwords via the terminal, you can use the following commands:
a - makepasswd
makepasswd is a command line tool for generating passwords in Ubuntu/Linux Mint. Install it with this command:
sudo apt-get install makepasswd
To generate a password with 20 characters, enter this command:
makepasswd --chars=20
b- OpenSSL
You can also use OpenSSL to generate random passwords using this simple command:
openssl rand -base64 20
5. Check Uptime
To check for how long your computer or laptop has been running since you powered it on, issue this command:
uptime
To monitor system uptime in real-time, use this command:
watch -n 1 uptime
6. Check Information About Your Video Card
To list information about your graphics card (Nvidia, AMD, Intel, etc.), enter this command:
lspci -v -s `lspci | awk '/VGA/{print $1}'`
7. Download And Extract Tar Files In One Command
If you want to extract an archive file after being downloaded in a single command, you can use the following command for tar files:
wget URL-To-TAR-File -O - | tar xfz -
Here is an example:
wget http://garr.dl.sourceforge.net/project/multibootusb/MultiBootUSB_4.7.tar.gz -O - | tar xfz -
8. Block/Unblock Wifi/Bluetooth
To disable wifi or Bluetooth in Ubuntu/Linux Mint, we can simply use the rfkill command line tool. To deactivate wifi, enter this command:
rfkill block wlan
For Bluetooth:
rfkill block bluetooth
To unblock WiFi, enter this command:
rfkill unblock wlan
For Bluetooth:
rfkill unblock bluetooth
9. Check CPU Temperature
To get the current temperature of your processor, issue this command:
acpi -t
To check CPU temp in real-time, run this command:
watch -n 1 acpi -t
10. Change Read Speed Of A CD/DVD
Let's first get the maximum read speed of your optical drive with this command:
eject -X
To increase/decrease read speed of a CD/DVD inserted into your optical drive, enter this command followed by the desired speed:
eject -x 4
For more than one optical disc drive, use this command:
eject /dev/cdrom -x 4
11. Check RAM Speed
To check memory speed from the command line, run this command:
sudo dmidecode -t 17 | awk -F":" '/Speed/ { print $2 }'
12. Read/Write Speed Of A Hard Disk
To check read/write speed of your hard drive on the terminal, use this command:
sudo hdparm -tT /dev/sda
13. Monitor Network Usage
IPTraf is a command line utility that allows to monitor network activities in real-time. Install it in Ubuntu/Linux Mint with this command:
sudo apt-get install iptraf
Start monitoring using this command:
sudo iptraf
14- Downloading Websites
If you want to download an entire website via the terminal, enter this command:
wget --recursive --page-requisites --convert-links www.domain.com
15. Check Gmail Unread Messages
To check for unread messages in your Gmail account, use this command:
curl -u GMAILUSER --silent "https://mail.google.com/mail/feed/atom" | perl -ne 'print "\t" if //; print "$2\n" if /<(title|name)>(.*)<\/\1>/;'
16. Monitor HDD Temperature
Use hddtemp to monitor hard disk temperature on the terminal. Run these commands:
sudo apt-get install hddtemp
sudo hddtemp /dev/sda
17. Force Kill Apps
To force close an unresponsive software, run xkill from the terminal then click the software's window to close it.
18. Screen Recording
To capture your screen and record it in a video, use ffmpeg:
sudo apt-get install ffmpeg
ffmpeg -f x11grab -s wxga -r 25 -i :0.0 -sameq output.mpg
19. Check Current Kernel Version
You can simply use this command:
uname -r
20. Dtrx
The dtrx tool allows to extract most archive files without the hassle of memorizing the various extraction commands. To install it, run this command:
sudo apt-get install dtrx
Here are some examples:
dtrx file.zip
dtrx file.tar.gz
dtrx file.7z
Etichete:
Linux,
Linux Mint,
Terminal,
Tools
Subscribe to:
Posts (Atom)