Showing posts with label Quantal Quetzal. Show all posts

Friday, December 7, 2012

Top 15 Desktop Environments for Ubuntu 12.10 Quantal Quetzal (Alternatives to Unity)


In this article, I have collected 15 best desktop environments available for Ubuntu 12.10 (Quantal Quetzal) that can be used as a replacement for Unity. If you are interested in good design and look for your desktop, you may try the first seven desktop environments given below. If you want speed with no interest in design and desktop look, you may start from the eighth desktop environment.

Additionally, instead of installing various desktop environments on Ubuntu 12.10, you may try the different Ubuntu flavors which are:


  •     Xubuntu - XFCE desktop environment
  •     Kubuntu - K Desktop environment
  •     Lubuntu - LXDE
Let's now see the various desktop environments available for Ubuntu 12.10 or older:

1. GNOME Shell


sudo apt-get install gnome-shell

2. KDE


sudo apt-get install --no-install-recommends kubuntu-desktop

3. Xfce


sudo apt-get install xfce4

4. LXDE


sudo apt-get install lxde

5. Cinnamon


sudo add-apt-repository ppa:gwendal-lebihan-dev/cinnamon-stable 
sudo apt-get update 
sudo apt-get install cinnamon

6. Mate


sudo add-apt-repository "deb http://packages.mate-desktop.org/repo/ubuntu precise main" 
sudo apt-get update 
sudo apt-get install mate-archive-keyring 
sudo apt-get update 
sudo apt-get install mate-desktop-environment

7. E17


sudo apt-add-repository ppa:hannes-janetzek/enlightenment-svn 
sudo apt-get update 
sudo apt-get install e17

8. Awesome WM


sudo apt-get install awesome

9. WindowMaker


sudo apt-get install wmaker

10. Fluxbox


sudo apt-get install fluxbox

11. Blackbox


sudo apt-get install blackbox

12. Openbox


sudo apt-get install openbox

13. jwm


sudo apt-get install jwm

14. IceWM


sudo apt-get install icewm

15. fvwm


sudo apt-get install fvwm
Extra DEs

Here are some other desktop environments suggested by our readers:

- Razor-qt


sudo add-apt-repository ppa:razor-qt 
sudo apt-get update 
sudo apt-get install razorqt

Note: You may also install these DEs on Linux Mint 14 or older.

Thursday, November 15, 2012

Install NVIDIA 310.19 Linux Driver In Ubuntu 12.10/12.04/Linux Mint 13


Nvidia has released a new driver (310.19) for Linux platforms which brings major performance improvements and threaded OpenGL performance optimizations.

The driver's release notes haven't been published yet in the Nvidia website, but here are some of the changes in this release taken from Phoronix:


Configuring Stereo Support From NVIDIA Settings 
Configuring ViewPortIn and ViewPortOut From NVIDIA Settings 
Fixing The Meta-Mode Book-Keeping 
Configuring Rotation And Reflection Per Display Device

This boost in performance in Nvidia latest Linux drivers is the result of VALVE's move in porting its games to Linux.

Driver Installation

You can install the NVIDIA 310.19 Linux driver from PPA with these commands at your own risk under Ubuntu 12.10/12.04/Linux Mint 13:

sudo add-apt-repository ppa:xorg-edgers/ppa 
sudo apt-get update 
sudo apt-get install nvidia-current nvidia-settings

For manual installation, you can run these commands:

cd && wget http://dl.dropbox.com/u/47950494/upubuntu.com/nvidia-310.19 
chmod +x nvidia-310.19
Enter now CLI mode by pressing CTRL+ALT+F2, login and run these commands to complete the installation of the driver:

sudo service lightdm stop 
cd && sudo sh nvidia-310.19 
sudo reboot
To install the driver from Recovery Mode, check this article.

How To Install And Configure A DHCP Server In Ubuntu 12.10 Server (Quantal Quetzal)


In this tutorial, we will help you set up and configure a DHCP server in Ubuntu 12.10 (Quantal Quetzal) server. This little guide is also workable for Ubuntu 12.04 Server (Precise Pangolin).


Getting Started

   1. Installing The DHCP Server

To install the DHCP server, run this command:

sudo apt-get install isc-dhcp-server

   2. Configuration

Let's now enable the DHCP server for your network interface by editing the /etc/default/isc-dhcp-server file:

sudo nano /etc/default/isc-dhcp-server

In this file, locate INTERFACES="" and add your network interface (eth0 for example):

INTERFACES="eth0"


For multiple network interfaces, you may add them as follows:

INTERFACES="wlan0 eth0"

When you finish, press CTRL+X, type Y (yes) and press Enter to save the new modifications. Finally, restart the DHCP server with this command:

sudo service isc-dhcp-server restart

Sunday, November 4, 2012

How To Record Videos Without Microphone or System Audio With RecordMyDesktop - Ubuntu/Linux Mint


In this tip, we will see how to configure RecordMyDesktop to not record audio coming from your microphone or system.

Gettinsg Strated

1. Open the terminal and install first the "pavucontrol" package with this command:


sudo apt-get install pavucontrol

2. Launch now RecordMyDesktop and start recording a video.

3. While RecordMyDesktop is recording, start pavucontrol with this command:

 pavucontrol

4. In the "Recording" tab, click the dropdown menu and select "Monitor of Built-in Audio Analog Stereo":


From now on, RecordMyDesktop will record videos without sound.

Note: this configuration doesn't affect other installed applications.

Thursday, November 1, 2012

Install Google Earth 7 In Ubuntu 12.10/12.04/Linux Mint 13

 
In this tutorial we will help you install Google Earth 7 in Ubuntu/Linux Mint. This latest version includes more exciting new features such as 3D imagery and tour guide. These features allow the user to view some cities in 3D which will be amazing for owners of HDTV and widescreen monitors. For more information about this latest release, click here.

The installation will be for the following Linux distributions:


  • Ubuntu 12.10/12.04/11.10
  • Linux Mint 13/12
  • Debian 6.0 Squeeze
Google Earth 7 Installation

In a 32-bit system, issue these commands from the terminal:

sudo apt-get install lsb-core 
cd /tmp 
wget -c http://goo.gl/YEqTf -O google-earth-stable_i386.deb 
sudo dpkg -i google-earth-stable_i386.deb
For 64-bit systems, run these commands:

sudo apt-get install lsb-core 
cd /tmp 
wget -c http://goo.gl/t6E3i -O google-earth-stable_amd64.deb 
sudo dpkg -i google-earth-stable_amd64.deb

You can also download Google Earth from its website here.

Install G-Xiria 3.0 Icon Theme From PPA In Ubuntu 12.10/12.04/Linux Mint 13


G-Xiria 3.0 is an amazing icon theme for Gnome Shell and Unity. In this tutorial we will help you install it under Ubuntu/Linux Mint from PPA. Here are some screenshots of G-Xiria 3.0 icons under Ubuntu Unity:


The PPA is supported by these distributions:

  • Ubuntu 12.10/12.04/11.10
  • Linux Mint 13
G-Xiria 3.0 Installation

Open the terminal and run these commands:

sudo add-apt-repository ppa:upubuntu-com/icons 
sudo apt-get update 
sudo apt-get install gxiria-icons

To enable it, use Gnome Tweak Tool or run this command:

gsettings set org.gnome.desktop.interface icon-theme 'G-Xiria'

Credits for this icon theme go here.

Wednesday, October 31, 2012

How to Full GNOME Shell Package Installation on Ubuntu 12.10


Are too loyal to Ubuntu , but you just can not digest Unity and prefer GNOME Shell ? Well, then this article is just for you! If you are using Ubuntu 12.10 with Unity or some other desktop environment, and want to switch to a full desktop experience without installing GNOME Shell Ubuntu GNOME Remix 12.10 , you can just simply install some packages . Using the instructions below, not only will install GNOME Shell but the default settings and applications that you find with Ubuntu GNOME Remix. There are also some optional steps for installing some applications, then it’s up to you to decide whether to opt for the installation or not.

Install GNOME packages necessary

The first thing to do is type in the terminal the following command:
sudo apt-get install ubuntu-desktop ubuntu-gnome-gnome-default-settings
Now it’s up to you to choose whether you want to GDM or LightDM because during the installation you will be asked if you want to install GDM. In the event that this does not happen, and you want GDM instead of LightDM, you would type:
sudo dpkg-reconfigure gdm
and select GDM instead of LightDM. At the end of installation just get out of the current session and select from the screen to enter GNOME GNOME Shell, at this point, it will be the version 3.6.1 ! Now the advice is to remove the following metapackage will not involve any system problem:

sudo apt-get remove ubuntu-settings
The package “ubuntu- settings ‘sets different default values of Ubuntu, as the order of the buttons in the window, some plugins Rhythmbox and so on.

Optional: Install the missing packages

Some packages in the repositories of Ubuntu 12.10 are not updated to the latest version 3.6.x. (As you already long ago we described, for example, Nautilus). To overcome this problem, open the terminal and type:
sudo add-apt-repository ppa: gnome3-team/gnome3
sudo apt-get update sudo apt-get
dist-upgrade
packages that will be upgraded are Aisleriot 3.6.0, Brasero 3.6.0, Nautilus 3.6.1, Totem 3.6.0, Transmission 0.7.1, Transmageddon 12:23 and Sound Juicer 3.5.0 .
Finally, if you like, you can also remove the overlay scrollbars:
sudo apt-get remove overlay-scrollbar *
attention now! If you have any problems with Plymouth try typing the command from the terminal:
sudo update-alternatives - config default.plymouth
and choose ubuntu-gnome, now given a nice:
sudo update-initramfs-u
and everything should be solved!

Tuesday, October 30, 2012

Install Mylo Xylotheme Icon Theme From PPA In Ubuntu 12.10/12.04/Linux Mint 13


Mylo Xylotheme is an icon theme that you can use with Unity or Gnome Shell desktop environment. In this tutorial, we will help you install it under Ubuntu/Linux Mint from PPA.


The PPA is supported by the following Linux distributions:

  • Ubuntu 12.10/12.04/11.10
  • Linux Mint 13 (Maya)
Mylo Xylotheme Installation

Open the terminal and run these commands:

sudo add-apt-repository ppa:upubuntu-com/icons 
sudo apt-get update 
sudo apt-get install mx-icons

To enable it, use this command:

gsettings set org.gnome.desktop.interface icon-theme 'MX Icons'

Here is a screenshot of it under Ubuntu Unity:


Credits for this icon theme go here.

Five Nice Gnome Shell 3.6 Extensions For Ubuntu 12.10 (Quantal Quetzal)


In this tutorial, we will introduce five popular extensions that are still not updated in the Gnome Extension Website for the Gnome 3.6 desktop environment. I have added them to our PPA to make them installable in Ubuntu 12.10 Quantal Quetzal with Gnome Shell 3.6 enabled.

If you haven't already installed Gnome Shell 3.6.x in Ubuntu 12.10, you can install it with this command:

sudo apt-get install gnome-shell gnome-tweak-tool

You need to use Gnome Tweak Tool to enable/disable the extensions given below:


Also, after installing any Gnome Shell extension from PPA, you need to restart Gnome Shell with these keys in order for the extension to show up in Gnome Tweak Tool:

ALT+F2 >> r

To add the extension PPA to your system, run these commands from the terminal:

sudo add-apt-repository ppa:upubuntu-com/gnome3.6 
sudo apt-get update

Installing Extensions

   1. Auto Hide Top Panel

This extension will force the top panel of Gnome Shell to hide. It will show up only when hovering your mouse cursor over the upper edge of the screen.


Code:
sudo apt-get install autohide-extension

   2. Bottom Panel


This extension will show up a taskbar at the bottom of your screen like in Gnome2.

Code:
sudo apt-get install bottom-panel-extension

   3. Move Top Panel To The Bottom With Reflection


The Reflection extension will force your top panel to appear at the bottom of your screen.

Code:
sudo apt-get install reflection-extension

   4. Overview Icon


This extension will show up current opened programs icons when enabling the overview mode.

Code:
sudo apt-get install overview-icon-extension

   5. Panel Favorites


This extension will display your favorite programs in the top panel.

Code:
sudo apt-get install panel-favorites-extension

Monday, October 29, 2012

Unsettings 0.08 Adds Support For Ubuntu 12.10 (Quantal Quetzal)


The latest version of Unsettings (0.08) has added support for Ubuntu 12.10 Quantal Quetzal. Unsettings is a graphical configuration program that allows Ubuntu users to customize the Unity desktop as well as modifying Unity settings.


 With Unsettings, you can do the following tasks:

  • Change GTK themes, icons, and cursors 
  • Enable/disable Global Menu, Overlay Scrollbars, and HUD 
  • Change Dash size and blur effect 
  • Change top panel opacity, show/hide username 
  • Change system fonts, etc.
Unsettings Installation

To install Unsettings 0.08 in Ubuntu 12.10/12.04, open the terminal and run these commands:

sudo add-apt-repository ppa:diesch/testing
sudo apt-get update
sudo apt-get install unsettings

For any bug encountered, you can report it here. This project is created by Florian Diesch, you can find his website here.

How To Enable DVD Playback In Ubuntu 12.10 Quantal Quetzal


A few days back the latest version of Ubuntu which is Ubuntu 12.10 which is code-named as Quantal Quetzal was released. A lot of new features are added and removed from the latest version of Ubuntu 12.10.  We have provided a complete guide on How to install Ubuntu 12.10 few days back. One of the main issues of Ubuntu 12.10 is that we will not be able to play DVD’s  without installing few codecs. Even if you have a DVD which contains some media contents we will not be able to play it in Ubuntu 12.10 which lacks few inbuilt codecs and that’s why we are not able to play DVD’s on Ubuntu 12.10 , If you want to enjoy a movie during leisure time on your latest version of Ubuntu 12.10 which will definitely will show an error report when you start playing the video. In order to rectify this issue of Ubuntu 12.0 you need to install few codes which will make ubuntu 12.10 support DVD playback , you will not be able to play DVDs on Ubuntu until you install some necessary codecs. Just follow these steps to enable DVD playback on your Ubuntu 12.10.
You need a package called libdvdread4 , this installs all the necessary codes for the correct DVD playback on Ubuntu. You can directly install libdvdread4 from  ‘Ubuntu Software Center.
If you need to install it using the Terminal.
Open up the terminal by pressing CTRL ALT T and type the following code:
sudo apt-get install libdvdread4
Once the library completes its installation, Open up the terminal again and type the following code:
sudo / usr/share/doc/libdvdread4/install-css.sh
After the execution of these command’s in the terminal then you will be able to watch DVD’s using your favorite player in ubuntu 12.10.

Sunday, October 28, 2012

Install New BeatBox 0.7 Music Player in Ubuntu 12.10


The new BeatBox music player released in version 0.7, come with new user interface enhancements and new features. The preferences window has been revamped to include preferences for plugins as well as a more robust UI for general settings. in addition, beatbox 0.7 also introduces plugin support with dedicated category. So, enabling or disabling a specific plugin is to be easily.
BeatBox media player is a comfortable, easy to use media player to player, stable, but especially fast, written in  Vala . With  Beatbox  have the chance to play music in shuffle mode and cyclic edit the metadata of the tracks, perform quick searches within the library, edit playlists, view album art,  playlists, podcasts, Internet radio,   and synchronize your player with our account  Last.FM.

Here’s New Change of Beatbox 0.7:

  • Plugin support
  • DB upgrading, which means no longer having to delete your db for new versions.
  • Better last.fm authentication
  • Smart auto scroll to current song
  • Fixed issue where list view became horizontally scrolled unnecessarily
  • Gapless playback
  • Much faster startup
  • Multi-library management. Podcasts now are a truly separate library with a separate folder associated it.
  • More detail, found it @BeatBox Release Announcement

Install BeatBox 0.7 in Ubuntu Based Distro

BeatBox 0.7 Install New BeatBox 0.7 Music Player in Ubuntu 12.10
To install BeatBox 0.7 in Ubuntu 12.04,ubuntu 12.10 and Linux Mint 13, you can add the following PPA:
sudo add-apt-repository ppa:sgringwe/beatbox
sudo apt-get update
sudo apt-get install beatbox
If you want to make BeatBox available in sound menu do the following tips, open terminal then install dconf-tool
sudo apt-get install dconf-tool
Open dconf-tool from unity dash, in dconf-tool navigate to com -> canonical -> indicator -> sound, double-click “Value” of interested-media-players then add ‘beatbox’ after ‘rhythmbox’.

How To Create A Live USB For Ubuntu 12.10 Quantal Quetzal


In this tutorial, we will see three methods for creating a live USB for Ubuntu 12.10 Quantal Quetzal. Creating live USBs will be very useful mainly for users of netbooks, laptops, and tablets. This tutorial is also applicable for other Linux distributions (Linux Mint 13, Debian Squeeze, etc.).

Preparing The USB Flash Drive

To be able to install a Linux distribution on a USB stick, it's recommended that you format it as ext4, but you can choose any other file system. Let's first identify your USB device using this command:

df -h

For my system, the USB drive is mounted as /dev/sdb1:


Change /dev/sdb1 with the name of your USB stick and run these commands to format it as ext4:

sudo umount /dev/sdb1

sudo mkfs.ext4 /dev/sdb1

If you want to format it as FAT32, run these commands:

sudo umount /dev/sdb1

sudo mkfs.vfat /dev/sdb1

Finally, remount your USB drive. See now below for ways to create a live Ubuntu USB.

1. Startup Disk Creator

If you are under Ubuntu, you can simply use Startup Disk Creator to create a live USB. Via Unity Dash, search and open Startup Disk Creator:


Click "Other" and select the Ubuntu 12.10 iso file, then click "Make Startup Disk":


2. UNetbootin

UNetbootin is a tool with GUI that allows users to create live usbs for various Linux distributions. To install it under Ubuntu/Linux Mint, run this command:

sudo apt-get install unetbootin

For RPM-based systems, you can install UNetbootin with this command:

sudo yum install unetbootin

From the main interface of UNetbootin, select "Diskimage" and click the browse button, then select the image of Ubuntu 12.10 from your hard drive:


Select now Type > USB Drive and Drive: /dev/sdb1, then click OK to create the live USB:


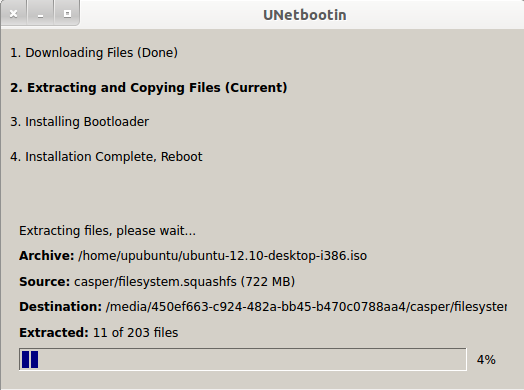
Wait now while your image is being exported to the USB drive:


At the end of the operation, reboot your system and boot from the USB drive.

3. Create a Live USB Via The Terminal

In the terminal, run this command to create a live usb for Ubuntu 12.10:

sudo dd if=/ubuntu-12.10-desktop-i386.iso of=/dev/sdb1 bs=1M

- /path/to/ubuntu-12.10.iso  --> Replace it with the full path to Ubuntu 12.10 iso image.
- /dev/sdb1 --> Replace it with the name of your USB drive.

Saturday, October 27, 2012

How To Fix Unity and Wireless Problems After Upgrading To Ubuntu 12.10 (Quantal Quetzal)


In this little guide, we will introduce solutions for some problems related to Ubuntu's Unity interface (Dash and toolbar), window frames, and wireless connections that occur after upgrading to Ubuntu 12.10 (Quantal Quetzal). Before we start, you should know that these solutions may work for some users and some not.

1. Lost Unity Dash, Window Frames, and Top Panel

If Unity is not responding to user inputs after upgrading to 12.10 and window frames disappeared, you can try these fixes:

- For Nvidia graphics cards, try to reinstall nvidia-current with this command:

sudo apt-get install --reinstall nvidia-current

For  NVIDIA Optimus laptops, try to reinstall bumblebee with this command:

sudo apt-get install --reinstall bumblebee bumblebee-nvidia

Then reboot your system:

sudo reboot

- For ATI AMD graphics cards, try to remove the fglrx package with this command:

sudo apt-get autoremove fglrx --purge

Then reboot:

sudo reboot

If the fglrx package is not installed in your system, you can use these commands instead:

sudo apt-get autoremove fglrx-updates fglrx-amdcccle-updates --purge

sudo reboot

2. WiFi Stops Working After Upgrading To Ubuntu 12.10 (Broadcom Wireless cards)

You can fix wifi problems using two methods:

- Either connect to the internet via wired connection and run this command:

sudo apt-get update && sudo apt-get upgrade

Then reboot your system.

- Or use the following commands:

sudo apt-get install linux linux-headers-generic kernel-package

sudo apt-get install --reinstall bcmwl* firmware-b43-lpphy-installer b43-fwcutter

Finally, reboot your system.

If that didn't help, try these commands:

sudo apt-get remove bcmwl-kernel-source

sudo apt-get install firmware-b43-installer b43-fwcutter

sudo reboot


If you have something to add, please use the comment form below.

Tuesday, October 23, 2012

Install AMD Catalyst 12.10 Driver On Ubuntu 12.10/12.04/Linux Mint 13


AMD Catalyst 12.10 has just been released which brings some few changes and improvements compared to previous version (12.9). As usual, there is no release notes for the AMD Catalyst 12.10 driver for Linux and to know its effectiveness, the user has to test it. In this article, we will see how to install the driver in Ubuntu 12.10/12.04 and Linux Mint 13 or older.

Current Driver Removal

Open the terminal and issue these commands:

sudo sh /usr/share/ati/fglrx-uninstall.sh

sudo apt-get remove --purge fglrx fglrx_* fglrx-amdcccle* fglrx-dev* xorg-driver-fglrx

AMD Catalyst 12.10 Installation

Via the terminal, run these commands:

sudo apt-get install unzip

cd /tmp && wget -c http://goo.gl/Bbeki -O catalyst-12.10-x86.x86_64.zip

unzip catalyst-12.10-x86.x86_64.zip

chmod +x amd-driver-installer-catalyst-12.10-x86.x86_64.run

sudo sh amd-driver-installer-catalyst-12.10-x86.x86_64.run

Then follow setup instructions:


Finally, run this command:

sudo aticonfig --initial -f

If you prefer to install from PPA, you can run these commands:

sudo add-apt-repository ppa:xorg-edgers/ppa
sudo apt-get update
sudo apt-get install fglrx-installer

If you failed in installing the driver, you can check this guide.

Testing Geary 0.2 in Ubuntu 12.10, a Lightweight eMail Client


For many years, Thunderbird is my default mail client in Ubuntu. The truth is that I’ve tried other options, which, especially in low resource teams, Thunderbird consumes too, and I’ve tried to find an alternative, but none convince me.
For some time, I think Ubuntu in particular lacks a simple email client, while powerful, and with a minimalist design yet elegant. I do not think to send an email or check your inbox, necessary, use an Internet browser, either Firefox, Chromium, or any other, nor is it necessary to use clients like Thunderbird, despite the power offered. In general, with a simple interface to do these things is enough.

Well, Geary, a mail client is deployed from its initial state to achieve this goal, a thin client.
Geary is an email client designed for GNOME so you can read your mail simply and effortlessly. Its interface is based on conversations, so you can read a full conversation without going by clicking on e-mail.

About Geary 0.2

geary 0.2 ubuntu 12.10 12.04 Testing Geary 0.2 in Ubuntu 12.10, a Lightweight eMail Client
Geary 0.2 is in the early stages of development, and currently, its features are limited. in fact, the version available on the 0.2 released in October 2012, you can only use a single email account, which is already a limitation considerable, since most of us have two or more accounts. However, Geary developers have planned to implement the search in mail, support for multiple accounts (fundamental) and designing an extensible architecture via supplements (like thunderbird) so that other developers can add all kinds of modular features.
Geary is developed in Vala, and has seamless integration with both GNOME and Ubuntu. But can also be used as a Debian other distributions, Fedora and more .

Install Geary 0.2 on Ubuntu 12.10/12.04

Geary 0.2 is not in the official Ubuntu repositories, but you can easily install on your ubuntu computer by adding the following PPA:
sudo add-apt-repository ppa:yorba/ppa
sudo apt-get update
sudo apt-get install geary

How to Use Geary 0.2

The first time you use Geary 0.2, you’ll see a dialog box like the one shown in the following image, where it asks for the minimum necessary to set up your email account. And from there, and you can use it.

Conclusions

Geary complies perfectly with the design for which it was developed, simple, easy and light. In fact, Geary consumes a fifth of Thunderbid resources, and it operates perfectly in the Ubuntu desktop, even with a team of reduced performance. The truth is that I like, and do not rule out using it in parallel with Thunderbird for one of my accounts, for which more use, and leave the rest of Thunderbird accounts.

Monday, October 22, 2012

Disable ‘Logout’, ‘Restart’ and ‘Shutdown’ Confirmation dialog box in Ubuntu 12.10 (tip)


In Ubuntu’s Unity desktop, whenever you select ‘Logout’, ‘Restart’ … functions from the top-panel’s session menu, the OS asks you to confirm. It is a good move from the users perspective, as you can undo the request at the conformation dialog box (say that you forgot to save a web page in Firefox).
 
However, apart from its usefulness, I mostly find it to be an annoying feature. Now, you can easily disable this in Ubuntu, but until the 12.10 release, one could not do that, due to how that menu was implemented.
For example, in earlier versions of Ubuntu, the ‘Restart’ option was only shown at the confirmation dialog box of ‘Shutdown’. Thus, if you had disabled the conformation dialog, then you no longer can access the ‘Restart’ option.
Luckily, with Ubuntu 12.10, this menu has been changed and users can access the ‘Restart’ menu item directly from the main session menu.
So finally, this gave me the chance do disable that conformation dialog box. I just did it and so far, loving it ;-) .
If you too would like to do that too, then open your Terminal window and simply enter the below command.
gsettings set com.canonical.indicator.session suppress-logout-restart-shutdown true
That should do it.
If you wanted to get back the original functionality later, then you can undo the change by using the below command.
gsettings set com.canonical.indicator.session suppress-logout-restart-shutdown false
Yup, that’s it!.

[FIX] Laptop's Touchpad/Trackpad Not Working On Ubuntu 12.10 Quantal Quetzal


In case your touchpad (aka trackpad) is not working despite having enabled it or re-installed its driver, you can follow this article which may solve your problem. In this tutorial we will see two solutions for enabling a laptop touchpad under Ubuntu 12.10 Quantal Quetzal. It is also possible to apply it on Ubuntu 12.04 or Linux Mint 13.

Solution  1

Open the terminal and enable the touchpad with this command:

gsettings set org.gnome.settings-daemon.peripherals.touchpad touchpad-enabled 'true'

Solution 2

If the first method is not working for you, you can try this tip:

- Via the terminal, list your devices with this command:

xinput --list

Here are the outputs returned for my laptop:

 ~$ xinput --list
⎡ Virtual core pointer                     id=2 [master pointer  (3)]
⎜   ↳ Virtual core XTEST pointer            id=4 [slave  pointer  (2)]
⎜   ↳ SIGMACHIP Usb Mouse                id=11 [slave  pointer  (2)]
⎜   ↳ ETPS/2 Elantech Touchpad           id=14 [slave  pointer  (2)]
⎣ Virtual core keyboard                   id=3 [master keyboard (2)]
    ↳ Virtual core XTEST keyboard          id=5 [slave  keyboard (3)]
    ↳ Power Button                     id=6 [slave  keyboard (3)]
    ↳ Video Bus                        id=7 [slave  keyboard (3)]
    ↳ Video Bus                        id=8 [slave  keyboard (3)]
    ↳ Sleep Button                      id=9 [slave  keyboard (3)]
    ↳ USB2.0 0.3M UVC WebCam           id=10 [slave  keyboard (3)]
    ↳ Asus Laptop extra buttons            id=12 [slave  keyboard (3)]
    ↳ AT Translated Set 2 keyboard          id=13 [slave  keyboard (3)]

- My touchpad is identified as id=14 (change it with yours), you can get more info about it with this command:

xinput --list-props 14

If it is disabled (0), you will get these outputs:

 xinput --list-props 14Device 'ETPS/2 Elantech Touchpad':
Device Enabled (137): 0

- To enable the touchpad, run this command (replace 14 with your own touchpad ID):

xinput set-int-prop 14 "Device Enabled" 8 1

Sunday, October 21, 2012