Friday, July 6, 2012

RIM’s Blackberry 10 Vs. Apple iPhone 4S


Blackberry 10 Smart Phone – Launch of this new weapon from RIM has delayed until 1st quarter of 2013 in order to achieve perfections after witnessing the drop of 33% sales in 2012. The Much awaited smartphone by RIM has already caused a great amount of stir among the smart phone lovers, who must be disappointed at the delay. But on the other end, speculations about Blackberry 10 are also mounting rapidly. It will not be difficult to say that RIM is planning to counter the entrenched euphoria of IPHONE, under the new CEO, who has been busy in restructuring and reorganizing the company in order to inflict a new life into “About-to-Die” Blackberry brand through Blackberry 10 smart phone.


According to the leaked specifications, the new Blackberry 10 phone would be launched in L-series touch phones and N-series QWERTY keypad phones respectively which would have the capacity to outdo IPhone 4S. L-series is said to be having the higher resolution than the Iphone 4S, it is expected to measure 55mm in width along with the screen resolution of 768 x 1280 which would be OLED or an LCD display with 356 ppi pixel density while IPhone 4S, in comparison, can measure 58.6 mm in width along with 640 x 960 pixels resolution screen with 330 ppi pixel density.
Further, the QWERTY based Blackberry N-series would measure 52 – 53mm in width, support 720 x 720 resolution display with 330 ppi pixel density. When it comes on display Blackberry 10 seems to outdo Apple IPhone retina display.


The Leaked images of Blackberry 10 suggested that it would be thinner than iPhone 4S and would be equivalent to Samsung galaxy. Rumors reported that RIM has also been testing TI OMAP5 and Qualcomm processors, both of these would come along with 1.5GHz dual-core processors. Apart from that, this new smart phone may also include 1GB RAM, Internal storage expandable to 32 GB via micro SD card, an 8 Mega Pixel camera with 1080p HD video recording and Wi-Fi range of 2.4 GHZ b/g/n – 5GHz a/n. All the other internet and browsing feature would also be the part of it like other smart phones.
This shows that RIM has been taking this new product as a savior. That is why they have delayed the launch of it from Q4 of 2012 to Q1 in 2013. Though the Blackberry 10 has developed the desirable get up and go among public but would it be able to out perform iPhone supremacy?  Well this is yet to be seen.

Pros & Cons Of Google Chrome Version For iOS


A few days back at the I/O conference in San Francisco, Google introduced its web browser Google Chrome version for iOS (An operating system that runs on Apple devices) which is now available for free at the app stores. The launch was so jubilant for the apple users that the newly launched iOS version of Chrome instantly sky rocketed straight to the top at the free apps chart in US.

When it comes on web browsing on APPLE’s iOS based devices, the mainly used browsers are very few consisting of Safari by Apple & Opera Mini by Opera but the launch of Google Chrome version of iOS has inflicted new life into this skewed browsing competition.  The alternative browser by Chrome has come up with many features but to name best of all,
  1. It lets you synchronize your Google Chrome Bookmarks, Open Tabs, Passwords and Browsing history between your Apple device and other devices. This synchronization would take place automatically. I.e. if you are signed in to your Google account than you would be able to see and easily access all the other tabs opened in Chrome browser on other devices, at your Apple device.
  2. Instead of opting for standard version of Chrome browser, a separate more protected version can also be used to overcome your privacy concerns. While in Safari you have to enable the privacy browsing option manually
  3.  You can open up unlimited tabs on Chrome browser compared to Safari where the number is limited to 9 only
  4. You can also request for a full desktop version of a website being opened up through your Chrome version of Apple devices
  5. You can also search through Google Chrome browser by using your VOICE. All you need to do just tap on the little micro phone logo in the URL bar
Apart from these astounding features, Google Chrome version of iOS is not without few demerits,
  1. Chrome version for iOS is not as quick as the native Safari browser. When you will try to open up sites that contain Ajax, Ads, Web 2.0 style content or
    even try to load Java Script then you can feel the performance difference
  2. You can not change your default browser from Safari to Chrome in Apple devices unless you feel like jail-breaking it
These were the pros and cons of Google Chrome version of iOS based Apple devices. Though Google version has promising features along with few glitches but despite that we have to say, Google attempt to creep into Apple territory has succeeded at the moment.

Monitor Hardware Temperature In Ubuntu With Psensor

 
Psensor is a tool to monitor hardware temperature that integrates nicely with Unity by using an Unity Launcher counter which displays the enabled temperatures as well as an appindicator that you can use to take a quick look at all available hardware temperatures or cpu usage.

Psensor can monitor:
  • motherboard and CPU temperatures
  • the temperature of Nvidia GPUs
  • experimental ATI/AMD GPUs temperature monitor (not enabled for the Ubuntu PPA as it requires compilation using libatiadlxx)
  • hard disk drives temperature
  • fan speed
  • CPU usage

psensor

The application can also display hot temperature alerts using desktop notifications and the application indicator which turns read when a threshold is reached. The alerts are not enabled by default - to enable them, select Sensor Preferences, then select a sensor check the "Activate desktop notifications" box under "Alerts".

From its preferences, you can select to hide the Psensor window on startup so you can use it as a stand-alone indicator or to hide window decoration and use the Psensor graph as a desktop widget

A new Psensor version has been uploaded recently into the Psensor unstable PPA, which fixes many bugs (including a bug that was casing the systray and appindicator to be visible in the same time when the systray is whitelisted) and adds some new features like:
  • low thresold support for alerts
  • fan alert support
  • added --new-instance option to allow the creation of multiple instances of Psensor
  • you can now select between Celsius and Fahrenheit temperature units
  • added option --use-libatasmart to use atasmart library for disk monitoring instead of hddtemp daemon
  • more


Install Psensor in Ubuntu


1. Firstly you need to install lm-sensors and hddtemp; these packages are required for Psensor to be able to monitor CPU, hard disk and motherboard temperatures as well as CPU fan speed:
sudo apt-get install lm-sensors hddtemp

2. Set up lm-sensors:
sudo sensors-detect

And answer "yes" to everything.

You can now either restart the computer or run the following command to load the modules required by the sensors:
sudo service module-init-tools start

3. Install Psensor

Psensor is available in the official Ubuntu repositories starting with Ubuntu 11.10 Oneiric Ocelot so to install it, click the button below:


Or run the following command in a terminal:
sudo apt-get install psensor

Psensor is also available in a stable PPA which you can use to install newer, stable Psensor versions:
sudo add-apt-repository ppa:jfi/ppa
sudo apt-get update
sudo apt-get install psensor

There's also an unstable Ubuntu PPA which comes with the new features I've mentioned above and many bug fixes. Using this package, you'll get newer features faster, but you may also encounter bugs. Add the PPA and install Psensor from the unstable PPA using the following commands:
sudo add-apt-repository ppa:jfi/psensor-unstable
sudo apt-get update
sudo apt-get install psensor

To install it in other Linux distributions, see the Psensor homepage.

Monitor Network Usage With Download Monitor

 
Download Monitor is an application developed for the Ubuntu Apps Showdown, useful for computers with a limited Internet plan.

The application displays the monthly, daily and hourly amount of data transferred over the network and it can warn you using desktop notifications when you're about to exceed the usage quota, which you can set from its preferences.

Download Monitor integrates nicely with Unity by using dynamic quicklists so you can see the network usage with a click and also, there's an Unity Launcher progress bar which displays the used / remaining usage quota:

download monitor


Once the Ubuntu Apps Showdown is over, Download Monitor will be available in the Ubuntu Software Center but if you want to install it already, you can use the following commands:
sudo add-apt-repository ppa:duncanjdavis/download-monitor-submit
sudo apt-get update
sudo apt-get install download-monitor
For other Linux distributions, you can get Download Monitor via Launchpad.

How to disable confirmation window when closing gnome-terminal


In Ubuntu, Linux Mint or any other Linux distro that uses Gnome, if you close the terminal while some script or command is running within it, a window will appear to ask you to confirm the action:


I myself think this feature is redundant. In Linux Mint (MATE) to disable this confirmation window, you can hit Alt + F2 then type "mateconf-editor" to open the Configuration Editor window. Next, go to apps > mate-terminal > global then uncheck the option "confirm_window_close" and everything is done:

disbale close confirmation gnome terminal

In Ubuntu or Linux Mint Cinnamon, you will have to install gconf-editor first. Just open the terminal and run the following command:
sudo apt-get install gconf-editor

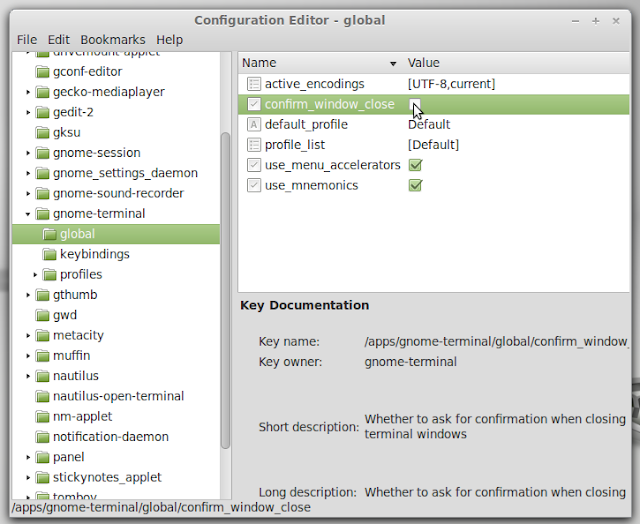
After that, hit Alt + F2 ( in Linux Mint Cinnamon) or open the Dash box ( in Ubuntu) and type "gconf-editor" and the configuration editor window will appear. Then you go to apps > gnome-terminal > global and uncheck the option "close_window_close" just like how you do it in MATE:

disbale close confirmation window gnome terminal


How to change the default system text editor in Linux Mint / Ubuntu


As you have read my previous article about the "less" command, if you hit the letter "v" when using "less", the default system text editor will be activated to allow you to edit the current file. If you havent defined the default system text editor, vi will be used when you hit "v".

If you want to use another text-editor instead of vi, you will have to change the default system text editor first. To change the default text editor, open the terminal and run the following command:

sudo update-alternatives --config editor

After that, the terminal will display something similar to this (screenshot taken in my Mint box):

Change the default system text editor in Linux

As you can see, everything is pretty self-explained here. The default system text editor of Linux Mint is nano. If you still want to keep using nano, just hit enter or close the terminal. If you want to use another text editor, just select the relevant number and hit enter.