Sunday, September 30, 2012

How To Install Joomla 3.0 CMS On Ubuntu 12.10/12.04/Linux Mint 13


Joomla 3.0, a popular content management system (CMS), has been released recently bringing more new features, improvements, and is optimized now for mobile devices thanks to the Twitter Bootstrap framework.

This new mobile capability allows websites and blogs using the Joomla CMS to display content on mobile devices like you do on PCs. Also, Twitter Bootstrap is a toolkit that allows to create web applications and websites.

 Here are the new features in this latest release:


    Incorporation of Twitter Bootstrap into a jui media package.
    A new responsive, mobile device friendly administrator template--Isis-- and interface.
    A new front end template--Protostar-- built using Twitter Bootstrap.
    Updated accessible template called Beez3.
    A simplified 3-step installation process.
    PostgreSQL Driver. You will be able to run Joomla 3.0 sites using the PostgreSQL database.
    PHP Memcached Driver
    Use of JFeed for feed management rather than SimplePie
    Installation of language packages directly from the extension manager
    Guest user group present by default
    Saving blank articles allowed
    New administrator statistics module
    Update TinyMCE to version 3.5.6
    Continued clean up of older unused code, files and database fields and tables and improved standardization of tables.
    Improvements to Smart Search
    Extensive work on code style standardisation and consistency
    Unit testing in the CMS
    Updated system tests in the CMS
    Custom active menu item for menu module
    Let the SEF plug-in add the canonical url to the head
    Version 12.2 of the Joomla Platform

In this tutorial, we will help you install Joomla 3.0 on the following Linux distributions:

  • Ubuntu 12.10 / Ubuntu 12.04 / Ubuntu 11.10
  • Linux Mint 13 / Linux Mint 12
Getting Started

   1. Installing A Web Server

There are many options for installing a web server on Ubuntu/Linux Mint. You can use either LAMP, XAMPP, or just install the Apache, MySQL and PHP packages manually. In this tutorial we will use the LAMP server which can be installed with this single command:

sudo apt-get install lamp-server^

You can also install phpMyAdmin with this command for managing MySQL users & databases:

sudo apt-get install libapache2-mod-auth-mysql phpmyadmin

Finally restart Apache with this command:

sudo /etc/init.d/apache2 restart
You can find more information about installing the LAMP web server and phpMyAdmin here.

   2. Configuring Joomla and Apache

Run now these commands to add a Joomla config file to Apache:

cd /etc/apache2/

sudo cp sites-available/default sites-available/joomla

Next, enable the Joomla website with these commands:

sudo a2ensite joomla

sudo /etc/init.d/apache2 restart

   3. Creating A MYSQL User and Database

You can do it with two options. Either with phpMyAdmin by opening this URL (replace localhost with your server IP address if needed):

http://localhost/phpmyadmin/

Or you can simply create all MYSQL details in CLI mode by running these sequence of commands:

mysql -u root -p

create database joomla;

CREATE USER 'joomla'@'localhost' IDENTIFIED BY '1234';

GRANT ALL PRIVILEGES ON joomla.* TO 'joomla' IDENTIFIED BY '1234';

exit

Replace 1234 with any password of your choice. The MySQL details that we have generated are as follows:

  • Database name: joomla
  • Database user: joomla
  • Database password: 1234
We will need this information later when installing Joomla 3.0 via the web browser.

   4. Installing Joomla 3.0

Via the terminal download and install Joomla 3.0 with the following commands:

sudo mkdir /var/www/joomla

cd /tmp

wget -c http://goo.gl/G6tQ5 -O Joomla_3.0.0-Stable-Full_Package.zip

sudo unzip -q Joomla_3*.zip -d /var/www/joomla

sudo chown -R www-data.www-data /var/www/joomla/

Note: Joomla recommends that Output Buffering is turned off, you can find here how to this under Ubuntu/Linux Mint.

You can now start the installation of Joomla 3.0 via your web browser by opening this link (replace localhost with your IP address if you are installing on a server):

http://localhost/joomla

If you find access permission problems to the Joomla website, you can run this command:

sudo chmod 777 -R /var/www/joomla/

In the first page "Main Configuration", enter information related to your website and admin details:


In the second page "Database Configuration", enter your MySQL settings as follows:

  • Database Type:   MySQL
  • Hostname:   localhost
  • Username:   joomla
  • Password:   The password selected for your database
  • Database Name:   joomla

In the last page "Finalisation", make sure your details entered are correct, then hit the "Install" button:


If the installation is successful, you will see this page:


Click "Remove installation folder" to be able to browse your Joomla site. Here is the default page of the main Joomla site:


The admin area will look like this:


I hope you find this article useful.

Hanthana Linux 17 "LXDE"


Danishka Navin announced the release of Hanthana Linux 17 "LXDE" edition, a lightweight live CD built from Fedora 17 and featuring the LXDE desktop environment: "Hanthana Linux live CD, the newest member of the Hanthana Linux family comes out today. While our regular DVD release is a complete software repository with the latest 3D-accelerated desktop, the live CD will cater the the needs of low-resource requirements, personalized software selection and simplicity. It comes with all the goodness of Hanthana and Fedora version 17, including Mozilla Firefox, LibreOffice Writer, Calc and Impress, and loads of more lightweight applications. LXDE is a lightweight and customizable desktop environment, which is designed to work with older hardware, although it also works perfectly well with modern 3D-accelerated graphics hardware." Here is the full release announcement which includes a screenshot of the default desktop. Download the installable live CD image from SourceForge: Hanthana-17-i386-livecd.iso (683MB, SHA256).

Saturday, September 29, 2012

[FIX] Ubuntu Keeps Forgetting My Wireless (WiFi) Connection Password / Key - Ubuntu 12.10/12.04


Whenever I restart my computer, Ubuntu asks again for my wireless connection password / key. This also happens even when I set the password to be remembered. If you want to solve this problem under Ubuntu 12.10/12.04, then follow these simple instructions:

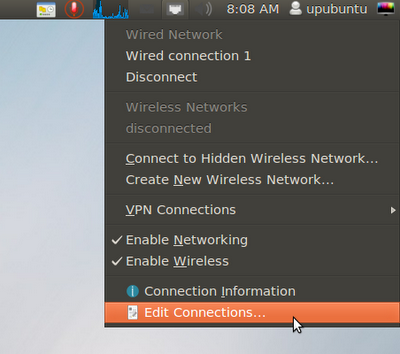
- Click the network icon displayed on the upper panel of Ubuntu and select "Edit Connection":


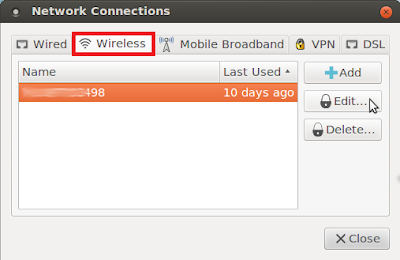
- Open the "Wireless" tab, select your wifi connection and click Edit:


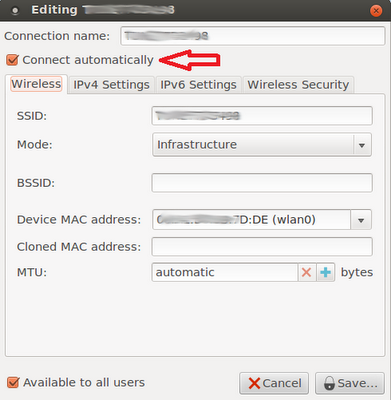
- Make sure now that "Connect automatically" is checked on:


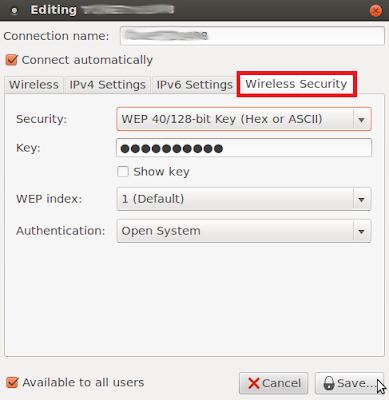
- Next, open the "Wireless Security" tab and enter these details, then click Save:

Security:   WEP 40/128-bit Key (Hex or ASCII)

Key:   Enter your wifi password


From now on, your wifi password will be remembered whenever you reboot your system.

Friday, September 28, 2012

How To Fix A Computer That Won't Restart On Ubuntu 12.10/12.04/Linux Mint 13


If you can't restart your computer under Ubuntu/Linux Mint and the screen turns black with no response after clicking the Restart button, you can follow this tutorial which may solve your reboot issues. This problem is common for owners of laptops or netbooks due to hardware/BIOS problems.

Getting Started

Open the terminal and edit this file under Ubuntu 12.10/12.04/Linux Mint 13:

sudo gedit /etc/default/grub

For Linux Mint, run this command:

sudo pluma /etc/default/grub

Find now this line:

GRUB_CMDLINE_LINUX=""


Replace it with this one:

GRUB_CMDLINE_LINUX="reboot=efi"


Save your file and close, then update Grub with this command:

sudo update-grub

Reboot your system, then try to restart your system to see if it works or not. If this is not working for you, repeat the same steps and try one of these lines instead:

GRUB_CMDLINE_LINUX="reboot=bios"

or

GRUB_CMDLINE_LINUX="reboot=acpi"

or

GRUB_CMDLINE_LINUX="reboot=pci"

If you have more solutions for reboot issues, please mention them in the comment form listed below.

Makagiga 4.4 Released, Installation For Ubuntu/Linux Mint Available


Makagiga is a cross-platform portable application that combines many tasks in a single window like todo listing, reading rss feeds, text editing, and basic image editing & viewing. Makagiga 4.4 is the latest version which brings more features, improvements and changes.


 Here are some of the changes in this latest release taken from the changelog of version 4.4:

* Fixed: Undo support for task color/repeat rule changes
* NEW: Color Chooser Dialog: Bookmarks
* Fixed document tool bar "crash" caused by a recently disabled plugin
* Forms: Auto select all text on field focus
* Font Chooser: Text autocompletion in font name filter box
* Basic Haiku OS support
* Improved Security Manager
* Updated Polish translation
* Various minor updates, bugfixes, and optimizations
* Fixed all compiler warnings
* Updated Eclipse project
* Fixed errors reported by Eclipse IDE
* Replaced @Deprecated API
* Compile with -Werror option
* Added "ui/history" icon

Makagiga 4.4 Installation

To install Makagiga 4.4 in Ubuntu 12.10/12.04/11.10, Linux Mint 13 or older, open the terminal and run the following commands:

cd /tmp

wget -c http://goo.gl/1p6rs -O makagiga_4.4-1_all.deb

sudo dpkg -i makagiga_4.4-1_all.deb

Makagiga requires Java 7 to run. If you have installed Java 7 and you receive this error when launching the application:


You can fix it by running this command from the terminal:

sudo update-alternatives --config java

And set Java 7 as the default Java launcher by entering the correct number:


Makagiga Home Page

Ubuntu 12.10 Beta 2


The second and final beta release of Ubuntu 12.10, code name "Quantal Quetzal", is ready for testing: "The Ubuntu team is pleased to announce the final beta release of Ubuntu 12.10 Desktop, Server, Cloud, and Core products. Some of the new features available since beta 1 are: Quantal beta 2 includes the 3.5.0-15.23 Ubuntu Linux kernel which is based on the 3.5.4 upstream Linux kernel; Unity has been updated to version 6.6 which contains the new default web application in the launcher, a new shopping lens, improvements to the dash and multiple bug fixes; GNOME has been updated to 3.5.92 for most components (some to 3.6.0); accessibility is turned on by default." Read the release announcement and release notes for more information. Download (SHA256): ubuntu-12.10-beta2-desktop-i386.iso (751MB, torrent), ubuntu-12.10-beta2-desktop-amd64.iso (756MB, torrent). Updated CD and DVD images for Kubuntu (download, release notes), Xubuntu (download, announcement), Lubuntu (download), Edubuntu (download) and Ubuntu Studio (download) are also available.