Wednesday, October 31, 2012

How to Full GNOME Shell Package Installation on Ubuntu 12.10


Are too loyal to Ubuntu , but you just can not digest Unity and prefer GNOME Shell ? Well, then this article is just for you! If you are using Ubuntu 12.10 with Unity or some other desktop environment, and want to switch to a full desktop experience without installing GNOME Shell Ubuntu GNOME Remix 12.10 , you can just simply install some packages . Using the instructions below, not only will install GNOME Shell but the default settings and applications that you find with Ubuntu GNOME Remix. There are also some optional steps for installing some applications, then it’s up to you to decide whether to opt for the installation or not.

Install GNOME packages necessary

The first thing to do is type in the terminal the following command:
sudo apt-get install ubuntu-desktop ubuntu-gnome-gnome-default-settings
Now it’s up to you to choose whether you want to GDM or LightDM because during the installation you will be asked if you want to install GDM. In the event that this does not happen, and you want GDM instead of LightDM, you would type:
sudo dpkg-reconfigure gdm
and select GDM instead of LightDM. At the end of installation just get out of the current session and select from the screen to enter GNOME GNOME Shell, at this point, it will be the version 3.6.1 ! Now the advice is to remove the following metapackage will not involve any system problem:

sudo apt-get remove ubuntu-settings
The package “ubuntu- settings ‘sets different default values of Ubuntu, as the order of the buttons in the window, some plugins Rhythmbox and so on.

Optional: Install the missing packages

Some packages in the repositories of Ubuntu 12.10 are not updated to the latest version 3.6.x. (As you already long ago we described, for example, Nautilus). To overcome this problem, open the terminal and type:
sudo add-apt-repository ppa: gnome3-team/gnome3
sudo apt-get update sudo apt-get
dist-upgrade
packages that will be upgraded are Aisleriot 3.6.0, Brasero 3.6.0, Nautilus 3.6.1, Totem 3.6.0, Transmission 0.7.1, Transmageddon 12:23 and Sound Juicer 3.5.0 .
Finally, if you like, you can also remove the overlay scrollbars:
sudo apt-get remove overlay-scrollbar *
attention now! If you have any problems with Plymouth try typing the command from the terminal:
sudo update-alternatives - config default.plymouth
and choose ubuntu-gnome, now given a nice:
sudo update-initramfs-u
and everything should be solved!
Slackel KDE-4.9.2


Dimitris Tzemos has announced the release of Slackel KDE-4.9.2, a live Slackware-based distribution with the very latest KDE desktop environment: "Slackel Live KDE-4.9.2 has been released. A collection of two KDE live DVD images are immediately available that can be burned to a DVD or used with a USB drive. The Slackel live DVD images include Linux kernel 3.2.29. Slackel Live KDE-4.9.2 includes the current tree of Slackware Linux and KDE 4.9.2, accompanied by a rich collection of KDE-centric software. Firefox 16.0.2, KMail, KTorrent, Akregator, Kopete, OpenJRE 7u9, Pidgin, gFTP, GParted, wicd, slapt-get and Gslapt, sourcery. In the multimedia section Bangarang 2.1, Clementine 1.0.1, K3b 2.0.2 are all included. See the release announcement to find out more about the release. Download (MD5) the installation DVD images from SourceForge: slackellive-kde-4.9.2-32.iso (1,002MB), slackellive-kde-4.9.2-64.iso (1,011MB).

Tuesday, October 30, 2012

Show Widget on Desktop with PlexyDesk


PlexyDesk is an extension for your desktop which lets you use your desktop background efficiently. It's powered by Nokia Qt Framework. If you have some scripting skill, you can customize your dekstop with QML and PlexyDesk C++ API, make theme packs (skins) using QML and share it with your friends.


PlexyDesk features:
  • Change your desktop wallpaper by dragging and dropping any image you like from your file manager
  • Fully supports Qt QML
  • Provides support for Qt/3D
  • PlexyDesk widgets can be programmed with shader programs (GLSL).
  • API for writing data models, and C++ widget plugins
  • Dbus api for changing the wallpaper on Linux
  • Various Utility widgets (like a Clock, File browser, and Photo Frame).
PlexyDesk is in early stages so it has many disadvantages such as: we can't change the size of the widgets and there is no support for removing widgets. If you want report bugs, issues, ideas, and suggestions please visit here.

Installation on Ubuntu
Unfortunately, there is no package for Ubuntu 12.10 Quantal Quetzal yet. Otherwise, Ubuntu 12.04 Precise Pangolin users and older version can install PlexyDesk with its official PPA.
Stable build:
  • sudo apt-add-repository ppa:plexydesk/plexydesk-stable
  • sudo apt-get update
  • sudo apt-get install plexydesk

Daily build:
  • sudo apt-add-repository ppa:plexydesk/plexydesk-dailybuild
  • sudo apt-get update
  • sudo apt-get install plexydesk
PlexyDesk's website: http://www.plexyplanet.org/

Parabola GNU/Linux 2012


André Fabian Silva Delgado has announced the release of Parabola GNU/Linux 2012.10.17, a new version of the project's Arch-based distribution containing strictly free software only: "There is a new install medium available. We plan to release new installation media monthly. The live system can be used for new installs or as a rescue system. We have updated packages, fixed bugs and we have done the following visible changes: first medium with Linux-libre 3.6 (3.6.2) with Atheros AR8162 (ALX driver) support; the script boot parameter works again; when booting via PXE and NFS or NBD the ISO will be copied to RAM to ensure a more stable usage; the live medium contains usb_modeswitch and wvdial which allows to establish a network connection using an UMTS USB dongle; the newest version of systemd and netcfg are included.... Read the remainder of the release announcement for further details. Download from here: parabola-2012.10.17-dual.iso (368MB, torrent).

Finnix 106


Ryan Finnie has announced the release of Finnix 106, a small, self-contained, bootable Linux CD distribution for system administrators, based on Debian's testing branch: "Today I am pleased to announce the release of Finnix 106, which contains an important kernel update as well as minor fixes and improvements. Finnix 106 includes Linux kernel 3.5, and notably fixes a major bug observed in Finnix 105 where booting would freeze if the system's disk included an extended partition. With Finnix 105, Project NEALE was announced - an effort to build Finnix releases in a completely automated and normalized way. Finnix 105 was the first release to be produced with NEALE, but the build infrastructure was not available to the public at the time. For Finnix 106, the build infrastructure has been finished and released to the public. See the release announcement and release notes for more details. Download (MD5): finnix-106.iso (176MB, torrent), finnix-ppc-106.iso (118MB, torrent).

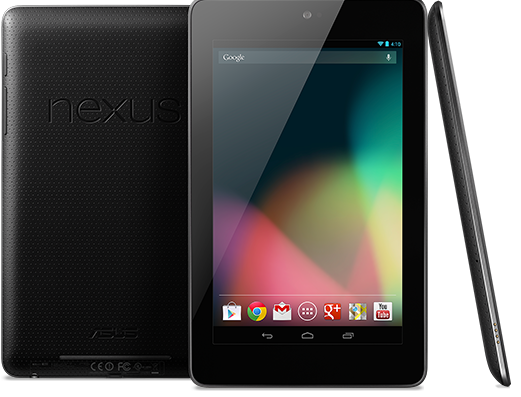
Google announces Nexus 4 phone, Nexus 10 tablet and HSPA+ Nexus 7

 
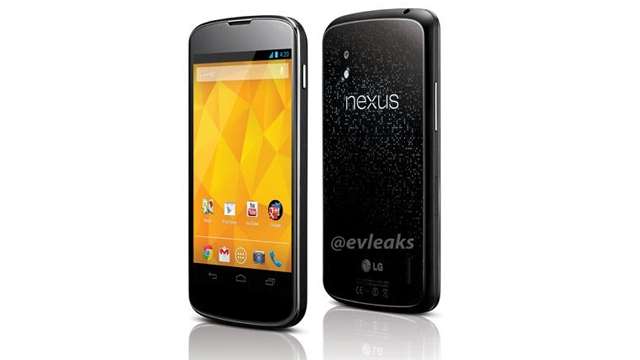
Google may have cancelled today's event due to hurricane Sandy, but they've still gone ahead with announcing the Nexus 4 smartphone built by LG and the Nexus 10 tablet build by Samsung. Both devices come with Android 4.2 which adds Gesture Typing, allowing users to glide fingers over letters to type, support for wireless display, allowing users to watch movies and play games on a Miracast-compatible HDTV, and multiple user support (on tablets).
Nexus 4


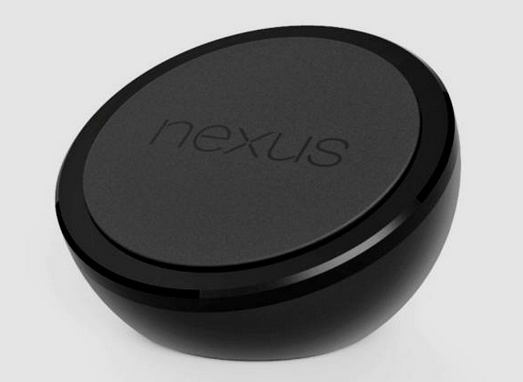
The Nexus 4 features a 4.7-inch 1280 x 768 IPS display (320ppi), a 1.5GHz quad-core Snapdragon S4 Pro processor, 2GB Of RAM, a 1.3 megapixel front facing camera, 8 megapixel rear camera, up to 16GB of storage, NFC, Bluetooth, and wireless charging via Google's new Wireless Charging Orb (see image below). The back is made of glass and features a sparkley pattern underneath the surface.

The device will go on sale unlocked for $299 with 8GB of storage and $349 with 16GB from the Google Play store in the U.S., U.K., Australia, France, Germany, Spain and Canada on November 13. T-Mobile will also sell the device unlocked for $199 on a two-year contract.
Nexus 10

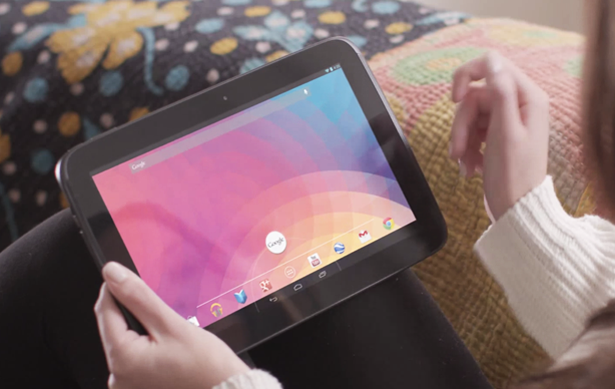
The Nexus 10 is a 10-inch tablet with a resolution of 2560 x 1600, which comes in at a whopping 300ppi. It features a dual-core ARM Cortex-A15 chip with a quad-core Mali T604 GPU, 2GB of RAM, a 5-megapixel camera on the back, a 1.8 megapixel camera on the front, dual-front facing speakers, micro HDMI, micro USB, two NFC chips, and a 8,000mAh battery, that Google says should latest around 9 hours of HD video playback.
The Nexus 10 will go on sale on November 13 on Google Play in the U.S., U.K., Australia, France, Germany, Spain, Canada and Japan. 16GB will cost $399 and 32GB will cost $499.
Nexus 7 32GB and mobile data


Google also announced a 32GB version of its Nexus 7 tablet for $249, along with a 32GB version with HSPA+ mobile data for $299, which can operate on more than 200 GSM providers worldwide according to Google.

Install Mylo Xylotheme Icon Theme From PPA In Ubuntu 12.10/12.04/Linux Mint 13


Mylo Xylotheme is an icon theme that you can use with Unity or Gnome Shell desktop environment. In this tutorial, we will help you install it under Ubuntu/Linux Mint from PPA.


The PPA is supported by the following Linux distributions:

  • Ubuntu 12.10/12.04/11.10
  • Linux Mint 13 (Maya)
Mylo Xylotheme Installation

Open the terminal and run these commands:

sudo add-apt-repository ppa:upubuntu-com/icons 
sudo apt-get update 
sudo apt-get install mx-icons

To enable it, use this command:

gsettings set org.gnome.desktop.interface icon-theme 'MX Icons'

Here is a screenshot of it under Ubuntu Unity:


Credits for this icon theme go here.

Five Nice Gnome Shell 3.6 Extensions For Ubuntu 12.10 (Quantal Quetzal)


In this tutorial, we will introduce five popular extensions that are still not updated in the Gnome Extension Website for the Gnome 3.6 desktop environment. I have added them to our PPA to make them installable in Ubuntu 12.10 Quantal Quetzal with Gnome Shell 3.6 enabled.

If you haven't already installed Gnome Shell 3.6.x in Ubuntu 12.10, you can install it with this command:

sudo apt-get install gnome-shell gnome-tweak-tool

You need to use Gnome Tweak Tool to enable/disable the extensions given below:


Also, after installing any Gnome Shell extension from PPA, you need to restart Gnome Shell with these keys in order for the extension to show up in Gnome Tweak Tool:

ALT+F2 >> r

To add the extension PPA to your system, run these commands from the terminal:

sudo add-apt-repository ppa:upubuntu-com/gnome3.6 
sudo apt-get update

Installing Extensions

   1. Auto Hide Top Panel

This extension will force the top panel of Gnome Shell to hide. It will show up only when hovering your mouse cursor over the upper edge of the screen.


Code:
sudo apt-get install autohide-extension

   2. Bottom Panel


This extension will show up a taskbar at the bottom of your screen like in Gnome2.

Code:
sudo apt-get install bottom-panel-extension

   3. Move Top Panel To The Bottom With Reflection


The Reflection extension will force your top panel to appear at the bottom of your screen.

Code:
sudo apt-get install reflection-extension

   4. Overview Icon


This extension will show up current opened programs icons when enabling the overview mode.

Code:
sudo apt-get install overview-icon-extension

   5. Panel Favorites


This extension will display your favorite programs in the top panel.

Code:
sudo apt-get install panel-favorites-extension

Monday, October 29, 2012

Unsettings 0.08 Adds Support For Ubuntu 12.10 (Quantal Quetzal)


The latest version of Unsettings (0.08) has added support for Ubuntu 12.10 Quantal Quetzal. Unsettings is a graphical configuration program that allows Ubuntu users to customize the Unity desktop as well as modifying Unity settings.


 With Unsettings, you can do the following tasks:

  • Change GTK themes, icons, and cursors 
  • Enable/disable Global Menu, Overlay Scrollbars, and HUD 
  • Change Dash size and blur effect 
  • Change top panel opacity, show/hide username 
  • Change system fonts, etc.
Unsettings Installation

To install Unsettings 0.08 in Ubuntu 12.10/12.04, open the terminal and run these commands:

sudo add-apt-repository ppa:diesch/testing
sudo apt-get update
sudo apt-get install unsettings

For any bug encountered, you can report it here. This project is created by Florian Diesch, you can find his website here.

Ubuntu 13.04 Raring Ringtail Official Logo (Unveiled) UDS


Today October 29 will take away the ‘ UDS Copenhagen and certainly we expect to receive a lot of exciting news from the event which will end on November 1. Looking forward to full-bodied, good news, especially from Valve will be present to talk about Steam for Linux , the main focus of the discussions will be the next release of Ubuntu:  Raring Ringtail.

The news of this article, a brief curiosity more than anything else, it concerns Ubuntu 13.04 has been unveiled the official logo of Raring Ringtail Canonical will be used to sponsor the new release of its Linux distribution. The image is that you can see at the beginning of article, but I know you’re waiting for the “new that count “, so are we and not just information come from Denmark will be ready to riportarvele

How To Enable DVD Playback In Ubuntu 12.10 Quantal Quetzal


A few days back the latest version of Ubuntu which is Ubuntu 12.10 which is code-named as Quantal Quetzal was released. A lot of new features are added and removed from the latest version of Ubuntu 12.10.  We have provided a complete guide on How to install Ubuntu 12.10 few days back. One of the main issues of Ubuntu 12.10 is that we will not be able to play DVD’s  without installing few codecs. Even if you have a DVD which contains some media contents we will not be able to play it in Ubuntu 12.10 which lacks few inbuilt codecs and that’s why we are not able to play DVD’s on Ubuntu 12.10 , If you want to enjoy a movie during leisure time on your latest version of Ubuntu 12.10 which will definitely will show an error report when you start playing the video. In order to rectify this issue of Ubuntu 12.0 you need to install few codes which will make ubuntu 12.10 support DVD playback , you will not be able to play DVDs on Ubuntu until you install some necessary codecs. Just follow these steps to enable DVD playback on your Ubuntu 12.10.
You need a package called libdvdread4 , this installs all the necessary codes for the correct DVD playback on Ubuntu. You can directly install libdvdread4 from  ‘Ubuntu Software Center.
If you need to install it using the Terminal.
Open up the terminal by pressing CTRL ALT T and type the following code:
sudo apt-get install libdvdread4
Once the library completes its installation, Open up the terminal again and type the following code:
sudo / usr/share/doc/libdvdread4/install-css.sh
After the execution of these command’s in the terminal then you will be able to watch DVD’s using your favorite player in ubuntu 12.10.

Sunday, October 28, 2012

Ubuntu 13.04 Will Run on the Google Nexus 7 Tablet


Jono Bacon announced yesterday, October 26th, on his personal blog that the upcoming Ubuntu 13.04 (Raring Ringtail) operating system will support the Nexus 7 tablet from Google. 
 The Ubuntu Developer Summit for Ubuntu 13.04 will start next Monday, on October 29th and the development team is preparing to give attendees a demonstration of Ubuntu OS on the Google Nexus 7 tablet.

“A core goal for Ubuntu 13.04 is to get Ubuntu running on a Nexus 7 tablet. To be clear, this is not going to be a tablet Unity interface running on the 8/16GB Nexus 7,” said Jono Bacon on his blog.

“But instead will focus on getting the current Ubuntu Desktop running on the Nexus so that we can ensure pieces such as the kernel, power management and other related areas are working effectively on a tablet device.” he continued.

However, the good news is that Canonical already tested the Ubuntu 12.04 LTS (Precise Pangolin) and Ubuntu 12.10 (Quantal Quetzal) releases on Nexus 7, and they provide a native installer for it, called Ubuntu Nexus 7 Desktop Installer, with step by step installation instructions (with screenshots).


 Unfortunately, we don’t have a Google Nexus 7 tablet so we can test the Ubuntu operating system on it, but from the Ubuntu Wiki page above it looks like the installation is pretty simple. Basically you’ll have to add the PPA for the installer, unlock your tablet, and install Ubuntu on Nexus 7.

If you don’t have a Nexus 7 tablet from Google and you want to buy one, just in case you would like to install Ubuntu on it, please visit its official website.

Don’t forget to visit our website next week, as we will cover the entire Ubuntu Developer Summit for Ubuntu 13.04 event and give you all the latest news from the Canonical world.

How To Install Azenis Icons (Green/Orange/Blue) From PPA In Ubuntu 12.10/12.04/Linux Mint 13


In this tutorial, we will see how to install Azenis Icons from PPA under Ubuntu/Linux Mint. This icon theme is available in three different colors which we will see how to enable them as described below. Here are screenshots of 'Azenis Icons' under Ubuntu:


The PPA is compatible with the following Linux distributions:

  • Ubuntu 12.10/12.04/11.10
  • Linux Mint 13/12
Azenis Icons Installation

Open the terminal and run these commands:

sudo add-apt-repository ppa:upubuntu-com/icons
sudo apt-get update
sudo apt-get install azenis-icons

Enable now the different Azenis icon colors with these commands:

* Azenis Green Icons:

 gsettings set org.gnome.desktop.interface icon-theme 'Azenis Icons Green'

* Azenis Blue Icons:

 gsettings set org.gnome.desktop.interface icon-theme 'Azenis Icons Blue'

* Azenis Orange Icons:

 gsettings set org.gnome.desktop.interface icon-theme 'Azenis Orange Icons'

Install New BeatBox 0.7 Music Player in Ubuntu 12.10


The new BeatBox music player released in version 0.7, come with new user interface enhancements and new features. The preferences window has been revamped to include preferences for plugins as well as a more robust UI for general settings. in addition, beatbox 0.7 also introduces plugin support with dedicated category. So, enabling or disabling a specific plugin is to be easily.
BeatBox media player is a comfortable, easy to use media player to player, stable, but especially fast, written in  Vala . With  Beatbox  have the chance to play music in shuffle mode and cyclic edit the metadata of the tracks, perform quick searches within the library, edit playlists, view album art,  playlists, podcasts, Internet radio,   and synchronize your player with our account  Last.FM.

Here’s New Change of Beatbox 0.7:

  • Plugin support
  • DB upgrading, which means no longer having to delete your db for new versions.
  • Better last.fm authentication
  • Smart auto scroll to current song
  • Fixed issue where list view became horizontally scrolled unnecessarily
  • Gapless playback
  • Much faster startup
  • Multi-library management. Podcasts now are a truly separate library with a separate folder associated it.
  • More detail, found it @BeatBox Release Announcement

Install BeatBox 0.7 in Ubuntu Based Distro

BeatBox 0.7 Install New BeatBox 0.7 Music Player in Ubuntu 12.10
To install BeatBox 0.7 in Ubuntu 12.04,ubuntu 12.10 and Linux Mint 13, you can add the following PPA:
sudo add-apt-repository ppa:sgringwe/beatbox
sudo apt-get update
sudo apt-get install beatbox
If you want to make BeatBox available in sound menu do the following tips, open terminal then install dconf-tool
sudo apt-get install dconf-tool
Open dconf-tool from unity dash, in dconf-tool navigate to com -> canonical -> indicator -> sound, double-click “Value” of interested-media-players then add ‘beatbox’ after ‘rhythmbox’.

Install Insync Google Drive Client on Ubuntu or Linux Mint


Insync caters to power and business users who have different needs from the average consumer — needs that are not being fulfilled by Google Drive.
Insync, an unofficial Google Drive client for Linux, is now available in a repository for Ubuntu, Linux Mint and Debian users and it's recommended you add since you'll get automatic updates.

Changes in latest version:

  • fixed symlinks not live syncing (before you had to restart Insync for changes to be detected)
  • Nautilus context menu will not show outside of the Insync folder.
  • Applets now have a pause/resume button to start/stop Insync from downloading and uploading.
  • Gdocs are now downloaded in Open Document Format
  • Built with Debian, fixes GLIBC error for Debian users.

Add Repository in Ubuntu:
echo "deb http://apt.insynchq.com/ubuntu $(lsb_release -cs) non-free" | sudo tee /etc/apt/sources.list.d/insync.list

Add Repository in Linux Mint:
echo "deb http://apt.insynchq.com/mint $(lsb_release -cs) non-free" | sudo tee /etc/apt/sources.list.d/insync.list

Add Repository in Debian:
echo "deb http://apt.insynchq.com/debian $(lsb_release -cs) non-free" | sudo tee -a /etc/apt/sources.list

After adding repository enter following commands for import key and apt update
wget -O - https://d2t3ff60b2tol4.cloudfront.net/services@insynchq.com.gpg.key | sudo apt-key add -
sudo apt-get update

Now install Insync Drive:
- For Unity (AppIndicator)
sudo apt-get install insync-beta-ubuntu

- For Gnome-Shell
sudo apt-get install insync-beta-gnome

- For Cinnamon
sudo apt-get install insync-beta-cinnamon

- For Kde4
sudo apt-get install insync-beta-kde

Download insync for other distributions.

Mozilla firefox 16.0.2 released


Mozilla firefox 16.0.2 final is now available for download.This is a security fix release.
what’s new in this firefox 16.0.2?
Fixed Security Vulnerability in Firefox 16.0.1.
Fixes for Location object issues.This is a critical Vulnerability.

Download Mozilla firefox 16.0.2

FreeNAS 8.3.0

FreeNAS
Josh Paetzel has announced the release of FreeNAS 8.3.0, a free and open-source Network-Attached Storage (NAS) operating system based on FreeBSD: "The FreeNAS development team is pleased to announce the immediate availability of FreeNAS 8.3.0-RELEASE. FreeNAS 8.3.0 is based on FreeBSD 8.3 with version 28 of the ZFS file system. This is a major milestone in FreeNAS development, bringing in the plugin system with ZFS version 28. Development of the FreeNAS 8.2 branch has come to a halt, as both ZFS version 15 as well as FreeBSD 8.2 are no longer supported. There have been no major changes between 8.3.0-RC1 and RELEASE, mostly bug fixes and minor usability improvements to the GUI." See the release announcement and release notes for further information. Download (SHA256): FreeNAS-8.3.0-RELEASE-x86.iso (103MB) FreeNAS-8.3.0-RELEASE-amd64.iso (112MB).

How To Create A Live USB For Ubuntu 12.10 Quantal Quetzal


In this tutorial, we will see three methods for creating a live USB for Ubuntu 12.10 Quantal Quetzal. Creating live USBs will be very useful mainly for users of netbooks, laptops, and tablets. This tutorial is also applicable for other Linux distributions (Linux Mint 13, Debian Squeeze, etc.).

Preparing The USB Flash Drive

To be able to install a Linux distribution on a USB stick, it's recommended that you format it as ext4, but you can choose any other file system. Let's first identify your USB device using this command:

df -h

For my system, the USB drive is mounted as /dev/sdb1:


Change /dev/sdb1 with the name of your USB stick and run these commands to format it as ext4:

sudo umount /dev/sdb1

sudo mkfs.ext4 /dev/sdb1

If you want to format it as FAT32, run these commands:

sudo umount /dev/sdb1

sudo mkfs.vfat /dev/sdb1

Finally, remount your USB drive. See now below for ways to create a live Ubuntu USB.

1. Startup Disk Creator

If you are under Ubuntu, you can simply use Startup Disk Creator to create a live USB. Via Unity Dash, search and open Startup Disk Creator:


Click "Other" and select the Ubuntu 12.10 iso file, then click "Make Startup Disk":


2. UNetbootin

UNetbootin is a tool with GUI that allows users to create live usbs for various Linux distributions. To install it under Ubuntu/Linux Mint, run this command:

sudo apt-get install unetbootin

For RPM-based systems, you can install UNetbootin with this command:

sudo yum install unetbootin

From the main interface of UNetbootin, select "Diskimage" and click the browse button, then select the image of Ubuntu 12.10 from your hard drive:


Select now Type > USB Drive and Drive: /dev/sdb1, then click OK to create the live USB:


Wait now while your image is being exported to the USB drive:


At the end of the operation, reboot your system and boot from the USB drive.

3. Create a Live USB Via The Terminal

In the terminal, run this command to create a live usb for Ubuntu 12.10:

sudo dd if=/ubuntu-12.10-desktop-i386.iso of=/dev/sdb1 bs=1M

- /path/to/ubuntu-12.10.iso  --> Replace it with the full path to Ubuntu 12.10 iso image.
- /dev/sdb1 --> Replace it with the name of your USB drive.

Saturday, October 27, 2012

How To Fix Unity and Wireless Problems After Upgrading To Ubuntu 12.10 (Quantal Quetzal)


In this little guide, we will introduce solutions for some problems related to Ubuntu's Unity interface (Dash and toolbar), window frames, and wireless connections that occur after upgrading to Ubuntu 12.10 (Quantal Quetzal). Before we start, you should know that these solutions may work for some users and some not.

1. Lost Unity Dash, Window Frames, and Top Panel

If Unity is not responding to user inputs after upgrading to 12.10 and window frames disappeared, you can try these fixes:

- For Nvidia graphics cards, try to reinstall nvidia-current with this command:

sudo apt-get install --reinstall nvidia-current

For  NVIDIA Optimus laptops, try to reinstall bumblebee with this command:

sudo apt-get install --reinstall bumblebee bumblebee-nvidia

Then reboot your system:

sudo reboot

- For ATI AMD graphics cards, try to remove the fglrx package with this command:

sudo apt-get autoremove fglrx --purge

Then reboot:

sudo reboot

If the fglrx package is not installed in your system, you can use these commands instead:

sudo apt-get autoremove fglrx-updates fglrx-amdcccle-updates --purge

sudo reboot

2. WiFi Stops Working After Upgrading To Ubuntu 12.10 (Broadcom Wireless cards)

You can fix wifi problems using two methods:

- Either connect to the internet via wired connection and run this command:

sudo apt-get update && sudo apt-get upgrade

Then reboot your system.

- Or use the following commands:

sudo apt-get install linux linux-headers-generic kernel-package

sudo apt-get install --reinstall bcmwl* firmware-b43-lpphy-installer b43-fwcutter

Finally, reboot your system.

If that didn't help, try these commands:

sudo apt-get remove bcmwl-kernel-source

sudo apt-get install firmware-b43-installer b43-fwcutter

sudo reboot


If you have something to add, please use the comment form below.

A Trick to Speed Up Ubuntu’s Shutdown Process


When compared with the excellent and robust Ubuntu 12.04 LTS release (at least in my experience), though the current 12.10 version brought few new features, it does not seem robust at all, as I’m having some serious issues with Compiz (which has never been the case for me as my Intel HD 3000 GPU worked really well with it).

Anyway, that is a hardware related issue, and perhaps the next one too might be as such. That is, despite Ubuntu 12.10 booting as fast as the 12.04 did, and I don’t know how it is in your computer, but I do notice a slight slowdown (2-3 seconds) when it is shutting down.
By default, there is very little that one can do to track down shutting down related issues as Ubuntu displays an image (logo), rather than showing-up the ‘old-school’ text output (which includes: listing programs that are shutting down, errors etc).
Nevertheless, you can alway bypass it (while booting and shutting down) by simply pressing the ‘ESC’ key. So I did that, and saw that a program called ‘modem-manager’ is taking few seconds to terminate. Now ‘modem-manager’, is sort of an extension, that mainly brings few hardware related patches (only supports mobile broadband modems) to the existing Network (Gnome) manager in Ubuntu.
I do not have a mobile broadband modem, plus, even if I had one, the default network manager should be able to handle it, so I just went ahead and removed it (yikes! :D ). Then I rebooted, hoping that it would fix the issue, sadly though, it did not work.
Next time, after a wild guess, just before shutting down, while I was still logged on to the desktop, I manually terminated the network-manager service. Then I hit the shutdown button, and this time, Ubuntu 12.10 shutdown like a champ ;-) .
I was able to reduce 2-3 seconds, which it might not sound like much, but when considering the fact that usually Ubuntu shutdown within like 2-3 seconds (12.04 for example) in my notebook, ‘thanks’ to this network-manager issue in 12.10, now it was taking like 5-6 seconds, so after the ‘manual fix’, I was able to achieve the same awesome shutdown speed the notebook had before.
But, terminating the network-manager manually was a temporary fix (of course). So I looked for a permanent solution.
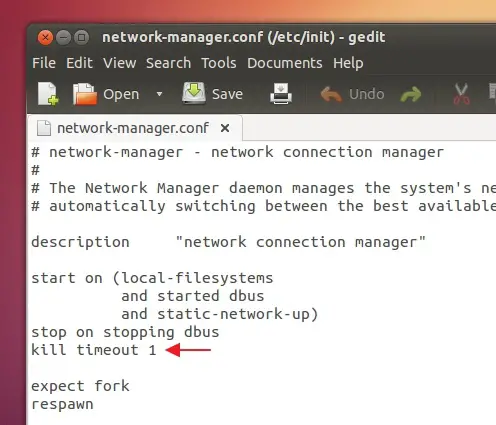
Ubuntu uses a core software utility called ‘upstart‘, for executing and terminating certain OS services, including the ‘network-manager’. And ‘upstart’ mainly stores the configuration files of those system services it manages, in ‘/etc/init’. So I opened that folder, and had a look at the ‘network-manager.conf’ file.
Now, by default, ‘upstart’ waits for about ’5′ seconds, till a process terminates, before taking any ‘manual action’. So all I did was nothing but add simple command (built-in one of ‘upstart), and reduced that ‘waiting seconds’ to ’1′ for ‘network-manager’. And it did the trick.
I do not know, if this will help you, if you are too experiencing a slowed down shutting down times in Ubuntu 12.10. But, if it is because of the ‘network-manager’, then this should help.
For fixing that (hopefully), please follow the below steps.
Step 1:
Open your Terminal window and enter the below command.
gksudo gedit /etc/init/network-manager.conf
Once the configuration file is opened, copy and paste the below code, below the existing ‘stop on stopping dbus’, as shown in the below screenshot.
kill timeout 1
Then, save your changes, and close the configuration file.
Step 2:
I do not think the below step is necessary, but you can do the same to the ‘modem-manager’, just in case. For that, enter the below command.
gksudo gedit /etc/init/modemmanager.conf
Then look for the existing ‘stop on stopped network-manage’ text line, and simply paste the below code just below it.
kill timeout 1
Now, save your changes and close the configuration file. That’s it!.
Now try shutting down the computer, and if it was any of those services that were causing the slowdown, then hopefully, it will be fixed. Good luck.

Linux Lite 1.0.0


Jerry Bezencon has announced the release of Linux Lite 1.0.0, a beginner-friendly Ubuntu-based desktop Linux distribution with Xfce as the preferred desktop environment: "Linux Lite 1.0.0 'Amethyst' final for 32-bit systems with PAE support has been released. This distro was created for three reasons. One, to show people just how easy it can be to use a Linux-based operating system and to dispel myths about how scary Linux operating systems are. Two, to help create awareness about Linux-based operating systems. And three, to help promote this community. Linux Lite is free for everyone to use and share, and suitable for people who are new to Linux or for people who want a lightweight environment that is also fully functional." Read the rest of the release announcement for other interesting information. Download (MD5): linux-lite-1.0.0-i386.iso (874MB).

How To Fix A Broken System After Enabling The LightDM Display Manager In Linux Mint 13


If after enabling the LightDM display manager under Linux Mint 13 your system fails to start and you are unable to login, you can follow this tutorial which will show you a solution for fixing your system without the need to re-install Linux Mint 13. We will help you restore MDM as your default display manager so that you can login again to your session.

Getting Started

1. Boot your system using the Linux Mint 13 live CD/USB and select "Start Linux Mint" from the boot screen:


2. Wait now until your system is fully loaded, then open the start menu and open the Terminal:


3. Let's now identify the hard disk your system is installed on with this command:

 sudo fdisk -l

For my system, Linux Mint is installed in /dev/sda1


4. Run now this sequence of commands to mount your hard disk so that you have read/write permissions on your system files:

sudo mkdir -p /media/mint

sudo mount /dev/sda1 /media/mint

sudo mount --bind /dev /media/mint/dev

sudo mount --bind /proc /media/mint/proc

sudo mount --bind /sys /media/mint/sys

sudo chroot /media/mint

5. To switch back to the MDM display manager, run this command:

sudo dpkg-reconfigure mdm

6. Select "mdm" and press Enter:


7. Remove now Live CD/USB of Linux Mint 13 and reboot your system. The MDM display manager will now show up again:


How To Install And Enable Ubuntu's Unity Desktop On Linux Mint 13


In this tutorial, we will see how to install and enable the Unity interface of Ubuntu under Linux Mint 13. As you know, the Linux Mint 13 distribution is based on Ubuntu 12.04 (Precise Pangolin), so all packages we are going to install will be from the Precise repository.

1. Unity Installation

Via the command line, run the following commands to install the Unity desktop:

sudo apt-get install unity gnome-session

sudo apt-get install unity-2d-panel unity-2d-launcher

You can also install Ubuntu Software Center with this command:

sudo apt-get install software-center

2. Enabling Unity

Log out the current session, click the session button, select "Ubuntu" and click "Change Session", then log back in:


Here are some screenshots of Linux Mint 13 with Unity enabled: