Showing posts with label Encrypt. Show all posts

Thursday, November 8, 2012

Encrypt/Decrypt Files From Nautilus Context Menu Under Ubuntu 12.10/12.04


In this tutorial, we will see how to encrypt or decrypt your files using the Nautilus context menu (right-click
 menu) under Ubuntu. To do this, we will need to install the seahorse-nautilus plugin. But, before installing it, you need to add a PGP key so that you can encrypt with it your files.

Adding A PGP Key

Open the Unity Dash and search and open "Passwords and Keys":


Click the add button, select "PGP Key", then click Continue:


Enter now your details (full name, email address, etc.) and click Create:


Submit now a passphrase for this new key:


Wait now until the key is completely generated.

Installing Seahorse-Nautilus

Open the terminal and install the seahorse-nautilus plug-in under Ubuntu 12.10/12.04 or older with this command:

sudo apt-get install seahorse-nautilus

Reset nautilus with these commands:

nautilus -q 
nautilus

Encrypt/Decrypt Files

Right click now any file and select Encrypt:


In the window that will pop-up, select your key, set "Sign message as: Your key" and click OK:


Another window will pop-up which will allow you to save your encrypted file. You will be required now to enter the passphrase associated with your PGP key:


Your file is now encrypted. To decrypt it, double-click the file or right click it and select "Open With Decrypt File":


Enter your passphrase to unlock it.

Monday, November 5, 2012

How To Create An Encrypted CD/DVD Image From The Terminal - Ubuntu/Linux Mint


In this tutorial, we will learn how to create an encrypted iso image containing your data using the terminal under Ubuntu or Linux Mint. We will use the AES (Advanced Encryption Standard) encryption which will help us encrypt the entire disk image. You can later mount and burn the encrypted disk image to a CD or DVD.

Getting Started

Let's first install the Loop-AES command line tools with these commands:


sudo apt-get install loop-aes-utils aespipe 
sudo modprobe cryptoloop

1. Creating An Encrypted Disk Image

The command for creating an encrypted disk image is the following:

genisoimage -quiet -r ~/Desktop | aespipe -T -e aes256 > image.iso

~/Desktop >>> Replace it with the path of the folder containing the data to be added to the iso file

image.iso >>> this is the name of the iso file to be generated. You can set any name of your choice.

You will be prompted to enter a passphrase two times of at least 20 characters. Your iso image is now encrypted and can't be mounted unless the user provides the correct passphrase.

2. Mounting An Encrypted Disk Image

Via the terminal, create a mount point with this command:

sudo mkdir /media/iso

Mount now your iso file with this command:

sudo mount -o loop,encryption=aes256 image.iso /media/iso

After entering your user password, you will be prompted to submit the passphrase associated with the iso file.

3. Burning An Encrypted Disk Image

You can burn your encrypted iso image with any software of your choice. For burning iso files from the terminal, you can use wodim. To list your burning device with wodim, run this command:

wodim --devices

For my system, the burning device is mounted as /dev/sg1


$ wodim --devices
wodim: Overview of accessible drives (1 found) :
-------------------------------------------------------------------------
 0  dev='/dev/sg1'      rwrw-- :  'Slimtype' 'DVD A DS8A5SH'
-------------------------------------------------------------------------

So, to burn the iso file, run this command:

wodim dev=/dev/sg1 image.iso

Friday, October 5, 2012

Mount, Encrypt, And Manage Disk Images/Hard Disks With eMount - Ubuntu 12.10/12.04/Linux Mint 13


eMount is a free tool with GUI that allows Linux users to easily manage disk images and hard drives. For your right to privacy, you can use eMount to encrypt your files and keep them secure from unauthorized access, which is very important when working on computers shared with other users. You can also use eMount to mopunt/unmount disk images and physical hard disks.


Here are some features of eMount:

Encrypt hard drives and disk images

Create encrypted disk images using these file systems: ReiserFS, XFS, ext2, ext3, ext4, NTFS, FAT-16/32, and  HFS/HFS+

Mount/unmount iso files and other disk image formats as well as hard drive partitions

The possibility to enlarge disk images having the following file systems: ReiserFS, XFS, ext2, ext3, and ext4, etc.

For more information, you can refer to the home page of eMount here. In this tutorial we will see how to install eMount in the following Linux distributions:

  • Ubuntu 12.10/12.04/11.10
  • Linux Mint 13/12
  • Debian 6.0 "Squeeze"
eMount Installation

The latest version of eMount is 0.11.3, you can install it with the following commands from the terminal:

   1. i386/32-bit system:

cd /tmp

wget -c http://goo.gl/DZ5pk -O emount_0.11.3-1_i386.deb

sudo dpkg -i emount_0.11.3-1_i386.deb

   2. amd64/64-bit system:

cd /tmp

wget -c http://goo.gl/3l6e0 -O emount_0.11.3-1_amd64.deb

sudo dpkg -i emount_0.11.3-1_amd64.deb

You can now start the application with this command:

sudo emount

For any bugs encountered, you can report it here.

Tuesday, September 25, 2012

Unity Dash Searches Will Be Encrypted in Ubuntu 12.10


A lot of people expressed security concerns about the integration of an Amazon lens into the Home lens in Ubuntu 12.10, but Canonical is making sure that users’ privacy will be respected.

Mark Shuttleworh, founder of Canonical, tried to address some of the problems that were mentioned by users, but the backlash of this new feature in Ubuntu 12.10 has caused quite a stir in the community.

So far, the traffic made through the Unity Dash, towards Amazon and through Canonical's servers, has not been encrypted, but Canonical assured us that this would change with the final version of Ubuntu 12.10.

Jono Bacon, community manager at Ubuntu, posted on his blog a response from John Lenton, the senior engineering manager in the Online Services team at Canonical.

We appreciate some of the community concerns about these searches operating unencrypted and we are currently working to encrypt these dash searches ready for the release of this feature in Ubuntu 12.10. This should resolve most of the concerns shared about unencrypted traffic.


This is certainly good news and the protests will get quiet for a while, at least until Ubuntu 12.10 (Quantal Quetzal) is officially released.

Wednesday, September 5, 2012

How to Encrypt Ubuntu Home Folder After Installation


The following tutorial will teach Ubuntu users how to encrypt their home folder after installation, for enhanced security.

Given the fact that we live in a virtual word where hackers grow like mushrooms every day, we think that it is essential for every computer user to use secure connections to the Internet, as well as encrypted hard drives.

All supported Ubuntu operating system to date allow the possibility to encrypt your home folder at installation, but if for some reason you forgot or expressly omitted to select this functionality, we now give you the opportunity to enable it after installation.

The following guide will provide you with step-by-step instructions on how to convert your unencrypted home folder to an encrypted one, for enhanced security over your sensitive files.

IMPORTANT: Before we start with the tutorial, please make sure that you have enough free space on the target device, which should be 2.5x the size your current home directory (e.g. if you have 10GB in your home folder, you'll need 25GB for the conversion). If this requirement is not met, the process will fail with "Not enough free disk space" error.

Editor's note: Make a copy of your personal files on an external device before encrypting your home folder. Just in case!

Step 1 - Installing the requirements

First of all, we need to install the package that helps us encrypt our home directory, so open a terminal, either by hitting CTRL+ALT+T or simply open it from the Applications menu or Unity, and paste the following command:

sudo apt-get install ecryptfs-utils

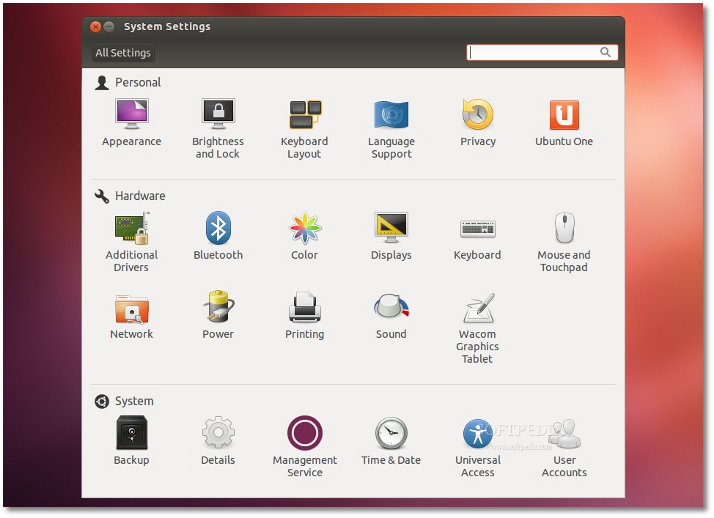
Then we need to add a test user with administrator rights. For this, you will need to go to the System Settings and access the User Accounts entry...

Review image

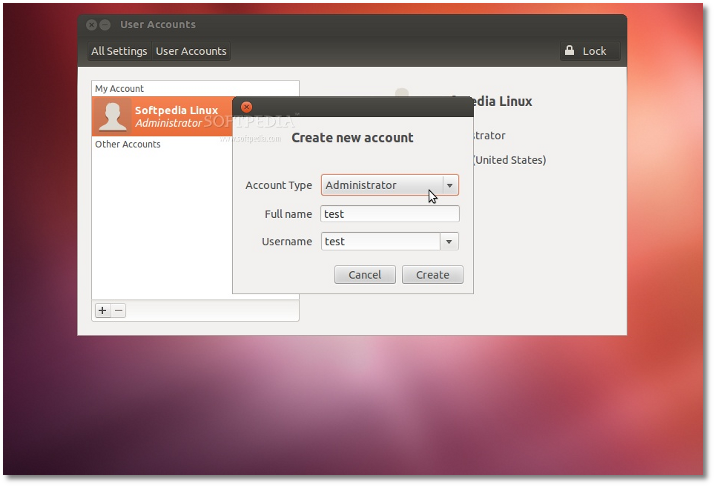
Click the "Unlock" button on the upper right side and enter your password. Then click the + button on the lower left side, type test on both fields and select "Administrator" where it says Account Type...

Review image

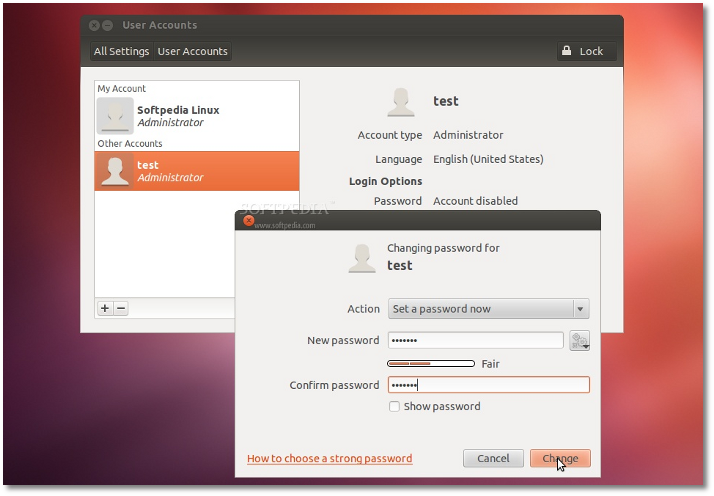
Click the "Create" button to create the user. Wait a few seconds for the new user to be created and make sure it is selected. In the right side, click on the "Account disabled" button and add a password in the new window that appears...

Review image

Click the "Change" button to submit the password and you will see that the "Account disabled" option will disappear and some dots will appear instead.

Reboot your computer!

Step 2 - Migrating your files and encrypting your home directory

When you get back, at the login screen DO NOT LOGIN, instead hit the CTRL+ALT+F1 key combination. This will switch you to a text mode, where you have to login with the test user we've created above and the password. Once logged in, type the following command, replacing USER with your normal username:

sudo ecryptfs-migrate-home -u USER

Enter your password when asked, hit Enter and wait for the process to finish. Encrypting your files will take a while, but if you have many files, it will take a lot of time, so make sure you grab a book or play a game on another machine.

When the process is over, you will be notified with some important notes. Read them thoroughly, as you will have to delete a folder from your home directory!

WARNING: DO NOT RESTART, DO NOT EXIT THE SESSION AND DO NOT LOG OUT. FOLLOW THE NEXT INSTRUCTIONS!

Step 3 – Setting up your passphrase and completing the encryption process

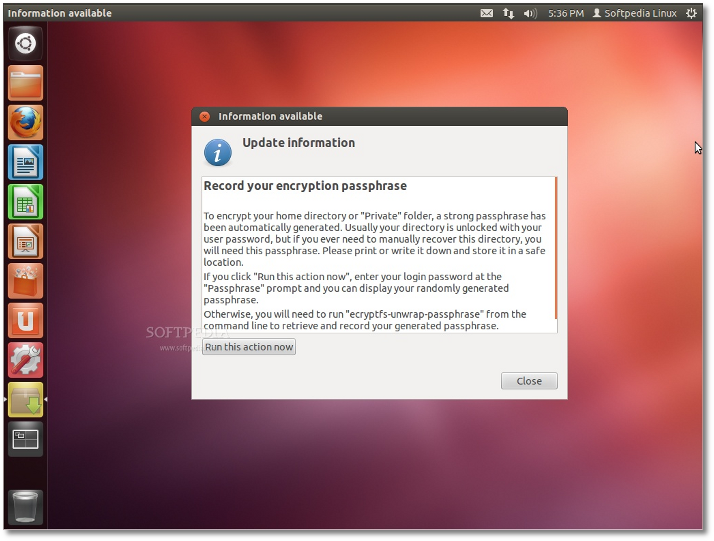
Now hit the CTRL+ALT+F7 key combination to return to the login screen. Log in with your normal user and wait for the encryption passphrase information window to appear. Click the "Run this action now" to record your passphrase, in case you will need to recover your files at a later time. Write your passphrase in your head or somewhere safe!

Review image

That's it! You can now safely reboot your machine and log back in into your newly encrypted Ubuntu session.

Editor's note: If everything is OK, please remove the extra folder (the one with some random letters after your name e.g.: softpedia.xzsdyes) in your home directory (you ill need to do that in a terminal with the sudo rm -rf FOLDER command). Also remove the test user created in the first step!

If you encounter problems with the tutorial, do not hesitate to comment below!