Saturday, October 27, 2012

How To Fix Unity and Wireless Problems After Upgrading To Ubuntu 12.10 (Quantal Quetzal)


In this little guide, we will introduce solutions for some problems related to Ubuntu's Unity interface (Dash and toolbar), window frames, and wireless connections that occur after upgrading to Ubuntu 12.10 (Quantal Quetzal). Before we start, you should know that these solutions may work for some users and some not.

1. Lost Unity Dash, Window Frames, and Top Panel

If Unity is not responding to user inputs after upgrading to 12.10 and window frames disappeared, you can try these fixes:

- For Nvidia graphics cards, try to reinstall nvidia-current with this command:

sudo apt-get install --reinstall nvidia-current

For  NVIDIA Optimus laptops, try to reinstall bumblebee with this command:

sudo apt-get install --reinstall bumblebee bumblebee-nvidia

Then reboot your system:

sudo reboot

- For ATI AMD graphics cards, try to remove the fglrx package with this command:

sudo apt-get autoremove fglrx --purge

Then reboot:

sudo reboot

If the fglrx package is not installed in your system, you can use these commands instead:

sudo apt-get autoremove fglrx-updates fglrx-amdcccle-updates --purge

sudo reboot

2. WiFi Stops Working After Upgrading To Ubuntu 12.10 (Broadcom Wireless cards)

You can fix wifi problems using two methods:

- Either connect to the internet via wired connection and run this command:

sudo apt-get update && sudo apt-get upgrade

Then reboot your system.

- Or use the following commands:

sudo apt-get install linux linux-headers-generic kernel-package

sudo apt-get install --reinstall bcmwl* firmware-b43-lpphy-installer b43-fwcutter

Finally, reboot your system.

If that didn't help, try these commands:

sudo apt-get remove bcmwl-kernel-source

sudo apt-get install firmware-b43-installer b43-fwcutter

sudo reboot


If you have something to add, please use the comment form below.

A Trick to Speed Up Ubuntu’s Shutdown Process


When compared with the excellent and robust Ubuntu 12.04 LTS release (at least in my experience), though the current 12.10 version brought few new features, it does not seem robust at all, as I’m having some serious issues with Compiz (which has never been the case for me as my Intel HD 3000 GPU worked really well with it).

Anyway, that is a hardware related issue, and perhaps the next one too might be as such. That is, despite Ubuntu 12.10 booting as fast as the 12.04 did, and I don’t know how it is in your computer, but I do notice a slight slowdown (2-3 seconds) when it is shutting down.
By default, there is very little that one can do to track down shutting down related issues as Ubuntu displays an image (logo), rather than showing-up the ‘old-school’ text output (which includes: listing programs that are shutting down, errors etc).
Nevertheless, you can alway bypass it (while booting and shutting down) by simply pressing the ‘ESC’ key. So I did that, and saw that a program called ‘modem-manager’ is taking few seconds to terminate. Now ‘modem-manager’, is sort of an extension, that mainly brings few hardware related patches (only supports mobile broadband modems) to the existing Network (Gnome) manager in Ubuntu.
I do not have a mobile broadband modem, plus, even if I had one, the default network manager should be able to handle it, so I just went ahead and removed it (yikes! :D ). Then I rebooted, hoping that it would fix the issue, sadly though, it did not work.
Next time, after a wild guess, just before shutting down, while I was still logged on to the desktop, I manually terminated the network-manager service. Then I hit the shutdown button, and this time, Ubuntu 12.10 shutdown like a champ ;-) .
I was able to reduce 2-3 seconds, which it might not sound like much, but when considering the fact that usually Ubuntu shutdown within like 2-3 seconds (12.04 for example) in my notebook, ‘thanks’ to this network-manager issue in 12.10, now it was taking like 5-6 seconds, so after the ‘manual fix’, I was able to achieve the same awesome shutdown speed the notebook had before.
But, terminating the network-manager manually was a temporary fix (of course). So I looked for a permanent solution.
Ubuntu uses a core software utility called ‘upstart‘, for executing and terminating certain OS services, including the ‘network-manager’. And ‘upstart’ mainly stores the configuration files of those system services it manages, in ‘/etc/init’. So I opened that folder, and had a look at the ‘network-manager.conf’ file.
Now, by default, ‘upstart’ waits for about ’5′ seconds, till a process terminates, before taking any ‘manual action’. So all I did was nothing but add simple command (built-in one of ‘upstart), and reduced that ‘waiting seconds’ to ’1′ for ‘network-manager’. And it did the trick.
I do not know, if this will help you, if you are too experiencing a slowed down shutting down times in Ubuntu 12.10. But, if it is because of the ‘network-manager’, then this should help.
For fixing that (hopefully), please follow the below steps.
Step 1:
Open your Terminal window and enter the below command.
gksudo gedit /etc/init/network-manager.conf
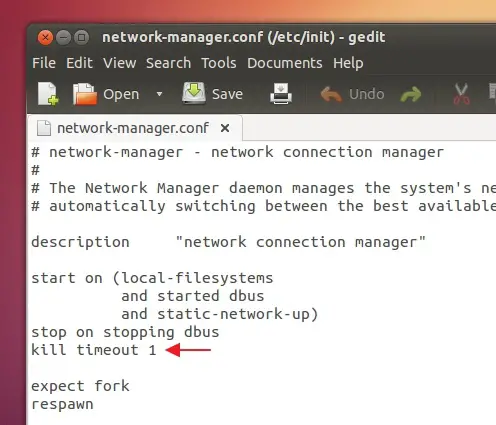
Once the configuration file is opened, copy and paste the below code, below the existing ‘stop on stopping dbus’, as shown in the below screenshot.
kill timeout 1
Then, save your changes, and close the configuration file.
Step 2:
I do not think the below step is necessary, but you can do the same to the ‘modem-manager’, just in case. For that, enter the below command.
gksudo gedit /etc/init/modemmanager.conf
Then look for the existing ‘stop on stopped network-manage’ text line, and simply paste the below code just below it.
kill timeout 1
Now, save your changes and close the configuration file. That’s it!.
Now try shutting down the computer, and if it was any of those services that were causing the slowdown, then hopefully, it will be fixed. Good luck.

Linux Lite 1.0.0


Jerry Bezencon has announced the release of Linux Lite 1.0.0, a beginner-friendly Ubuntu-based desktop Linux distribution with Xfce as the preferred desktop environment: "Linux Lite 1.0.0 'Amethyst' final for 32-bit systems with PAE support has been released. This distro was created for three reasons. One, to show people just how easy it can be to use a Linux-based operating system and to dispel myths about how scary Linux operating systems are. Two, to help create awareness about Linux-based operating systems. And three, to help promote this community. Linux Lite is free for everyone to use and share, and suitable for people who are new to Linux or for people who want a lightweight environment that is also fully functional." Read the rest of the release announcement for other interesting information. Download (MD5): linux-lite-1.0.0-i386.iso (874MB).

How To Fix A Broken System After Enabling The LightDM Display Manager In Linux Mint 13


If after enabling the LightDM display manager under Linux Mint 13 your system fails to start and you are unable to login, you can follow this tutorial which will show you a solution for fixing your system without the need to re-install Linux Mint 13. We will help you restore MDM as your default display manager so that you can login again to your session.

Getting Started

1. Boot your system using the Linux Mint 13 live CD/USB and select "Start Linux Mint" from the boot screen:


2. Wait now until your system is fully loaded, then open the start menu and open the Terminal:


3. Let's now identify the hard disk your system is installed on with this command:

 sudo fdisk -l

For my system, Linux Mint is installed in /dev/sda1


4. Run now this sequence of commands to mount your hard disk so that you have read/write permissions on your system files:

sudo mkdir -p /media/mint

sudo mount /dev/sda1 /media/mint

sudo mount --bind /dev /media/mint/dev

sudo mount --bind /proc /media/mint/proc

sudo mount --bind /sys /media/mint/sys

sudo chroot /media/mint

5. To switch back to the MDM display manager, run this command:

sudo dpkg-reconfigure mdm

6. Select "mdm" and press Enter:


7. Remove now Live CD/USB of Linux Mint 13 and reboot your system. The MDM display manager will now show up again:


How To Install And Enable Ubuntu's Unity Desktop On Linux Mint 13


In this tutorial, we will see how to install and enable the Unity interface of Ubuntu under Linux Mint 13. As you know, the Linux Mint 13 distribution is based on Ubuntu 12.04 (Precise Pangolin), so all packages we are going to install will be from the Precise repository.

1. Unity Installation

Via the command line, run the following commands to install the Unity desktop:

sudo apt-get install unity gnome-session

sudo apt-get install unity-2d-panel unity-2d-launcher

You can also install Ubuntu Software Center with this command:

sudo apt-get install software-center

2. Enabling Unity

Log out the current session, click the session button, select "Ubuntu" and click "Change Session", then log back in:


Here are some screenshots of Linux Mint 13 with Unity enabled:


Install Emays Conky On Ubuntu 12.10/12.04/Linux Mint 13


In this tutorial, we will help you install an amazing conky theme named Emays that will beautify your desktop. This desklet will display time, date, and some system information. Here is a screenshot of it:


If you haven't already installed Conky on your system, then run this command:

sudo apt-get install conky-all

Emays Conky Installation

Open the terminal and run these commands:

mkdir -p ~/.emays && cd ~/.emays 

wget http://goo.gl/mw4rF -O emays_conky.zip

unzip -q ema*.zip

Install now fonts with this command:

mkdir -p ~/.fonts

cp ~/.emays/Emays/Fonts/* ~/.fonts

To start Emays Conky, run this command:

conky -c ~/.emays/Emays/Conkyrc/conkyrc

Configuration

To change the position of the desklet on your desktop, edit this file:

gedit ~/.emays/Emays/Conkyrc/conkyrc 

Change now this line:

alignment top_left

To any of these options:

  • alignment top_right
  • alignment bottom_left
  • alignment bottom_right
Save your file and exit.

Emays Conky Removal

Via the terminal, run these commands:

rm -rf ~/.emays

rm -rf ~/.fonts/AMAZB*.TTF

rm -rf ~/.fonts/Janda*.ttf