

Monday, December 31, 2012
AgiliaLinux 8.1.1

AgiliaLinux 8.1.1 has been released. AgiliaLinux is a Russian Slackware-derived distribution with a custom, dependency-resolving package manager and support for several pre-configured desktop environments. Changes in this release include: fixed problems with dBUS in Openbox causing nm-applet to work incorrectly; fixed dcron - now it creates pid-file and rc-service crond restart works correctly; fixed the PHP build on x86_64 architecture; fixed calculation of required space during installation; added phonon-gstreamer to KDE without which there were problems with sound; support for fbdev video driver and modesetting in live mode; fixed a problem with hostname and NetworkManager; fixed problem with "grey faces" in YouTube and updated libvdpau to 0.5; Firefox now uses the default system language, not English; the mpkg package manager now always uses "safe" mode to update packages; updated Linux kernel to 3.6.11, Qt to 4.8.4 and KDE to 4.9.4.... Read the release announcement (in Russian) for a full list of bug fixes and other changes. Download: AgiliaLinux-8.1.1-x86.iso (3,011MB, MD5), Agilialinux-8.1.1-x86_64.iso (3,108MB, MD5).
Sunday, December 30, 2012
Drawers 12.12.2 Brings Improved Loading Speed for Large Drawers - Ubuntu 13.04/12.10/12.04
Drawers has been updated recently to version 12.12.2 bringing more new features and fixes. Drawers is an application that allows Ubuntu users to organize items in the Unity launcher by creating drawers (stacks) into which you can add and group your favorite programs, files/folders, and links with support of drag and drop.

The Drawer's window can also be customized via the Preferences menu:

New created drawers will be now added automatically to the Unity launcher, no need to do that manually. Here are the complete new features and changes in Drawers 12.12.2:
- New Item Properties Editor Dialog (allows icon selection)
- Quicklists for alternate execution of Drawer Items
- - Will import from newly added applications
- - Alternates can be added in Edit Properties dialog
- New Drawers are added to Unity Launcher Bar automatically
- - Preference dialog appears first to allow icon changes
- - Thanks to Bernhard Kaindl for code
- Color and Font Changes take effect immediately on closing preferences
- Improved loading speed for large drawers
- Locale support for application names
- New Translations added (German & Russian)
Drawers 12.12.2 Installation
To install Drawers 12.12.2 from PPA in Ubuntu 13.04/12.10/12.04, enter these commands:
sudo add-apt-repository ppa:ian-berke/ppa-drawers
sudo apt-get update
sudo apt-get install drawersSearch and open Drawers from the Unity Dash to start creating new stacks.
Drawers Removal
To uninstall Drawers from Ubuntu, enter these commands:
sudo apt-get remove drawers
sudo add-apt-repository --remove ppa:ian-berke/ppa-drawers
sudo apt-get update
20 Useful Terminal Commands and Tools that you May Need in Ubuntu/Linux Mint
Terminal is a text-based interface that grants users direct access to the UNIX system. You can use Terminal to run some specific commands, create files/folders, change system settings, and any other features that aren't available via programs with GUI.
In this article, I have collected 20 tools and commands that can be useful for Ubuntu/Linux Mint users. If you have more interesting commands or tools, you can mention them below.
1. Make An ISO From A Folder
If you want to make an iso file from a directory containing other files and sub-directories via the terminal, you can use the following command:
mkisofs -o image.iso -R /path/to/folder/
If you wish to backup the home folder, use this command:
mkisofs -o image.iso -R $HOME
2. Remove Non-Empty Folder
To remove a non-empty folder from the command line, you can use this command:
rm -rf /path/to/folder/
3. Checking Current CPU Architecture (32-bit or 64-bit)
To list your processor architecture in Ubuntu/Linux Mint, use one of these commands:
uname -m
or
arch
or
file /bin/bash | cut -d' ' -f3
4. Generate Random Passwords
To generate random passwords via the terminal, you can use the following commands:
a - makepasswd
makepasswd is a command line tool for generating passwords in Ubuntu/Linux Mint. Install it with this command:
sudo apt-get install makepasswd
To generate a password with 20 characters, enter this command:
makepasswd --chars=20
b- OpenSSL
You can also use OpenSSL to generate random passwords using this simple command:
openssl rand -base64 20
5. Check Uptime
To check for how long your computer or laptop has been running since you powered it on, issue this command:
uptime
To monitor system uptime in real-time, use this command:
watch -n 1 uptime
6. Check Information About Your Video Card
To list information about your graphics card (Nvidia, AMD, Intel, etc.), enter this command:
lspci -v -s `lspci | awk '/VGA/{print $1}'`
7. Download And Extract Tar Files In One Command
If you want to extract an archive file after being downloaded in a single command, you can use the following command for tar files:
wget URL-To-TAR-File -O - | tar xfz -
Here is an example:
wget http://garr.dl.sourceforge.net/project/multibootusb/MultiBootUSB_4.7.tar.gz -O - | tar xfz -
8. Block/Unblock Wifi/Bluetooth
To disable wifi or Bluetooth in Ubuntu/Linux Mint, we can simply use the rfkill command line tool. To deactivate wifi, enter this command:
rfkill block wlan
For Bluetooth:
rfkill block bluetooth
To unblock WiFi, enter this command:
rfkill unblock wlan
For Bluetooth:
rfkill unblock bluetooth
9. Check CPU Temperature
To get the current temperature of your processor, issue this command:
acpi -t
To check CPU temp in real-time, run this command:
watch -n 1 acpi -t
10. Change Read Speed Of A CD/DVD
Let's first get the maximum read speed of your optical drive with this command:
eject -X
To increase/decrease read speed of a CD/DVD inserted into your optical drive, enter this command followed by the desired speed:
eject -x 4
For more than one optical disc drive, use this command:
eject /dev/cdrom -x 4
11. Check RAM Speed
To check memory speed from the command line, run this command:
sudo dmidecode -t 17 | awk -F":" '/Speed/ { print $2 }'
12. Read/Write Speed Of A Hard Disk
To check read/write speed of your hard drive on the terminal, use this command:
sudo hdparm -tT /dev/sda
13. Monitor Network Usage
IPTraf is a command line utility that allows to monitor network activities in real-time. Install it in Ubuntu/Linux Mint with this command:
sudo apt-get install iptraf
Start monitoring using this command:
sudo iptraf
14- Downloading Websites
If you want to download an entire website via the terminal, enter this command:
wget --recursive --page-requisites --convert-links www.domain.com
15. Check Gmail Unread Messages
To check for unread messages in your Gmail account, use this command:
curl -u GMAILUSER --silent "https://mail.google.com/mail/feed/atom" | perl -ne 'print "\t" if //; print "$2\n" if /<(title|name)>(.*)<\/\1>/;'
16. Monitor HDD Temperature
Use hddtemp to monitor hard disk temperature on the terminal. Run these commands:
sudo apt-get install hddtemp
sudo hddtemp /dev/sda
17. Force Kill Apps
To force close an unresponsive software, run xkill from the terminal then click the software's window to close it.
18. Screen Recording
To capture your screen and record it in a video, use ffmpeg:
sudo apt-get install ffmpeg
ffmpeg -f x11grab -s wxga -r 25 -i :0.0 -sameq output.mpg
19. Check Current Kernel Version
You can simply use this command:
uname -r
20. Dtrx
The dtrx tool allows to extract most archive files without the hassle of memorizing the various extraction commands. To install it, run this command:
sudo apt-get install dtrx
Here are some examples:
dtrx file.zip
dtrx file.tar.gz
dtrx file.7z
Snowlinux 4 RC

Lars Torben Kremer has announced that the release candidate for Snowlinux 4, a Debian-based desktop Linux distribution with MATE, is now ready for testing: "The team is proud to announce the release of Snowlinux 4 'Glacier'. Snowlinux 4 is based upon Debian GNU/Linux 7.0 'Wheezy' and uses Linux kernel 3.5. MATE 1.4 is the default desktop environment and LightDM as the new default login manager that replaces GDM 3. Many new features were introduced, like snowMenu, the Snowlinux menu and snowMount, the Snowlinux mount tool for drives. The Snowlinux Metal theme was colored blue and the icon set was updated with the latest Faience icons. Snowlinux now uses Pidgin as the default IM client. This release comes with Firefox 17 and Thunderbird 17, LibreOffice, Rhythmbox and Shotwell." See the release announcement for more details and a screenshot. Download links (MD5): snowlinux-4-glacier-i386-rc.iso (980MB), snowlinux-4-glacier-amd64-rc.iso (1,008MB).
Saturday, December 29, 2012
Calculate Linux 13

Alexander Tratsevskiy has announced the release of Calculate Linux 13, a Gentoo-based distribution for desktops and servers: "We are proud to announce the final release of Calculate Linux 13. Main changes and fixes: meta-packages are no longer used to manage default dependencies; Portage files will be unpacked when booting for the first time; better identification of NTFS partitions; fixed the user profile configuration for VMware; Composite enabled by default for VMware; should you want to replace main applications, their launch icons will be created correctly; in case the user modified the local Portage overlay repositories, those can now be restored; Calculate Utilities were updated to 3.1; full French translation now available...." Read the rest of the release announcement for a full list of changes. Get your preferred edition from the distribution's mirrors or download the default "KDE" variants from here: cld-13-i686.iso (2,016MB, MD5, torrent), x86_64/cld-13-x86_64.iso (2,233MB, MD5, torrent).
Friday, December 28, 2012
Beautify your Desktop with Potenza, a New Icon Theme for Ubuntu/Linux Mint
Potenza is the name of the new icon theme that has been created by the Mystras team. This beautiful icon theme comes in two different colors for folders (blue and orange). In this article, we will see how to install this icon set in Ubuntu Unity or Gnome Shell, but the Potenza's author is working hard to make it compatible with most Linux desktop environments, you can support him here.
The PPA is available for these Ubuntu/Linux Mint distros:
- Ubuntu 13.04/12.10/12.04
- Linux Mint 14/13
To install Potenza and Potenza Orange in Ubuntu/Linux Mint, open the terminal and issue these commands:
sudo add-apt-repository ppa:upubuntu-com/potenza
sudo apt-get update
sudo apt-get install potenza-icons
You can use Gnome Tweak Tool to enable the different variants of Potenza, or enter these commands from the terminal:
- Potenza (default)
gsettings set org.gnome.desktop.interface icon-theme 'Potenza'
- Potenza Orange
gsettings set org.gnome.desktop.interface icon-theme 'Potenza-Orange'
Here are some screenshots of Potenza under Ubuntu Unity:
Potenza Removal
In case you want to uninstall Potenza from your system, enable another icon theme then run these commands:
sudo apt-get remove potenza-icons
sudo add-apt-repository --remove ppa:upubuntu-com/potenza
sudo apt-get update
Thursday, December 27, 2012
SMPlayer 0.8.3 Fixes Youtube Video Playback Problems - Ubuntu/Linux Mint
SMPlayer has been updated to version 0.8.3 recently which fixes YouTube playback problems. As a reminder, SMPlayer is a front-end for MPlayer capable of playing almost any media formats without the need to install any external codecs because it comes with built-in codecs. You can also use SMPlayer to search, play and download YouTube videos.


The PPA below is available for the following Ubuntu/Linux Mint distros:
- Ubuntu 12.10/12.04/11.10
- Linux Mint 14/13/12
To install SMPlayer 0.8.3 in Ubuntu/Linux Mint, open the terminal and enter these commands:
sudo add-apt-repository ppa:rvm/smplayer
sudo apt-get update
sudo apt-get install smplayer smplayer-themes smtube
SMPlayer Removal
To uninstall SMPlayer from your computer, enter these commands:
sudo apt-get remove smplayer*
sudo add-apt-repository --remove ppa:rvm/smplayer
sudo apt-get update
SMPlayer Home Page
Wednesday, December 26, 2012
Porteus 2.0 RC1

Ira McDaniel has announced the availability of the first release candidate for Porteus 2.0, a set of Slackware-based live images with a choice of KDE 4, LXDE, Razor-qt and Xfce desktop environments: "The Porteus community is excited to announce Porteus 2.0 RC1, the first development release of a new version for our standard and Xfce editions. Porteus is a lightweight, highly configurable and flexible live distribution based on Slackware that is optimized to run from USB drives, flash cards, CDs or other storage media. The 32-bit standard edition now ships with Razor-qt as the desktop environment, replacing Trinity/LXDE. Some of the more important changes from Porteus 1.2 include: bumped Linux kernel to 3.7.1 and userland to Slackware 14.0; switched to initramfs and added a second initramfs for PXE booting...." Visit the Porteus forum to read the full release announcement. Download: Porteus-v2.0-rc1-i486.iso (235MB), Porteus-XFCE-v2.0-rc1-i486.iso (198MB), Porteus-v2.0-rc1-x86_64.iso (224MB), Porteus-XFCE-v2.0-rc1-x86_64.iso (186MB).
Finnix 107
Ryan Finnie has announced the release of Finnix 107, a small, self-contained, bootable Linux CD distribution for system administrators, based on Debian's testing branch: "Today I am pleased to announce the release of Finnix 107, only two months from the previous release, but packed with new functionality and bug fixes. Finnix 107 includes Linux kernel 3.6, and includes a fix for the (overhyped, it seems) ext4 corruption bug. Average Finnix startup times have been reduced even further by the cleanup of legacy code. In addition, the shutdown procedure, which largely has not changed in years, got a revamp and is now noticeably quicker. The x86 ISO is now being built with the isohybrid method, meaning you can now write the ISO directly to a USB flash drive at the block level to boot it." Read the release announcement and release notes for further information. Download (MD5): finnix-107.iso (117MB, torrent), finnix-ppc-107.iso (117MB, torrent).
The reNIX Theme Ported To GTK 3.6, PPA Available For Ubuntu 12.10/Linux Mint 14
reNIX, an amazing GTK+ 3 theme, has been updated recently to work with Gnome 3.6 which can be now installed in Ubuntu 12.10 (Quantal Quetzal). This latest release also fixes some minor issues. reNIX is compatible with both Unity and Gnome Shell.

The PPA below is available for Ubuntu 12.10 and Linux Mint 14. To enable this theme, you may use Gnome Tweak Tool or any other tool of your choice.
reNIX Installation
To install reNIX from PPA, open the terminal and enter these commands:
sudo add-apt-repository ppa:upubuntu-com/gtk+3.6
sudo apt-get update
sudo apt-get install renix-gtk
reNIX Removal
In case you want to remove this theme from your system, switch to another theme, then issue this sequence of commands:
sudo apt-get remove renix-gtk
sudo add-apt-repository --remove ppa:upubuntu-com/gtk+3.6
sudo apt-get update
Friday, December 21, 2012
How to Monitor your Laptop's Battery Life Status in LXDE - Ubuntu/Linux Mint
If you install and enable the LXDE desktop environment under Ubuntu/Linux Mint, you will notice that the battery life status icon is missing which will prevent users from knowing the battery level of their laptops. In this tip, we will see how to use fdpowermon - a simple tool for monitoring battery power of laptops with ACPI - to display the battery life status icon in your taskbar.
To install fdpowermon in Ubuntu 12.10/12.04 or Linux Mint 14/13, open the terminal and run this command:
sudo apt-get install fdpowermon
Let's now configure fdpowermon to start automatically after you log in to your desktop. To do this, edit this file (replace gedit with your favorite text editor):
gksu gedit /etc/xdg/lxsession/LXDE/autostart
Append this line:
@fdpowermon

Save your file and exit. The battery status icon will now show up automatically at system startup:
Thursday, December 20, 2012
SparkyLinux 2.0.1

Paweł Pijanowski has announced the release of SparkyLinux 2.0.1, a lightweight Debian-based distribution featuring a customised LXDE desktop and plenty of games: "SparkyLinux 2.0.1 'GameOver'. No, it's not the end of the project. It's brand new release. This idea was waiting in my Tomboy for the whole year. Finally I got back to work and three weeks later it's ready to go. It was built on the latest release of SparkyLinux 2.0 and it's designed for games players. Many applications have been removed from the system and replaced by games. The main system is based on Debian 'Wheezy' and has LXDE as the default desktop. All packages has been synchronised with Debian's 'testing' repositories as of 2012-12-12. What's under the hood: Linux kernel 3.2, LXDE, Iceweasel, VLC, Leafpad, Pidgin, Transmission, XChat, Flash, Java, multimedia codecs, VLC plugin for Iceweasel...." See the release announcement for a full list of included games and a screenshot. Download: sparkylinux-2.0.1-gameover-i386.iso (3,913MB, MD5).
Stream Video and Music from PC/Laptop to Android - Ubuntu/Linux Mint
In this tutorial, we will explain how to make it easy streaming music and video from a PC or laptop to an Android device (smartphones, tablets, etc.) over a wireless network. We have previously done a tutorial for streaming videos from PC to iOS devices, you can check it here.
We will use under Ubuntu or Linux Mint (13.04/12.10/12.04, Mint 14/13 or older) the VLC Media Player, and in the Android device we will use VLC Direct Pro which allows to stream media contents from your computer to Android, it can be also used to control your VLC media player remotely.
Getting Started
1. Installing VLC Media Player & Configuration (Ubuntu/Linux Mint)
Let's first install the non-free-codecs package under Ubuntu/Linux Mint to be able to play media files on your Android device. To do this, open the terminal and issue these commands:
sudo -E wget --output-document=/etc/apt/sources.list.d/medibuntu.list http://www.medibuntu.org/sources.list.d/$(lsb_release -cs).list
sudo apt-get update
sudo apt-get -y --allow-unauthenticated install medibuntu-keyring
sudo apt-get update
sudo apt-get install non-free-codecs
Install now VLC Media Player with these commands:
sudo add-apt-repository ppa:videolan/stable-daily
sudo apt-get update
sudo apt-get install vlc
Start VLC and enable the web interface by opening View >> Add interface >> Web:

Minimize the VLC window, then check your IP address of your wireless (wifi) internet connection in the network manager, or run simply this command from the terminal:
ifconfig wlan | grep inet
Your wireless IP address will be listed after "inet addr":

This IP address will be used later with VLC Direct Pro on your Android-based device.
2. Installing VLC Direct Pro Free & Configuration (Android)
Search 'VLC Direct Pro Free' in Play Store and install it:

Launch the app now and in the setup wizard, don't tap "Next", just tap the "menu" button on your Android device and select Settings:

Tap now "Manual Configuration":

Tap "VLC Host":

Enter now the IP address of the wireless internet connection of your computer/laptop as explained above:

Leave VLC web interface port as is (8080).
Move back to the 'Preferences' menu and tap "Automatic Connection Wizard":

Tap "Start":

The app will now scan your computer or laptop to see if VLC Media Player is running. Once detected, tap the Target icon (top left corner) and change it to Android, then tap the Computer icon and browse your computer/laptop hard drive to locate the folder containing your media files to play them:


Your audio/video file will be now streamed to your Android device:

Enjoy!
Tuesday, December 18, 2012
Transmission 2.74 Released! Install on Ubuntu Enhancements for IPv6
And ‘now available a new update of the Transmission BitTorrent client, that give program version 2.74. For those who does not know, efficient BitTorrent client Transmission is a feature-rich use rather simple, which comes preinstalled in the desktop environment gtk-based (in particular Transmission is the manager torrent default Ubuntu). This release, in particular, is oriented towards strong improvements both for the integration of the program with the IPv6 protocol for the management of so-called “magnetic link”. But there is much more: just read the changelog is included below for realizing it!

All Platforms
- Fix a bug That prevented IPv6 addresses from being saved in dht.dat
- Better handling of magnet links That Contain ‘tr.x =’ parameters
- filtering of addresses used for uTP peer connections
- Whether or not a peer supports uTP connections
Mac
- Auto-grouping will not apply until torrents are demagnetized
- Tweak the inspector’s and add window’s file lists to avoid auto-hiding scrollbars overlapping the priority controls
- Fix potential crash When downloading and seeding complete at the same time
- Fix bug where stopped torrents might start When waking the computer from sleep
Web Client
- Fix a multi-file selection bug
- Fix bug where the upload and download arrows and rates would not Appear for downloading torrents
- Fix bug tracker When displaying the list
Install Transmission 2.74 on Ubuntu 12.04/12.10 (PPA and procedure manual)
If you want to use the PPA, below find the instructions to import and update Transmission. At the time of this writing, however, they are still outdated:
sudo add-apt-repository ppa: transmissionbt / ppa sudo apt-get

update sudo apt-

get install transmission
Since the PPA still pointed to the old version of Transmission,
proceed with the installation manual by source. Before proceeding,
however, I want to remind you that you can safely wait Transmission is
updated within the Ubuntu repositories and update the system easily
using the command
sudo apt-get

update sudo apt-get dist-upgrade
If you’re like me, and want to get programs from your system
immediately up-to-date , follow the instructions below! First install a
little ‘dependencies (yes, we’ll need it) and download the source
tarball of Transmission, with the commandsAt this point, let us go into source directory, compile the program and …. use checkinstall to install it, so you can comfortably manage in the future by USC / gdebi / dpkg / apt-get / aptitudesudo apt-get install automake build-essential autoconf libtool pkg-config libcurl4-openssl-dev intltool libglib2.0-dev libevent-dev-dev libminiupnpc libminiupnpc libappindicator-dev-dev checkinstall
cd / tmp wget
http://download.transmissionbt.com/files/transmission-2.74.tar.bz2
xvjf tar transmission-2.74.tar.bz2
cd / tmp/transmission-2.74

. / configure

make

sudo checkinstall
At this point we do not need the source directory (which will be
deleted automatically when you restart the system), but it is a good
idea to keep a copy Package. deb, so you can easily reinstall if
necessary. I will put on my desk!
cp / * tmp/transmission-2.74/transmission. deb ~ / Desktop /
Enjoy!Monday, December 17, 2012
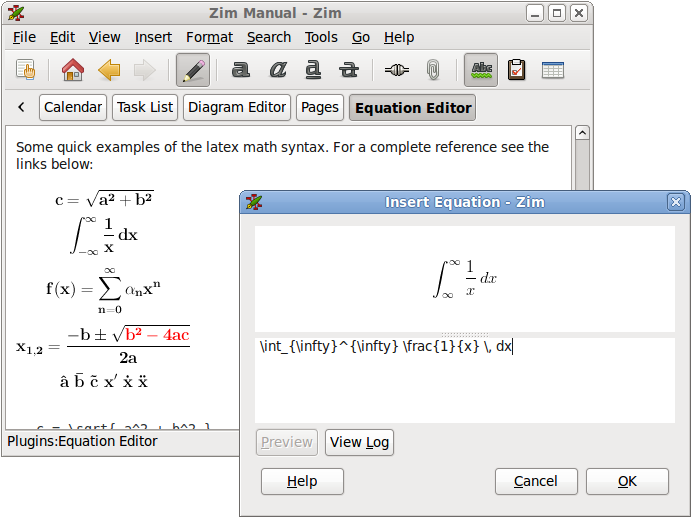
Zim Text Editor 0.58 Allows Now To Export LaTeX Equations - Ubuntu/Linux Mint

Zim has been updated recently to version 0.58 bringing more bug fixes, especially for the bug that prevented the application to start after crashing. This new release allows users to export LaTeX equations and interwiki links are now working fine.
If you have no idea about Zim, it's a graphical (WYSIWYG) text editor written in Python and GTK+ developed by Jaap Karssenberg who wants to bring the concept of a wiki to your Linux desktop. Zim is also considered a personal journal or to-do list.
It can also serve as a distraction-free writing tool that, for example, helps users write novels, short stories, or complex LaTeX equations for Math projects using the 'Equation Editor' plugin.
Zim allows simple formatting or markup for typed text (italics, numbered list, checkbox list, bullet lists, headings, etc.), insert/attach images, link to other wiki pages, etc. Here is a video explaining basic use of Zim:
For more information and features about Zim, click here.
In this article, we will see how to install Zim from PPA under the following Ubuntu/Linux Mint distributions:
- Ubuntu 13.04/12.10/12.04/11.10 (or older)
- Linux Mint 14/13/12 (or older)
Open the terminal and install it with the following commands:
sudo add-apt-repository ppa:jaap.karssenberg/zim
sudo apt-get update
sudo apt-get install zim
For bugs encountered while using this software, please report it here.
Zim Removal
To remove this text editor from your system, run the following commands:
sudo apt-get remove zim
sudo add-apt-repository --remove ppa:jaap.karssenberg/zim
sudo apt-get update
Friday, December 14, 2012
Install MultiBoot USB from PPA under Ubuntu 12.10/12.04 and Linux Mint 14/13
MultiBootUSB (aka Multi Boot USB) is a tool with GUI (user interface) written in Gambas that allows users to install and boot various Linux distributions from a single USB flash drive (USB key). Supporting 145 Linux distros including Ubuntu and its derivatives, Multi Boot USB can detect iso Images automatically with the possibility to delete any Linux distro whenever you want. You can visit the tool's home page here for more information.
MultiBootUSB screenshots:


The PPA below is available for these Ubuntu/Linux Mint distributions:
- Ubuntu 13.04/12.10/12.04/11.10
- Linux Mint 14/13/12
To install the latest version of MultiBootUSB from PPA (v6.0-1), open the terminal and issue these commands:
sudo add-apt-repository ppa:upubuntu-com/ppa
sudo apt-get update
sudo apt-get install multibootusbFor any bug encountered, report it here.
MultiBootUSB Removal
To uninstall MultiBoot USB from your system, run these commands:
sudo add-apt-repository --remove ppa:upubuntu-com/ppa
sudo apt-get remove multibootusb
sudo apt-get update
Install AMD Catalyst 12.12 from PPA in Ubuntu 12.10/12.04 and Linux Mint 14/13
AMD Catalyst 12.12 has just been released, coming with more bug fixes and is based on fglrx 9.01. We don't know much about this new release, but it generally improves support for more AMD graphics cards and Steam client for Linux.
In this tutorial, we will see how to install AMD Catalyst 12.12 from PPA or manually via the driver's .run file as shown below. The PPA is available for the following Ubuntu/Linux Mint distributions:
- Ubuntu 13.04/12.10/12.04
- Linux Mint 14/13
1. Automatic Installation
Open the terminal and issue these commands:
sudo add-apt-repository ppa:xorg-edgers/ppa
sudo apt-get update
sudo apt-get install fglrx-installer
It's recommended that you remove the xorg-edgers PPA to avoid installing unwanted packages on your system. You can remove it with these commands:
sudo add-apt-repository --remove ppa:xorg-edgers/ppa
sudo apt-get update
2. Manual Installation
Before installing a new AMD driver, we need first to uninstall the current one. To do this, run these two commands from the terminal:
sudo sh /usr/share/ati/fglrx-uninstall.sh
sudo apt-get remove --purge fglrx fglrx_* fglrx-amdcccle* fglrx-dev* xorg-driver-fglrx
For manual installation of the AMD Catalyst 12.12 driver, issue this sequence of commands:
sudo apt-get install unzip
cd /tmp && wget -c http://goo.gl/ytSAn -O 9.01-121106a-150335C-EDG_Direct.zip
unzip 9.01*EDG*.zip
chmod +x amd*9.01*.run
sudo sh amd*9.01*.run

When you finish the installation, run these commands:
sudo aticonfig --initial -f
sudo reboot
Thursday, December 13, 2012
LuninuX OS 12.10

Emmanuel Appiah has announced the release of LuninuX OS 12.10, an Ubuntu-based distribution with a customised GNOME Shell desktop interface: "It has been a long long long journey but we have made progress. The task to improve already good quality does not mean stop when it's good enough, it simply means make it better and with the release of LuninuX OS 12.10 'Quite Quail', you will see how much better it has been made. Some of the major changes are Opera as the default web browser with privacy plugins, boxes for virtual machines, OpenJDK and many more. You can download the release on the download page and as an option to purchase a USB/DVD media that will be mailed to you." Here is the brief release announcement. Download the live DVD images from SourceForge: LuninuXOS-12.10-Desktop-i386.iso (1,460MB, MD5), LuninuXOS-12.10-Desktop-amd64.iso (1,383MB, MD5).
Install WordPress 3.5 'Elvin' On Ubuntu 12.10/12.04 and Linux Mint 14/13
WordPress has been updated to version 3.5 having this codename 'Elvin' in honor of Elvin Jones (drummer). This new version comes with a new media manager and Retina support. Users of WordPress will have a new experience when uploading images and creating galleries thanks to the new image uploader.
WordPress 3.5 comes also with various tweaks and a new default theme (Twenty Twelve). You can find full features here. In this tutorial, we will see how to install this blogging and CMS platform under the following Ubuntu/Linux Mint distributions:
- Ubuntu 12.10/12.04/11.10 or older
- Linux Mint 14/13/12 or older
- Any other Ubuntu-based System
To be able to install WordPress 3.5 in Ubuntu/Linux Mint, we need to install a web server (Apache, PHP, MySQL, etc.). If you are following my previous tutorials, you will notice that I prefer to use the LAMP server, you can find here detailed instructions for installing it.
2. Creating A MySQL Database For WordPress
For GUI mode, I recommend that you use phpMyAdmin to create a MySQL database and user for WordPress. For CLI mode, you can run this sequence of commands (change text in red to reflect your own database configuration):
mysql -u root -p
create database wordpress;
CREATE USER 'wordpress-user'@'localhost' IDENTIFIED BY '12345';
GRANT ALL PRIVILEGES ON wordpress.* TO 'wordpress-user' IDENTIFIED BY '12345';
exit
The commands above will create these details:
- Hostname: localhost
- Database: wordpress
- Database User: wordpress-user
- Database User Password: 12345
Via the terminal, download and move the WordPress folder to /var/www/ with these commands:
cd /tmp
wget -c http://wordpress.org/latest.zip
sudo unzip -q latest.zip -d /var/www/
sudo chmod 777 -R /var/www/wordpress
sudo /etc/init.d/apache2 restart
Open now this link to start the web-based installation:
http://localhost/wordpress
NOTE: You can replace localhost with your server IP address.
In the first page, click Create a Configuration File:

Then follow setup instructions:


Tuesday, December 11, 2012
Slax 7.0

Tomáš Matějíček has announced the final release of Slax 7.0, a Slackware-based live CD with KDE 4.9.4 that fits onto a 220 MB CD: "I'm happy to announce the final release of Slax version 7.0, code name 'Green Horn'. After more than three years of silence Slax is back in action and is better than ever before. Slax 7.0 is the major update of the Slax Linux live operating system. It includes the newest Linux kernel, KDE 4 desktop, GCC compiler and lots of other stuff in a 210 MB download. Furthermore it's available in more than 50 localizations, so you can get a Slax that speaks your language. Big thanks to everybody who helped with development and testing. The work didn't end now, actually it rather just started. I'm going to prepare a modules section for the website and bring Software Center in Slax to life. The next step, however, is to start supporting buildscripts." Here is the brief release announcement with a screenshot. Download (MD5): slax-English-US-7.0-i486.iso (212MB), slax-English-US-7.0-x86_64.iso (219MB).
Saturday, December 8, 2012
ArchBang Linux 2012.12

Stan McLaren has announced the release of ArchBang Linux 2012.12, a new stable version of the project's lightweight desktop distribution based on Arch Linux: "ArchBang Linux 2012.12 is out in the wild. If you are already running ArchBang smoothly on your system then you don’t need to install the new release. This 2012.12 release is a full systemd version with our latest set of minimal packages and Openbox for the competent Linux user. A few changes for this release: Linux kernel 3.6.8; GnomishDark theme with Shakey-Stapler-Dark widget; updated Openbox menu; dbus-launch removed. ArchBang still plans to have four major releases per year. Due to upgrades and improvements to the Arch Linux system, ArchBang will continue to release unofficial test images between official releases to address changes and prevent excessive workarounds in installing and updating newly installed systems." Here is the brief release announcement with a screenshot. Download (MD5): archbang-2012.12.03-i686.iso (545MB), archbang-2012.12.03-x86_64.iso (548MB).
How To Run JNLP Files Under Ubuntu/Linux Mint

In this tutorial, we will show you how to run .jnlp files in a system running Ubuntu/Linux Mint. The extension jnlp (Java Network Launching Protocol) is used to launch and manage Java programs via the internet or network. If you have downloaded a *.jnlp file on your computer and don't know how to execute it, you can simply use javaws to run it.
Getting Started
To install javaws under Ubuntu 12.10/12.04 and Linux Mint 14/13 or older, open the terminal and run these commands:
sudo apt-get install icedtea-netx
Via the terminal, cd to the folder containing your plnp file and run this command:
javaws filename.jlnp
Example:
MSGViewer is an application that allows users to preview Microsoft Outlook MSG files in a Linux-based system. This application is packaged in PLNP file. To run it, you can use the following commands from the terminal:
cd /tmp
wget http://goo.gl/cTJwB -O launch.jnlp
javaws launch.jnlp
Subscribe to:
Posts (Atom)