Thursday, July 12, 2012

4 cool tricks to do with MPlayer


MPlayer is a very common tool in the Linux world, it is usually used for watching videos or running audios. However, MPlayer has many more features and options. Here are 4 cool tricks you can do with MPlayer:

Take screenshots from video

To manually take screenshots from a video ( for example, video.avi), you can open the terminal and run the following command:

 mplayer -vf screenshot video-file  
After you hit enter, MPlayer will start to run the video at its original resolution. To take screenshots of the video in any moment, you just need to press the letter "s". Each time you press "s", one screenshot will be taken.

Convert files into .wav format

You already know how to use ffmpeg to convert an audio file to .wav format and you can use MPlayer to do the task too. The cool thing about MPlayer is that you can directly convert the audio of a video file into a separate .wav file too. The command to do the trick is:
 mplayer input.avi -vc null -vo null -ao pcm:fast:waveheader:file=output.wav
Just replace input.avi with whatever video or audio file you want. With this command, MPlayer will ignore the video part and convert the audio part into a .wav file.

Play videos in the terminal

You can use MPlayer to play videos in the linux terminal. The drawback with this trick is that the video will be played in ASII mode so the video quality sucks. However, you will gain a lot of coolness points for this trick.

The command to play a video in the terminal will be:
mplayer -vo caca video.avi
If you want to watch the video in black and white color, the command will be:
mplayer -vo aa video.avi

Just replace video.avi with any other video you want.

Here is an example of a video running in the terminal:
 
 Create GIF images 
There are many tools to create animated GIF images and MPlayer is one of them. To create a GIF image from a video, the command you can use is:

mplayer video-file -ao null -ss 0:00:15 -endpos 15 -vo gif89a:fps=24:output=animated.gif -vf scale=400:280

Here is what the variables in this command mean:

"video-file": the video from which you want to create the GIF
"-ss 0:00:15" : when the GIF starts in the video, replace 0:00:15 with what you want
"-endpos 15": the length of the GIF, replace 15 with what you want
"gif89a:fps=24" : 24 here means 24 frames/seconds
"output=animated.gif" : change the animated.gif into the file name you want
"scale=400:280" : dimensions of the GIF

Here is an example of a GIF created with MPlayer:


*****************

Hope you find this article cool and useful.

Linux.org comes back to life


After several months of reconstruction, the popular Linux.org site quietly relaunched what it terms an "alpha release" on May 4.
Though the site's Twitter feed makes reference of an announcement to be made on May 7, no such announcement seems to be visible on the usual Internet news sources.
The new site seems to have much of the original content the old one did, as well as new articles that have been added since the site's soft launch in May. The site is still adding features: RSS feeds and inline commenting were added in mid-May, and more features are being hinted at.

rest here

KDE 4.9 Release Caters to Power Users


With the plethora of open source desktop environments available at the moment, it’s hard to keep track of all the different features sets. And since KDE, which has recently become my interface of choice, arguably enjoys less media love than alternatives such as GNOME and Unity, it seems only fair to highlight some of the feature changes in its next upcoming release, KDE 4.9. Read on for a look — and, just maybe, a few compelling reasons to give KDE a try.
To be honest, I’ve always had a bizarre uneasiness describing myself as a KDE user, a hesitancy I owe mostly to KDE developers’ obsession with inserting the letter “K” wherever possible. That’s a trait I associate with a certain producer of oversugared donuts, not to mention products such as “krazy” glue. It doesn’t make me think of quality software.
Nonetheless, amid all the confusion and upheaval that has struck the Linux world over the last couple years as a new generation of desktop environments — many of them a bit less mature than some might like — have hit the stage, KDE has just worked the best for me. And so it’s been my desktop environment of choice for several months now on my Ubuntu 12.04 system, although I keep Unity and GNOME Shell on hand as well just in case I need to remind myself why I switched to KDE.

Rest here

Install LibreOffice 3.5.5 On Ubuntu 12.04/Linux mint 13 (Maya)


A new version of LibreOffice has been released recently that comes full of many bug fixes and better stability. For further information about LibreOffice 3.5.5, you can visit this page. In this tutorial, you will get instructions for the installation of LibreOffice 3.5.5 under Ubuntu 12.04/Linux Mint 13 (Maya).


LibreOffice 3.5.5 Installation

To install LibreOffice 3.5.5 on Ubuntu 12.04/Linux Mint 13 (Maya), run these commands via the terminal:

sudo add-apt-repository ppa:libreoffice/ppa
sudo apt-get update
sudo apt-get install libreoffice

For better Gnome integration, it is recommended to install this package:

sudo apt-get install libreoffice-gnome

To enable Global Menu for LibreOffice, run this command:

sudo apt-get install --reinstall lo-menubar

LibreOffice 3.5.5 is now installed!

Install UNetbootin 577 From PPA In Ubuntu 12.04/Linux Mint 13 (Maya)


UNetbootin has been updated recently to version 577 which added support for more Linux distributions. In this tutorial, we will see how to install this latest version under Ubuntu/Linux Mint from our custom PPA. As a reminder, UNetbootin is an application with GUI that allows users to create bootable Live USB drives (flash drives) for most Linux distributions such as Ubuntu, Fedora, Debian, BackTrack, CentOS, openSUSE, etc.

WIth UNetbootin, you can either download distros from the Internet or use ISO files stored in your hard drive to create Live USB drives. For more information about this application, you can refer to this website.


UNetbootin Installation

To install UNetbootin 577 on Ubuntu 12.10/12.04/11.10/11.04 or Linux Mint 13 (Maya) or older, start the terminal and run these commands:

sudo add-apt-repository ppa:upubuntu-com/apps


sudo apt-get update


sudo apt-get install unetbootin

Linux Mint 13 RC KDE Edition Has Been Released


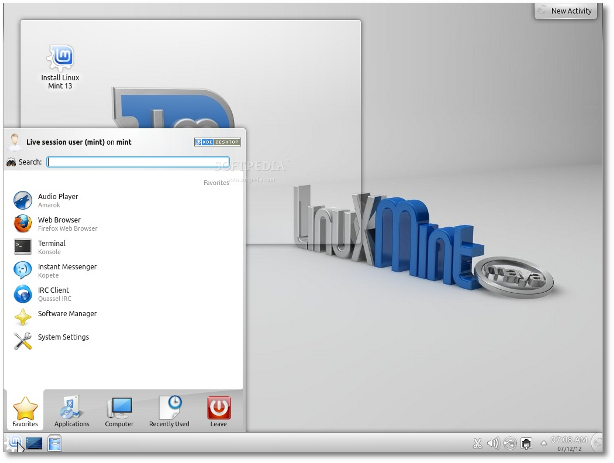
Clement Lefebvre, father of the Linux Mint project, announced earlier today, July 12th, that the Release Candidate of the upcoming Linux Mint 13 KDE Edition operating system is available for download and testing.  

Being based on Ubuntu 12.04 LTS (Precise Pangolin) and the Maya technologies, Linux Mint 13 RC KDE is built on top of the stable KDE Software Compilation 4.8.3 desktop environment, it is powered by Linux kernel 3.2, and includes applications like Mozilla Firefox 12, Amarok 2.5.0, KTorrent 4.1.3, GIMP 2.6.12, digiKam 2.5.0, Kaffeine 1.2.2, VLC 2.0.1, LibreOffice 3.5.3.

Highlights of Linux Mint 13 RC KDE:

· Based on Ubuntu 12.04 LTS;
· Linux kernel 3.2.0;
· KDE SC 4.8.3;
· MATE and mintMenu applets;
· Mint Display Manager;
· Artwork improvements;
· Search engines.


Review image
Linux Mint 13 RC KDE

The following system requirements are recommended by the developers for Linux Mint 13 KDE installations:

· An modern CPU (32-bit or 64-bit);
· Minimum 512 MB of RAM (1 GB of RAM is recommended);
· 10 GB of free hard disk space;
· Video card capable of 800x600 resolution;
· A DVD-ROM drive or USB port.

There's no official release announcement at the time of writing this, but Linux Mint 13 KDE RC is already available for download, distributed as Live DVD ISO images supporting both 32-bit and 64-bit architectures.

About Linux Mint

Linux Mint is and will always be an elegant, easy-to-use, up-to-date, 100% free and comfortable Linux operating system based on the very popular Ubuntu OS.

It offers paid commercial support to companies and individuals. Also, free community support is available from the forums and the IRC channel.


Download Linux Mint 13 RC KDE
 

Ubuntu 12.10 Gets Revamped Session Menu


With yesterday's updates, Canonical made some changes to the upcoming Ubuntu 12.10 (Quantal Quetzal) operating system, regarding the two panel indicators.

More exactly, the Fast-User Switching indicator has been removed and it is now integrated in the existing Session menu indicator.

That's not all, as the Session menu indicator has been completely revamped, and it now features the highly anticipated "Restart" option, and the "Displays", "Startup Applications" and "Software Up to Date" entries have been replaced with the "About This Computer" and "Ubuntu Help" entries.

Moreover, the "Lock Screen" entry has been renamed to "Lock", as you can see in the screenshot above, showing a before and after comparison of the Session menu indicator.

Overall, the panel now looks simple, awaiting new indicators. However, considering that Ubuntu 12.10 is in Alpha development stage, everything is subject to change.

Ubuntu One No Longer Supports Facebook Sync


Canonical announced yesterday, July 11th, on the Ubuntu One blog that they will completely remove support for Facebook from the Ubuntu One cloud storage.

I always thought that technologies are getting improved all the time with new features, but it looks like they are also regressing, as importing and syncing Facebook contacts option from the Ubuntu One web dashboard has been removed.

Users who already imported their Facebook contacts into the Ubuntu One web dashboard can still manually add new ones or edit the existing contacts.

"As we communicated back in December, we’re continuing to invest in our new data sync infrastructure U1DB. Therefore, we’ve been gradually turning off services that are reliant on the old infrastructure and providing little value to users in their current form."

"Contacts will also be one of the first services that we will build on top of our upcoming new data sync infrastructure." - was stated in the blog announcement.

Use MeMaker to create cool avatars


MeMaker is a simple open-source tool that allows you to create cool avatars to use in wherever you like, ie forums, facebook, twitter, chat room, image boards ... The package's size is very small but it has many options and features. You can choose various styles for your avatar: plazmoid, cocohead, artistic, glyphface,  animal-crackers, plastidudes and free-styles.  When creating your avatar, there are also many different types of hair, eye, mouth, face shape ... for you to choose to make your avatar unique. After finishing the avatar, you can save it as PNG, BMP, SVG or Gnome avatar. The exported images will have a transparent background.

Here is an avatar I created with the Freestyle style:


Use MeMaker to create cool avatars

And another one with the Artistic style:

create cool avatars with MeMaker

Since MeMaker is in the repository of Ubuntu and Linux Mint, if you are using one of these distros, you can search for it in the Software Center or use the following command to install it:
sudo apt-get install memaker

If you are using Arch Linux, here is the aur package of MeMaker

If you are using other distros, here is the source package of MeMaker