Showing posts with label USB. Show all posts

Monday, April 1, 2013

Install Chromium OS on USB Flash Drive with Ubuntu/Linux Mint


This article is for those who want to install and run ChromiumOS onto a USB storage device. Let us see how it can be done with the OS image.

Open the terminal and run these commands to download the ChromiumOS image to your home folder:
mkdir ~/ChromiumOS; cd ~/ChromiumOS
wget -c http://goo.gl/ICSpt -O ChromeOS-Vanilla-3274.0.zip
unzip ChromeOS*.zip
mv ChromeOS*.img ChromeOS.img
Run the following commands and to identify the USB device:
fdisk -l
If you mounted the USB flash drive as /dev/sdb1 on your system.  Use the command and unmount the USB device:
sudo umount /dev/sdb1
Use your USB device name and replace /dev/sdb1
Run the following command to create a bootable USB device with the Chrome OS image. It will delete all data from your USB device.
sudo dd if=ChromeOS.img of=/dev/sdb1 bs=4M
Or
sudo dd if=ChromeOS.img of=/dev/sdb1 oflag=direct
Boot from the Chromium OS USB flash drive after finishing the process. To boot from USB storage devices, you can use the Plop boot loader too. the ChromiumOS VM can download and use from http://goo.gl/G0ZSk when you fail to create a bootable USB stick.

Sunday, March 31, 2013

How to change directory and transfer files to USB with the command line


You will sometimes need to use the command line to access the USB and transfer files from or to it. This usually happens when something wrong happens to X or when you try to install everything from scratches like with Arch Linux. To change the directory or transfer files to a USB from the command line, you just need to know the name of the USB.

Just open the terminal and from your home folder, type:

 cd /media  

Then:
 ls  

And you will see the name of the USB and other mounted devices.

To change directory or transfer files to the USB or the mounted devices, just copy paste the name after /media like this:
 cd /media/name-of-USB  

In case the name of the USB has spaces, you will need to use the quote marks ("") around its name. Here is how it looks in the terminal in my box:


Friday, December 14, 2012

Install MultiBoot USB from PPA under Ubuntu 12.10/12.04 and Linux Mint 14/13


MultiBootUSB (aka Multi Boot USB) is a tool with GUI (user interface) written in Gambas that allows users to install and boot various Linux distributions from a single USB flash drive (USB key). Supporting 145 Linux distros including Ubuntu and its derivatives, Multi Boot USB can detect iso Images automatically with the possibility to delete any Linux distro whenever you want. You can visit the tool's home page here for more information.

MultiBootUSB screenshots:


The PPA below is available for these Ubuntu/Linux Mint distributions:

  • Ubuntu 13.04/12.10/12.04/11.10
  • Linux Mint 14/13/12
MultiBootUSB Installation

To install the latest version of MultiBootUSB from PPA (v6.0-1), open the terminal and issue these commands:

sudo add-apt-repository ppa:upubuntu-com/ppa 
sudo apt-get update 
sudo apt-get install multibootusb
For any bug encountered, report it here.

MultiBootUSB Removal

To uninstall MultiBoot USB from your system, run these commands:

sudo add-apt-repository --remove ppa:upubuntu-com/ppa 
sudo apt-get remove multibootusb 
sudo apt-get update

Monday, November 26, 2012

[How To] Install and Run Chromium OS onto a USB Flash Drive - Ubuntu/Linux Mint


In this tutorial, we will see how to install and run ChromiumOS onto a USB storage device using the OS image created by Hexxeh. The ChromiumOS image will be installed in a 4GB USB stick or higher in persistent mode. You can use the commands given below under Ubuntu/Linux Mint (12.10/12.04/Mint 14/13, etc.) and any other Linux-based system.

Getting Started

Open the terminal and download the ChromiumOS image to your home folder (precisely in the ChromiumOS folder) with these commands:


mkdir ~/ChromiumOS; cd ~/ChromiumOS 
wget -c http://goo.gl/ICSpt -O ChromeOS-Vanilla-3274.0.zip 
unzip ChromeOS*.zip 
mv ChromeOS*.img ChromeOS.img

Let's now identify the USB device by running this command:

fdisk -l

For my system, the USB flash drive is mounted as /dev/sdb1. Unmount the USB device with this command:

sudo umount /dev/sdb1

Note: Replace /dev/sdb1 with your own USB device name.

To create a bootable USB device using the Chrome OS image, run this command (all data in your usb device will be deleted):

sudo dd if=ChromeOS.img of=/dev/sdb1 bs=4M

or

sudo dd if=ChromeOS.img of=/dev/sdb1 oflag=direct

After you finish, boot from the Chromium OS USB flash drive. You can also use the Plop boot loader which allows to boot from USB storage devices. If you fail to create a bootable USB stick, you can download and use the ChromiumOS VM for VirtualBox from here.

Here are some screenshots of ChromiumOS:


Friday, November 23, 2012

How To Boot From Live USB in VMware Player/VirtualBox - Ubuntu/Linux Mint


In this tutorial, we will show you a way for making VirtualBox or VMware Player boot from live USB devices since this feature hasn't been implemented yet natively in both software. The trick we will use will rely on the Plop boot manager which allows via a live iso to boot from USB devices.


We will show you how to use the Plop boot manager with both VMware Player and VirtualBox under Ubuntu/Linux Mint (12.10/12.04/Mint 14/13, etc.).

Downloading the Plop Boot Manager

You can download the Plop iso file from here. Or Open the terminal and download the Plop iso image to your home directory with this command:

cd && wget -c http://goo.gl/sJoKf -O ploplinux-4.2.2.iso

1. Boot from Live USB in VirtualBox

We assume you have already created a VM (virtual machine), double click it to start it. Mount the USB stick (live USB) to VirtualBox by opening Devices >> USB Devices >> Your USB Device:


 If it is not available, then you may need to run this command from the terminal to be able to mount USB devices under Ubuntu/Linux Mint (replace username with your own user account name):

sudo adduser username vboxusers

Once your USB device is mounted in VirtualBox, look at the bottom of the VM's window, you will see a small CD icon, right-click it and select "Choose a virtual CD/DVD disk file":


Select now the plob iso file (ploplinux-4.2.2.iso) that you have downloaded:


Press Right CTRL+R to reset the VM and wait for Plop boot menu. If it didn't show up, reset the VM again and press F12 to bring up the boot menu, press c to boot from CD-ROM:


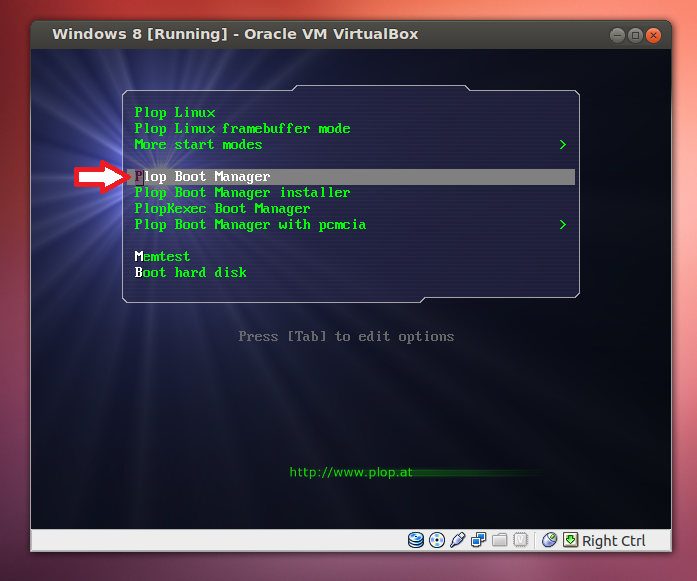
In the Plop boot menu, use your arrow keys to select the "Plop Boot Manager" option and press Enter:


Another menu will show up, select USB and press Enter to boot from the USB device:


2. Boot from Live USB in VMware Player

To boot from a live USB in VMware Player, we will also use the Plop boot loader. Start VMware Player, select any VM of your choice, then click "Edit Virtual machine settings":


Select the "CD/DVD (IDE) option, then in the right side, select "Use ISO image" and click the Browse button:


Open the Plop iso file and click Save:


Start now the VM and wait for the Plop boot menu. When it shows up, select Plop Boot Manager and press Enter:


In the next menu, select USB and press Enter to boot from the USB device:


Saturday, November 17, 2012

How to Enable USB Support in VirtualBox 4.2.x under Ubuntu/Linux Mint


If you find difficulties mounting USB devices in VirtualBox, then you need to install the VirtualBox Extension Pack, which is not installed by default, to add support for USB drives. Once installed, this extension pack will add support for USB 2.0 devices, RDP (VirtualBox Remote Desktop), and PXE boot for Intel network card.

In this tutorial, we will show you how to enable the VirtualBox Extension Pack for the latest version of VirtualBox (4.2.4). For older versions, you may download them from here.

Getting Started

Open the terminal in Ubuntu 12.10/12.04/Linux Mint 13 or older and download VirtualBox 4.2.4 Oracle VM VirtualBox Extension Pack with these commands to your home folder:


cd 
wget -c http://goo.gl/QETFV -O Oracle_VM_VirtualBox_Extension_Pack-4.2.4-81684.vbox-extpack

Open now VirtualBox and head to File > Preferences:


Open the Extensions tab, click the browse button and select the file that you have already downloaded in your home directory:


Another small window will appear, click Install, then accept the agreement (root password is required):


You have now successfully installed the VirtualBox Extension Pack for VirtualBox 4.2.4.

How To Configure VirtualBox (4.2.x) To Boot From A USB Device Under Ubuntu/Linux Mint


In this tutorial, we will see how to make VirtualBox (v4.2.x or older) boot from USB devices under a system running Ubuntu/Linux Mint. The method that we will use consists of mapping the USB device as a virtual disk and then mount it with VirtualBox.

If you haven't installed the latest version of VirtualBox under Ubuntu 12.10/12.04/Linux Mint 13, then do with the following commands:


 echo "deb http://download.virtualbox.org/virtualbox/debian $(lsb_release -sc) contrib" | sudo tee /etc/apt/sources.list.d/virtualbox.list 
wget -q http://download.virtualbox.org/virtualbox/debian/oracle_vbox.asc -O- | sudo apt-key add - 
sudo apt-get update 
sudo apt-get install virtualbox-4.2

1. Identifying Your USB Device

Connect your USB drive to your computer/laptop, then open the terminal and run this command:

 fdisk -l

or

 df -h

For my system, the USB stick is identified as /dev/sdb1:


Change /dev/sdb1 to your own usb flash drive name in the commands below.

2. Unmounting The USB Device

Via the terminal, run these commands:

sudo umount /dev/sdb1 
sudo chmod 666 /dev/sdb1

3. Boot From USB Device Under VirtualBox

Run now this command to map your usb drive as a disk image so that it can be mounted by VirtualBox:

VBoxManage internalcommands createrawvmdk -filename ~/.VirtualBox/usb.vmdk -rawdisk /dev/sdb1

The command above will create a disk image named usb.vmdk that will be associated with your USB flash drive (/dev/sdb1). Now, you can attach this vritual disk (usb.vmdk) to any of your current virtual machines.

Friday, November 16, 2012

How to Use your USB Flash Drive (USB Token) to Log into your PC under Ubuntu/Linux Mint


In this tutorial, we will help you create secure way for logging in with the help of your USB stick to your session. Once setup, you will no longer use your user account name and password to log in, just insert your usb device and click Log In:


To do this, we will use PAMUSB which is a module for PAM (Pluggable Authentication Modules) that allows users to have authentication from a USB device. It is compatible with many display managers (LightDM, GDM, etc.).

Getting Started

Open the terminal and run this command to install required packages under Ubuntu 12.10/12.04/Linux Mint 13:

sudo apt-get install pamusb-tools libpam-usb

Connect your usb flash drive to your computer/laptop and run this command to add it to PAM (the usb device will be detected automatically):

sudo pamusb-conf --add-device usb-key-name

Replace usb-key-name with any name of your choice. You will be prompted to save your configuration to /etc/pamusb.conf, type Y and press Enter:


Let's now add your username to PAM so that it will be granted access to your desktop via the USB drive. To do this, run this command:

sudo pamusb-conf --add-user username

Replace username with your own user account name. Or run this command which will detect automatically your current username:

sudo pamusb-conf --add-user=$USER

Type again Y and press Enter to save:


Edit now this file to make sure PAM is using the pam_usb library:

sudo gedit /etc/pam.d/common-auth

For Linux Mint, replace gedit with pluma. These lines must be available in /etc/pam.d/common-auth:

auth sufficient      pam_usb.so 
auth [success=1 default=ignore] pam_unix.so nullok_secure try_first_pass

Save your file and close. Next, run this command to check if the username you have added is authenticated to login with the USB device:

su username
or

pamusb-check $USER

If everything goes well, you will get these outputs:

$ su upubuntu 
* pam_usb v0.5.0 
* Authentication request for user "upubuntu" (su) 
* Device "upubuntu-usb-key" is connected (good). 
* Performing one time pad verification... 
* Regenerating new pads... 
* Access granted.

You can now log in to your user session without submitting your password as along as the USB device is connected.

Sunday, October 28, 2012

How To Create A Live USB For Ubuntu 12.10 Quantal Quetzal


In this tutorial, we will see three methods for creating a live USB for Ubuntu 12.10 Quantal Quetzal. Creating live USBs will be very useful mainly for users of netbooks, laptops, and tablets. This tutorial is also applicable for other Linux distributions (Linux Mint 13, Debian Squeeze, etc.).

Preparing The USB Flash Drive

To be able to install a Linux distribution on a USB stick, it's recommended that you format it as ext4, but you can choose any other file system. Let's first identify your USB device using this command:

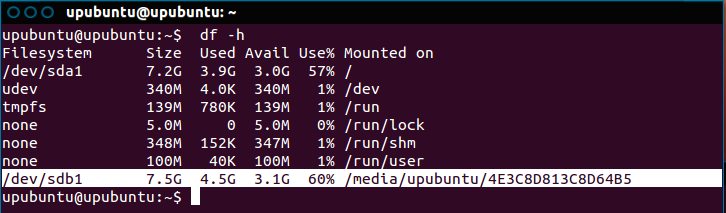
df -h

For my system, the USB drive is mounted as /dev/sdb1:


Change /dev/sdb1 with the name of your USB stick and run these commands to format it as ext4:

sudo umount /dev/sdb1

sudo mkfs.ext4 /dev/sdb1

If you want to format it as FAT32, run these commands:

sudo umount /dev/sdb1

sudo mkfs.vfat /dev/sdb1

Finally, remount your USB drive. See now below for ways to create a live Ubuntu USB.

1. Startup Disk Creator

If you are under Ubuntu, you can simply use Startup Disk Creator to create a live USB. Via Unity Dash, search and open Startup Disk Creator:


Click "Other" and select the Ubuntu 12.10 iso file, then click "Make Startup Disk":


2. UNetbootin

UNetbootin is a tool with GUI that allows users to create live usbs for various Linux distributions. To install it under Ubuntu/Linux Mint, run this command:

sudo apt-get install unetbootin

For RPM-based systems, you can install UNetbootin with this command:

sudo yum install unetbootin

From the main interface of UNetbootin, select "Diskimage" and click the browse button, then select the image of Ubuntu 12.10 from your hard drive:


Select now Type > USB Drive and Drive: /dev/sdb1, then click OK to create the live USB:


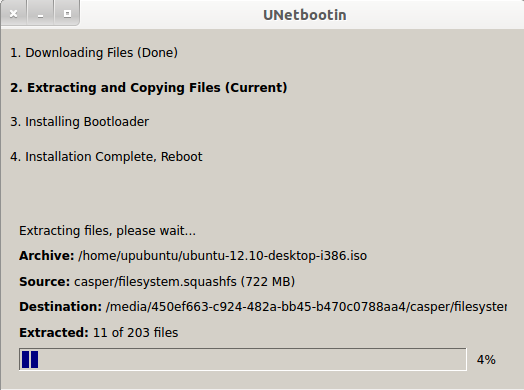
Wait now while your image is being exported to the USB drive:


At the end of the operation, reboot your system and boot from the USB drive.

3. Create a Live USB Via The Terminal

In the terminal, run this command to create a live usb for Ubuntu 12.10:

sudo dd if=/ubuntu-12.10-desktop-i386.iso of=/dev/sdb1 bs=1M

- /path/to/ubuntu-12.10.iso  --> Replace it with the full path to Ubuntu 12.10 iso image.
- /dev/sdb1 --> Replace it with the name of your USB drive.

Sunday, September 9, 2012

Arch Linux 2012.09.07


Pierre Schmitz has announced the availability of a new Arch Linux installer image, version 2012.09.07: "As is customary by now there is a new install medium available at the beginning of this month. The live system can be downloaded from the download page and used for new installs or as a rescue system. In addition to a couple of updated packages and bug fixes the following changes stand out: first medium with Linux kernel 3.5 (3.5.3); the script boot parameter works again; when booting via PXE and NFS or NBD the ISO image will be copied to RAM to ensure more stable usage; the live medium contains usb_modeswitch and wvdial which allows to establish a network connection using an UMTS USB dongle. Furthermore the newest versions of initscripts, systemd and netcfg are included. Here is the brief release announcement. Download: archlinux-2012.09.07-dual.iso (392MB, MD5, torrent). Don't miss the excellent installation guide that will guide you through the initial Arch Linux setup.