Showing posts with label Fix. Show all posts

Tuesday, November 20, 2012

How to Fix MBR or Damaged Partition Table under Ubuntu 12.10/12.04/Linux Mint 13


If you have boot issues which are caused by accidentally deleting a partition table, you can use TestDisk, which is a data recovery software that allows to find lost partitions and repair MBR or damaged partition table.

Here are some features of TestDisk:


  •    Repair partition table
  •    Recover deleted partition
  •    Recover FAT32/NTFS boot sector from its backup
  •    Rebuild FAT12/FAT16/FAT32/NTFS boot sector
  •    Repair FAT tables
  •    Fix MFT using MFT mirror
  •    Locate ext2/ext3/ext4 Backup SuperBlock
  •    Undelete files from FAT, exFAT, NTFS and ext2 filesystem
  •    Copy files from deleted FAT, exFAT, NTFS and ext2/ext3/ext4 partitions


In this tutorial, we will show you how to install and run TestDisk under Ubuntu/Linux Mint to repair your partition table or MBR.

Warning: Use TestDisk at your own risk! We are not liable for any misuse of this tool.

TestDisk Installation

Open the terminal and install TestDisk with this command under Ubuntu 12.10/12.04/Linux Mint 13 or older:

sudo apt-get install testdisk -y

TestDisk Uses

Via the terminal, you can start TestDisk with this command (root privileges required):

sudo testdisk

In the first screen, you will be asked to select whether you want to create a log or not. It is optional, so you can select any option from the list using the arrow keys, then hit Enter:


Select now the media you want to access (hard disk partition) and press Enter:


Select now the partition table type and press Enter:


Highlight now the "Analyze" option and press Enter to search for lost partitions:


At the bottom of the window, leave the "Quick Search" option highlighted and press Enter:


In the newt screen, you will get the structure condition of your disk:


Press Enter to continue, then highlight the "Write" option and press Enter to fix the partition table:


Quit now TestDisk and reboot your system:

sudo reboot

You should now re-gain access to your partition files.

Wednesday, November 14, 2012

How to Fix/Repair ATI Catalyst AMD Video Driver on Ubuntu 12.xx


ATI Catalyst drivers are blocking the system? Have you stopped abruptly installation of the latter, and now you can no longer use the X server Ubuntu 12.10 or Ubuntu 12.04 Precise Quantal? You “forced” a bit ‘too his hand, and your Catalyst refuse to work? Well, then this is just the guide for you: we will see how to restore the drivers AMD / ATI Catalyst using recovery mode Ubuntu.
Maybe you could think that that option boot system was there only as a formality, but it is not! The recovery mode has its uses: it is possible to perform diagnostics, recovery and system repairs regardless of the damage it caused during the various sessions of use. E ‘for this reason that, today, upubuntu suggests how to use the recovery mode if the ATI Catalyst drivers suddenly they stopped working, something that happens regularly – for example – after a change kernel or operating system upgrade.
First, the selection screen of GRUB, if we have a version of GRUB less than 2.0 we select
Into Our OS-with-our-kernel (recovery mode / recovery mode)
such as
Ubuntu, with 3.xx-y.generic (recovery mode)

and give ENTER. Or, if we GRUB 2.0, have to bring us in ”Advanced options for Ubuntu”: find there the recovery mode! (Small tip: if GRUB does not appear, start the computer by pressing and holding the SHIFT key after the BIOS POST).
Wait kernel initialization after that, in the next window, select ”Network” (will allow you to enable the network). The system will notify you that your disk will be remounted in read / write mode: you confirm and wait for the loading.
 How to Fix/Repair ATI Catalyst AMD Video Driver on Ubuntu 12.xx
At this point we get back to the main screen, hence selected root (Open a root shell) and dates sent. At this point, the steps are the same people who normally perform from terminal to install the ATI drivers. Eye could happen that the layout of the keyboard is the American one. First, for the avoidance of doubt, a moment update the system with the commands
Into sudo apt-get
update sudo apt-get upgrade

And now, let’s install the ATI drivers (the last are the 12.10) by following the steps in this guide.
After the procedure, we can exit the shell by typing the command of recovery
Into exit
And then selecting from the main window ”Resume” – “Restore normal startup.”

Saturday, October 27, 2012

How To Fix Unity and Wireless Problems After Upgrading To Ubuntu 12.10 (Quantal Quetzal)


In this little guide, we will introduce solutions for some problems related to Ubuntu's Unity interface (Dash and toolbar), window frames, and wireless connections that occur after upgrading to Ubuntu 12.10 (Quantal Quetzal). Before we start, you should know that these solutions may work for some users and some not.

1. Lost Unity Dash, Window Frames, and Top Panel

If Unity is not responding to user inputs after upgrading to 12.10 and window frames disappeared, you can try these fixes:

- For Nvidia graphics cards, try to reinstall nvidia-current with this command:

sudo apt-get install --reinstall nvidia-current

For  NVIDIA Optimus laptops, try to reinstall bumblebee with this command:

sudo apt-get install --reinstall bumblebee bumblebee-nvidia

Then reboot your system:

sudo reboot

- For ATI AMD graphics cards, try to remove the fglrx package with this command:

sudo apt-get autoremove fglrx --purge

Then reboot:

sudo reboot

If the fglrx package is not installed in your system, you can use these commands instead:

sudo apt-get autoremove fglrx-updates fglrx-amdcccle-updates --purge

sudo reboot

2. WiFi Stops Working After Upgrading To Ubuntu 12.10 (Broadcom Wireless cards)

You can fix wifi problems using two methods:

- Either connect to the internet via wired connection and run this command:

sudo apt-get update && sudo apt-get upgrade

Then reboot your system.

- Or use the following commands:

sudo apt-get install linux linux-headers-generic kernel-package

sudo apt-get install --reinstall bcmwl* firmware-b43-lpphy-installer b43-fwcutter

Finally, reboot your system.

If that didn't help, try these commands:

sudo apt-get remove bcmwl-kernel-source

sudo apt-get install firmware-b43-installer b43-fwcutter

sudo reboot


If you have something to add, please use the comment form below.

Monday, October 22, 2012

[FIX] Laptop's Touchpad/Trackpad Not Working On Ubuntu 12.10 Quantal Quetzal


In case your touchpad (aka trackpad) is not working despite having enabled it or re-installed its driver, you can follow this article which may solve your problem. In this tutorial we will see two solutions for enabling a laptop touchpad under Ubuntu 12.10 Quantal Quetzal. It is also possible to apply it on Ubuntu 12.04 or Linux Mint 13.

Solution  1

Open the terminal and enable the touchpad with this command:

gsettings set org.gnome.settings-daemon.peripherals.touchpad touchpad-enabled 'true'

Solution 2

If the first method is not working for you, you can try this tip:

- Via the terminal, list your devices with this command:

xinput --list

Here are the outputs returned for my laptop:

 ~$ xinput --list
⎡ Virtual core pointer                     id=2 [master pointer  (3)]
⎜   ↳ Virtual core XTEST pointer            id=4 [slave  pointer  (2)]
⎜   ↳ SIGMACHIP Usb Mouse                id=11 [slave  pointer  (2)]
⎜   ↳ ETPS/2 Elantech Touchpad           id=14 [slave  pointer  (2)]
⎣ Virtual core keyboard                   id=3 [master keyboard (2)]
    ↳ Virtual core XTEST keyboard          id=5 [slave  keyboard (3)]
    ↳ Power Button                     id=6 [slave  keyboard (3)]
    ↳ Video Bus                        id=7 [slave  keyboard (3)]
    ↳ Video Bus                        id=8 [slave  keyboard (3)]
    ↳ Sleep Button                      id=9 [slave  keyboard (3)]
    ↳ USB2.0 0.3M UVC WebCam           id=10 [slave  keyboard (3)]
    ↳ Asus Laptop extra buttons            id=12 [slave  keyboard (3)]
    ↳ AT Translated Set 2 keyboard          id=13 [slave  keyboard (3)]

- My touchpad is identified as id=14 (change it with yours), you can get more info about it with this command:

xinput --list-props 14

If it is disabled (0), you will get these outputs:

 xinput --list-props 14Device 'ETPS/2 Elantech Touchpad':
Device Enabled (137): 0

- To enable the touchpad, run this command (replace 14 with your own touchpad ID):

xinput set-int-prop 14 "Device Enabled" 8 1

Saturday, September 29, 2012

[FIX] Ubuntu Keeps Forgetting My Wireless (WiFi) Connection Password / Key - Ubuntu 12.10/12.04


Whenever I restart my computer, Ubuntu asks again for my wireless connection password / key. This also happens even when I set the password to be remembered. If you want to solve this problem under Ubuntu 12.10/12.04, then follow these simple instructions:

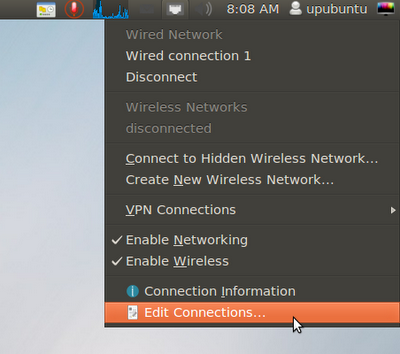
- Click the network icon displayed on the upper panel of Ubuntu and select "Edit Connection":


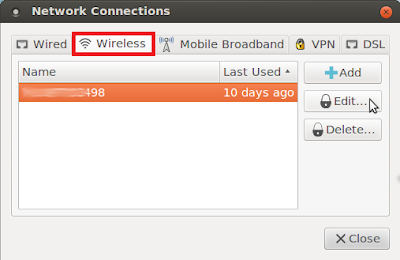
- Open the "Wireless" tab, select your wifi connection and click Edit:


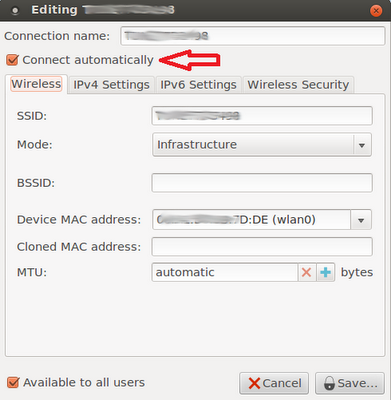
- Make sure now that "Connect automatically" is checked on:


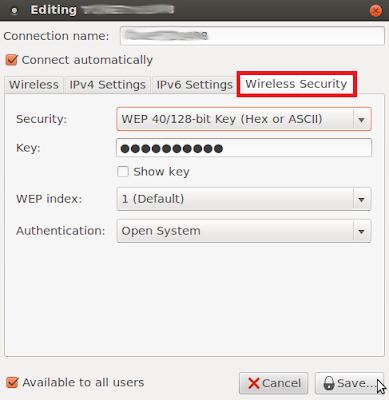
- Next, open the "Wireless Security" tab and enter these details, then click Save:

Security:   WEP 40/128-bit Key (Hex or ASCII)

Key:   Enter your wifi password


From now on, your wifi password will be remembered whenever you reboot your system.

Friday, September 28, 2012

How To Fix A Computer That Won't Restart On Ubuntu 12.10/12.04/Linux Mint 13


If you can't restart your computer under Ubuntu/Linux Mint and the screen turns black with no response after clicking the Restart button, you can follow this tutorial which may solve your reboot issues. This problem is common for owners of laptops or netbooks due to hardware/BIOS problems.

Getting Started

Open the terminal and edit this file under Ubuntu 12.10/12.04/Linux Mint 13:

sudo gedit /etc/default/grub

For Linux Mint, run this command:

sudo pluma /etc/default/grub

Find now this line:

GRUB_CMDLINE_LINUX=""


Replace it with this one:

GRUB_CMDLINE_LINUX="reboot=efi"


Save your file and close, then update Grub with this command:

sudo update-grub

Reboot your system, then try to restart your system to see if it works or not. If this is not working for you, repeat the same steps and try one of these lines instead:

GRUB_CMDLINE_LINUX="reboot=bios"

or

GRUB_CMDLINE_LINUX="reboot=acpi"

or

GRUB_CMDLINE_LINUX="reboot=pci"

If you have more solutions for reboot issues, please mention them in the comment form listed below.