Showing posts with label Google. Show all posts

Monday, February 4, 2013

How to Schedule Pins on Pinterest Using Pingraphy


One of the techniques I use most when managing my social media accounts is automation. I love using Buffer to schedule posts for Twitter, LinkedIn, and my Facebook page. I also use HootSuite from time to time to schedule posts for Google+.

When it comes to Pinterest, there aren’t many tools available for scheduling your posts. Pingraphy is a “Pinterest management tool for brands” that can help you schedule pins, among other things.
You can check out the other features after creating your account. For now, let’s see how to schedule pins on Pinterest via Pingraphy.
1. Log in to Pingraphy using your Pinterest email and password. For those of you using Facebook or Twitter to log in, there doesn’t seem to be a way to log in using those methods; you’ll need to create an account on Pinterest using your email.
2. Drag the Pingraphy bookmarklet to your bookmarks bar.
Drag the Pingraphy bookmarklet to your bookmarks bar.
3. When you find an item or items that you want to pin, click on the Pinography bookmarklet and choose the item(s).
4. Once you click on the “next” button, another window will pop up. Here, you can choose the board that the item(s) should be pinned to. You can also edit the description and URL of each item if needed.
Customize your pin and choose to upload now or schedule for later.
5. Finally, choose to “upload now” or “schedule” the pin.
6. When you click on “Schedule,” you’ll be able to choose a start time, interval between each pin (if you’re adding more than one item), and time zone.
Pingraphy is obviously set up to schedule pins in bulk (i.e. you can select more than one image at a time), which is why you can choose a start time and interval. If you only have one item to schedule, you can leave out the interval.
Customize your pin schedule on Pingraphy.
7. You can also enhance your images by adding effects, changing the orientation, cropping, changing the brightness, and more.
Enhance your images on Pingraphy.
8. Once scheduled, you can see your item(s) on the Pingraphy dashboard, along with the time(s) they’ll get posted.
View your scheduled pins and recent uploads on the Pingraphy dashboard.
From what I’ve gathered, there doesn’t seem to be a limitation to the number of pins that you can schedule. As you can see, with Pingraphy it’s really easy to schedule pins from anywhere on the Web.

Tuesday, January 29, 2013

Back Up Your Google Account to Your Mac with CloudPull


Do you use all or most of Google’s services on a regular basis? If so, I’m sure you’ll find a backup service like CloudPull extremely helpful. CloudPull is a Mac app that can back up your Google account to your Mac, which conveniently makes your information available for offline use and access. Additionally, it supports multiple accounts.
CloudPull supports: Gmail (and Google Apps email), Google Contacts, Google Calendar, Google Drive, and Google Reader. It will perform a backup every hour, and “maintain old point-in-time snapshots of your account for 90 days.
The cool thing about using CloudPull to back up your Google account is that the backups are created in standard file formats. This means that your items can be easily imported into Apple programs. For instance, your email messages can be imported into Apple Mail. Likewise, your contacts can be imported into Apple Contacts, calendar events can be imported into iCal, etc.
If you’re ready to get started, here’s how to back up your Google account with CloudPull Free.

Setup and Usage

1. Install CloudPull from the Mac App Store and open it.
2. On the welcome screen, you can choose to subscribe to CloudPull news alerts and/or be added to their mailing list.
Welcome to CloudPull, subscribe to news alerts.
3. On the next screen, you can choose to run CloudPull automatically when you log into your Mac, or you can run it manually when you choose to.
Choose to run CloudPull automatically or manually.
4. On the next screen, you’ll need to enter your Google account email address and password. You will also need to select the services that you want backed up.
Enter your Google account credentials and choose the services to back up.
Note: You will need to have IMAP enabled in your account in order to back up your email. Your Inbox, Sent Mail, Drafts and All Mail system labels will also need to have the “show in IMAP” option selected.
Make sure your system labels have the 'show in IMAP' option enabled.
5. Afer you click on “continue,” your username and password will be verified. You will then choose the labels from your Gmail or Google Apps email account that you want CloudPull to back up.
Choose the labels to backup in your Gmail or Google Apps account.
6. Finally, CloudPull will begin to pull in your data. If you have a large amount of data, this could take awhile. If you’re like me and have a really slow Internet connection at home, then of course it can take hours for your initial backup to finish.
CloudPull will pull in your data from Google and save it.
7. Your items can be accessed and organized via CloudPull’s email-like interface. Each item type will have its own set of options. All items can also be opened in their respective Apple applications (i.e. email in Apple Mail, contacts in Google Contacts, etc).
Your backed up items can be viewed offline and opened in their respective Apple programs.

Final Thoughts

CloudPull is an awesome way to back up your Google account and organize it in a user-friendly interface, but there are a few cons to the service. For starters, this is the free version. If you want to upgrade to the Premium version, it will cost you $10.
The free version of CloudPull only allows you to back up one Google account. So power users like me (with 4 different Google accounts), will not benefit much from the free version. The Premium version supports up to 10 different Google accounts.
The Premium version also has the option to run CloudPull as a background application; meaning it can run without appearing in the Dock or Force Quit window. Whatever you decide, you can’t deny that this is a handy app with a lot of benefits.
How do you backup your Google data?

Wednesday, January 23, 2013

How to Preview Links Before Clicking in Google Chrome


Have you ever wished you could see what was behind a link before clicking on it?
When using Google Chrome to browse the Web or read a social networking site like Facebook or Google+, a feature that will let you preview links can really come in handy.
If you’re looking for an easy way to preview a link before clicking on it, look no further. There’s a neat extension for Chrome that allows you to do just that.
1. Install the SwitftPreview extension.
2. Head over to the options page by right clicking on the SwiftPreview browser icon and selecting “options.”
3. In options, you can customize the preview window’s width and height. If you prefer, you can even make the preview fit to your window.
SwiftPreview's options page.
4. By default, you can see a link preview by just hovering over the link – after a slight delay. In options you can change this behavior so that you have to hold down the shift key to see a preview instead.
5. Once you’re done setting up the options, you can browse to any Web page to test it out. When you hover your mouse over a link (short or long), you should see a preview after a few seconds (or long if you’ve changed it in the options).
Pin link previews to your window with SwiftPreview.
6. You can pin the preview to your window by clicking the CTRL key on your keyboard. This way it won’t disappear when you move your mouse away from the link.
7. You can also block link previews on individual domains by clicking on the browser icon from that domain. SwiftPreview will be immediately disabled on that domain; you can click the browser icon again to re-enable it for that domain.
That’s it’s! SwiftPreview is definitely not the only tool that can help you preview links in Google Chrome, but it’s simple and does the job well. You’ll save time and clicks.

Wednesday, January 9, 2013

Retro Game Boy Modified into an Android Gamepad


There are tons of great retro game emulators for the Android platform, put using the touch screen as a game controller is a lackluster solution. This fun electronics hack turns an old Game Boy into a case/controller for your phone.
Courtesy of Chad Boughton, this hack merged the guts of a Wiimote with the case of an old Gameboy. Just clip your phone into the bracket in the top of the Game Boy case, link the two by Bluetooth, and enjoy a beefier and more tactile controller for your games.
If you want the same experience without the destruction of a perfectly good Wiimote and all the DIY work involved, you may want to check out the MOGA system, a very similar (but commercially produced) system for Android phones–just make sure to download the unlock app to use it with the emulator of your choice.

Thursday, November 1, 2012

Install Google Earth 7 In Ubuntu 12.10/12.04/Linux Mint 13

 
In this tutorial we will help you install Google Earth 7 in Ubuntu/Linux Mint. This latest version includes more exciting new features such as 3D imagery and tour guide. These features allow the user to view some cities in 3D which will be amazing for owners of HDTV and widescreen monitors. For more information about this latest release, click here.

The installation will be for the following Linux distributions:


  • Ubuntu 12.10/12.04/11.10
  • Linux Mint 13/12
  • Debian 6.0 Squeeze
Google Earth 7 Installation

In a 32-bit system, issue these commands from the terminal:

sudo apt-get install lsb-core 
cd /tmp 
wget -c http://goo.gl/YEqTf -O google-earth-stable_i386.deb 
sudo dpkg -i google-earth-stable_i386.deb
For 64-bit systems, run these commands:

sudo apt-get install lsb-core 
cd /tmp 
wget -c http://goo.gl/t6E3i -O google-earth-stable_amd64.deb 
sudo dpkg -i google-earth-stable_amd64.deb

You can also download Google Earth from its website here.

Tuesday, October 30, 2012

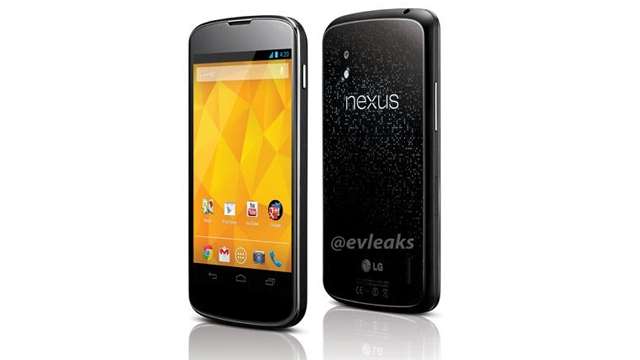
Google announces Nexus 4 phone, Nexus 10 tablet and HSPA+ Nexus 7

 
Google may have cancelled today's event due to hurricane Sandy, but they've still gone ahead with announcing the Nexus 4 smartphone built by LG and the Nexus 10 tablet build by Samsung. Both devices come with Android 4.2 which adds Gesture Typing, allowing users to glide fingers over letters to type, support for wireless display, allowing users to watch movies and play games on a Miracast-compatible HDTV, and multiple user support (on tablets).
Nexus 4


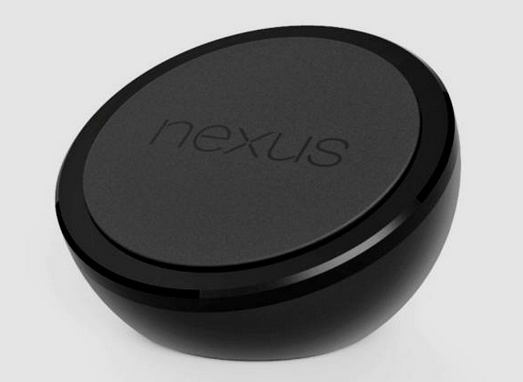
The Nexus 4 features a 4.7-inch 1280 x 768 IPS display (320ppi), a 1.5GHz quad-core Snapdragon S4 Pro processor, 2GB Of RAM, a 1.3 megapixel front facing camera, 8 megapixel rear camera, up to 16GB of storage, NFC, Bluetooth, and wireless charging via Google's new Wireless Charging Orb (see image below). The back is made of glass and features a sparkley pattern underneath the surface.

The device will go on sale unlocked for $299 with 8GB of storage and $349 with 16GB from the Google Play store in the U.S., U.K., Australia, France, Germany, Spain and Canada on November 13. T-Mobile will also sell the device unlocked for $199 on a two-year contract.
Nexus 10

The Nexus 10 is a 10-inch tablet with a resolution of 2560 x 1600, which comes in at a whopping 300ppi. It features a dual-core ARM Cortex-A15 chip with a quad-core Mali T604 GPU, 2GB of RAM, a 5-megapixel camera on the back, a 1.8 megapixel camera on the front, dual-front facing speakers, micro HDMI, micro USB, two NFC chips, and a 8,000mAh battery, that Google says should latest around 9 hours of HD video playback.
The Nexus 10 will go on sale on November 13 on Google Play in the U.S., U.K., Australia, France, Germany, Spain, Canada and Japan. 16GB will cost $399 and 32GB will cost $499.
Nexus 7 32GB and mobile data


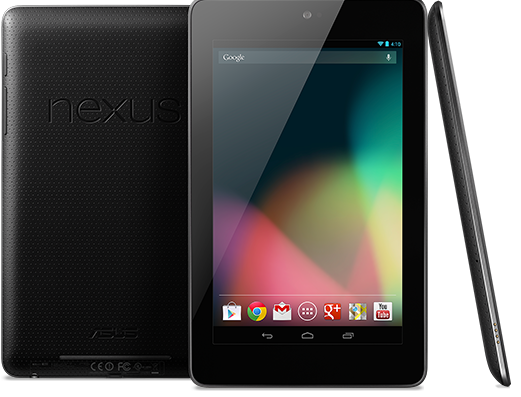
Google also announced a 32GB version of its Nexus 7 tablet for $249, along with a 32GB version with HSPA+ mobile data for $299, which can operate on more than 200 GSM providers worldwide according to Google.

Sunday, October 28, 2012

Ubuntu 13.04 Will Run on the Google Nexus 7 Tablet


Jono Bacon announced yesterday, October 26th, on his personal blog that the upcoming Ubuntu 13.04 (Raring Ringtail) operating system will support the Nexus 7 tablet from Google. 
 The Ubuntu Developer Summit for Ubuntu 13.04 will start next Monday, on October 29th and the development team is preparing to give attendees a demonstration of Ubuntu OS on the Google Nexus 7 tablet.

“A core goal for Ubuntu 13.04 is to get Ubuntu running on a Nexus 7 tablet. To be clear, this is not going to be a tablet Unity interface running on the 8/16GB Nexus 7,” said Jono Bacon on his blog.

“But instead will focus on getting the current Ubuntu Desktop running on the Nexus so that we can ensure pieces such as the kernel, power management and other related areas are working effectively on a tablet device.” he continued.

However, the good news is that Canonical already tested the Ubuntu 12.04 LTS (Precise Pangolin) and Ubuntu 12.10 (Quantal Quetzal) releases on Nexus 7, and they provide a native installer for it, called Ubuntu Nexus 7 Desktop Installer, with step by step installation instructions (with screenshots).


 Unfortunately, we don’t have a Google Nexus 7 tablet so we can test the Ubuntu operating system on it, but from the Ubuntu Wiki page above it looks like the installation is pretty simple. Basically you’ll have to add the PPA for the installer, unlock your tablet, and install Ubuntu on Nexus 7.

If you don’t have a Nexus 7 tablet from Google and you want to buy one, just in case you would like to install Ubuntu on it, please visit its official website.

Don’t forget to visit our website next week, as we will cover the entire Ubuntu Developer Summit for Ubuntu 13.04 event and give you all the latest news from the Canonical world.

Install Insync Google Drive Client on Ubuntu or Linux Mint


Insync caters to power and business users who have different needs from the average consumer — needs that are not being fulfilled by Google Drive.
Insync, an unofficial Google Drive client for Linux, is now available in a repository for Ubuntu, Linux Mint and Debian users and it's recommended you add since you'll get automatic updates.

Changes in latest version:

  • fixed symlinks not live syncing (before you had to restart Insync for changes to be detected)
  • Nautilus context menu will not show outside of the Insync folder.
  • Applets now have a pause/resume button to start/stop Insync from downloading and uploading.
  • Gdocs are now downloaded in Open Document Format
  • Built with Debian, fixes GLIBC error for Debian users.

Add Repository in Ubuntu:
echo "deb http://apt.insynchq.com/ubuntu $(lsb_release -cs) non-free" | sudo tee /etc/apt/sources.list.d/insync.list

Add Repository in Linux Mint:
echo "deb http://apt.insynchq.com/mint $(lsb_release -cs) non-free" | sudo tee /etc/apt/sources.list.d/insync.list

Add Repository in Debian:
echo "deb http://apt.insynchq.com/debian $(lsb_release -cs) non-free" | sudo tee -a /etc/apt/sources.list

After adding repository enter following commands for import key and apt update
wget -O - https://d2t3ff60b2tol4.cloudfront.net/services@insynchq.com.gpg.key | sudo apt-key add -
sudo apt-get update

Now install Insync Drive:
- For Unity (AppIndicator)
sudo apt-get install insync-beta-ubuntu

- For Gnome-Shell
sudo apt-get install insync-beta-gnome

- For Cinnamon
sudo apt-get install insync-beta-cinnamon

- For Kde4
sudo apt-get install insync-beta-kde

Download insync for other distributions.

Wednesday, September 19, 2012

Google Earth 6.2.2.6613 Review


Building a software that can catalog an entire planet is not a feat for everyone, and if there is someone out there who is up for the task, then Google is surely the only company capable to do it.

Sure, many have tried to encompass the entire Earth in a single application in the past, but the sheer size of the software would have made this task almost impossible. More importantly, whatever software someone would use, such as an Encyclopedia, it would never cover places that had no special significance.


Many of us are now used with Google Earth, but we must keep in mind that back in 2005, when it was first launched, it made a big impact. Its arrival was made possible by the advent of high-speed Internet which permitted the fast streaming of images.

We have to give credit where it's due. Google did not built this from scratch, but bought a company in 2004, called Keyhole Inc., which at that time was developing a software called EarthViewer 3D. The company was funded by non-others than the CIA.

How they managed to buy it with the approval of the government is beyond me; maybe CIA needed to expand the software and Google had enough money and man power to do this.

Installation

Depending on your operating system, you might have the Google Earth package in your repository. If not, Google provides packages for everyone, including Debian-based operating systems and Red Hat based ones. Both 32-bit and 64-bit architectures are supported.

We've installed it in Ubuntu 12.04 LTS (Precise Pangolin) by downloading the Debian package from the official website. You will need a lot of dependencies so just run the following commands in a terminal, one by one, and everything should be just fine:

sudo dpkg -i google-earth-stable_current_i386.deb
sudo apt-get -f install


You should now have Google Earth installed and available from Unity or from your Application menu.

Usage

The number of features crammed in this software is amazing. It would take dozens of pages to go through all of them and in the end no one would understand much of it.

Let's start with the basics. Google Earth is a software that renders the surface of the planet (and more) with the help of satellite imagery, from a myriad of sources.

The software can be used as a simple map, searching for locations, plotting routes, and even zooming in at street level. I actually used it a couple of times to find remote interesting ski resorts and even found accommodation with it. It's very versatile and it estimates arrival time with great accuracy.

On top of this fundamental function, there are a lot of implemented layers. You can activate all of them or one at a time. Some are quite basic such as country borders, roads, gallery, photos (including the Panoramio service and 360Cities), 3D buildings (an amazing feature that is beautifully integrated with StreetView), Global Awareness, and many more.

Besides the obvious use, there are a lot of functions that are almost never used, and the average user has no idea that they exist. First off, there's the flight simulator, where users define a starting point and start flying over the landscape in a simple, but relatively correct, flight simulator. A joystick is required for precise flying, of course.

Another important function is the Sky Mode, where users can switch from viewing the Earth in the exactly opposite position, and start looking at the stars. The star charts are amazing and actual images are used to render the sky, including nebulae, galaxies and even star systems.

The planet Mars and the Moon are also available in great detail. All the high-res images NASA has taken over the years have been implemented in Google Earth so everyone can enjoy the landscape of other heavenly bodies in the way they truly look.

The Good

The obvious teaching capabilities of the software cannot be expressed in words. There are so many things that can be done with Google Earth, that it's almost impossible not to find use for it.

The streaming of images has improved greatly over the years and the application has managed to keep low hardware requirements.

Google has dedicated a lot of time and effort to this project and it shows. 3D buildings are added all the time, new sources for images are implemented on a regular basis, and they even managed to help government authorities to control a crisis like the one in Haiti by refreshing their images just a few days after the calamity.

The Bad

I have only one reproach and I'm pretty sure that it's a problem only present on the Linux platform, most probably on Ubuntu. I can't say that other distributions have this particular problem as I did not test it. Google Earth uses proprietary Microsoft fonts, but even with the appropriate package installed, the fonts are hard to read and they look terrible.

Conclusion

Google Earth is one the first apps I install on a fresh system, even if I don't have an immediate use for it.

The development of Google Earth has slowed down in the last couple of years and I sincerely hope that Google will continue to pour money into it for further development. It's an amazing project that should continue to exist for many years to come.


Saturday, September 15, 2012

Google Earth 6.2.2.6613 Review


Building a software that can catalog an entire planet is not a feat for everyone, and if there is someone out there who is up for the task, then Google is surely the only company capable to do it.

Sure, many have tried to encompass the entire Earth in a single application in the past, but the sheer size of the software would have made this task almost impossible. More importantly, whatever software someone would use, such as an Encyclopedia, it would never cover places that had no special significance.

Many of us are now used with Google Earth, but we must keep in mind that back in 2005, when it was first launched, it made a big impact. Its arrival was made possible by the advent of high-speed Internet which permitted the fast streaming of images.

We have to give credit where it's due. Google did not built this from scratch, but bought a company in 2004, called Keyhole Inc., which at that time was developing a software called EarthViewer 3D. The company was funded by non-others than the CIA.

How they managed to buy it with the approval of the government is beyond me; maybe CIA needed to expand the software and Google had enough money and man power to do this.

Installation

Depending on your operating system, you might have the Google Earth package in your repository. If not, Google provides packages for everyone, including Debian-based operating systems and Red Hat based ones. Both 32-bit and 64-bit architectures are supported.

We've installed it in Ubuntu 12.04 LTS (Precise Pangolin) by downloading the Debian package from the official website. You will need a lot of dependencies so just run the following commands in a terminal, one by one, and everything should be just fine:

sudo dpkg -i google-earth-stable_current_i386.deb
sudo apt-get -f install


You should now have Google Earth installed and available from Unity or from your Application menu.

Usage

The number of features crammed in this software is amazing. It would take dozens of pages to go through all of them and in the end no one would understand much of it.

Let's start with the basics. Google Earth is a software that renders the surface of the planet (and more) with the help of satellite imagery, from a myriad of sources.

The software can be used as a simple map, searching for locations, plotting routes, and even zooming in at street level. I actually used it a couple of times to find remote interesting ski resorts and even found accommodation with it. It's very versatile and it estimates arrival time with great accuracy.

On top of this fundamental function, there are a lot of implemented layers. You can activate all of them or one at a time. Some are quite basic such as country borders, roads, gallery, photos (including the Panoramio service and 360Cities), 3D buildings (an amazing feature that is beautifully integrated with StreetView), Global Awareness, and many more.

Besides the obvious use, there are a lot of functions that are almost never used, and the average user has no idea that they exist. First off, there's the flight simulator, where users define a starting point and start flying over the landscape in a simple, but relatively correct, flight simulator. A joystick is required for precise flying, of course.

Another important function is the Sky Mode, where users can switch from viewing the Earth in the exactly opposite position, and start looking at the stars. The star charts are amazing and actual images are used to render the sky, including nebulae, galaxies and even star systems.

The planet Mars and the Moon are also available in great detail. All the high-res images NASA has taken over the years have been implemented in Google Earth so everyone can enjoy the landscape of other heavenly bodies in the way they truly look.

The Good

The obvious teaching capabilities of the software cannot be expressed in words. There are so many things that can be done with Google Earth, that it's almost impossible not to find use for it.

The streaming of images has improved greatly over the years and the application has managed to keep low hardware requirements.

Google has dedicated a lot of time and effort to this project and it shows. 3D buildings are added all the time, new sources for images are implemented on a regular basis, and they even managed to help government authorities to control a crisis like the one in Haiti by refreshing their images just a few days after the calamity.

The Bad

I have only one reproach and I'm pretty sure that it's a problem only present on the Linux platform, most probably on Ubuntu. I can't say that other distributions have this particular problem as I did not test it. Google Earth uses proprietary Microsoft fonts, but even with the appropriate package installed, the fonts are hard to read and they look terrible.

Conclusion

Google Earth is one the first apps I install on a fresh system, even if I don't have an immediate use for it.

The development of Google Earth has slowed down in the last couple of years and I sincerely hope that Google will continue to pour money into it for further development. It's an amazing project that should continue to exist for many years to come.


Monday, July 2, 2012

Google Compute Engine Draws Early Praise, and Some Skepticism


At the Google I/O conference, company officials announced a big next step for the company--the public availability of the Google Compute Engine public cloud service (following much beta testing). It puts the company in direct competition with Amazon Web Services (AWS), and is a step squarely into the Infrastructure-as-a-Service space. Now third parties are popping up with services surrounding the platform,  much as third parties provide services for AWS. How will Compute Engine fare against other offerings in the cloud?
According to an insightful essay from Jakiram + Associates:
"Amazon Web Services is ahead of any Cloud offering by leaps and bounds. The sheer breadth of services that AWS offers is mindboggling. The API that AWS designed for each of its service is considered to be an industry standard so much so that even the competition is left with no choice but to endorse it."
A number of stories appearing about Google's platform also ask why it took Google so long to deliver a viable platform.
Despite naysayers, though, Google Compute Engine has a lot going for it. Its Cloud Storage API is fully compatible with the Amazon S3 API. Google App Engine, a Platform-as-a-Service (PaaS) offering that can help organizations develop cloud-based applications, is also a good complement. And, most importantly, partners are expressing support for Compute Engine.
 Compute Engine is also a good Linux story. Google is leveraging huge number of Linux virtual machines to keep its platform persistently available. Information Week already has a hands-on review that attests to its speed and availability:
"In real-world benchmarks, using full copies of my company's production database and replicas of our application servers, we found that VMs on GCE--in this private beta period--had more consistent performance than comparable servers on AWS. Of note, the GCE hardware is used for many of Google's internal applications, so it wasn't just GCE testers hitting the servers; the underlying hardware was under significant load."
Obviously, Google Compute Engine will draw comparisons to AWS for some time to come. In all likelihood, both of these platforms will remain interesting and competitition between them will be good for the cloud. A complete breakdown of Google Compute Engine's capabilities is available here

Thursday, June 28, 2012

Android 4.1 "Jelly Bean" Arrives at Google I/O, Looks Impressive


The Google I/O conference is in full swing this week, and many of the rumors from recent weeks are coming true. As we discussed last week, Google did show off its new $199 7-inch Nexus tablet that will run the latest Android 4.1 "Jelly Bean" mobile OS. Hands-on reviews of the tablet, many of them favorable, are appearing. Of course, Android 4.1 is also big news and will be at the heart of Google's mobile strategy going forward. Here is more on what's new in it.
Android 4.0, the "Ice Cream Sandwich" version of the mobile OS didn't get substantial pick-up from hardware manufacturers. However, the new version 4.1, "Jelly Bean," is a substantial upgrade of the OS.
In particular, system performance in Android 4.1 is reported to be much better. As InfoWorld notes:
"Much of the focus on 'Jelly Bean' was improved performance. For example, it runs all processes' and apps' screen display at 60 frames per second to make the UI run more smoothly, and it does predictive assessment as to where you are moving your finger to speed response as a screen refreshes. To improve performance, the processor now runs at full speed while a user is using gestures."
Among other improvements, Jelly Bean offers a home screen that automatically adapts to fit content, a predictive keyboard, richer and more interactive notifications, larger payload sizes for Android Beam sharing, and more. The Android Developers Blog also calls out new APIs aimed at developers, which are the pathways to richer and better Android applications:
"Expandable notifications: Android 4.1 brings a major update to the Android notifications framework. Apps can now display larger, richer notifications to users that can be expanded and collapsed with a pinch. Users can now take actions directly from the notification shade, and notifications support new types of content, including photos.
    Android Beam: In Android 4.1, Android Beam makes it easier to share images, videos, or other payloads by leveraging Bluetooth for the data transfer.
    Bi-directional text support: Android 4.1 helps you to reach more users through support for for bi-directional text in TextView and EditText elements.
    Gesture mode: New APIs for accessibility services let you handle gestures and manage accessibility focus. Now you can traverse any element on the screen using gestures, accessories, you name it.
    Media codec access: Provides low-level access to platform hardware and software codecs.
    Wi-Fi Direct service discoverability: New API provides pre-associated service discovery letting apps get more information from nearby devices about the services they support, before they attempt to connect.
  1.  
 For a complete overview of new APIs in Jelly Bean, check out the API highlights document. It's clear that Jelly Bean is an Android upgrade that is going to make a big difference for many users and developers.