Saturday, September 29, 2012

[FIX] Ubuntu Keeps Forgetting My Wireless (WiFi) Connection Password / Key - Ubuntu 12.10/12.04


Whenever I restart my computer, Ubuntu asks again for my wireless connection password / key. This also happens even when I set the password to be remembered. If you want to solve this problem under Ubuntu 12.10/12.04, then follow these simple instructions:

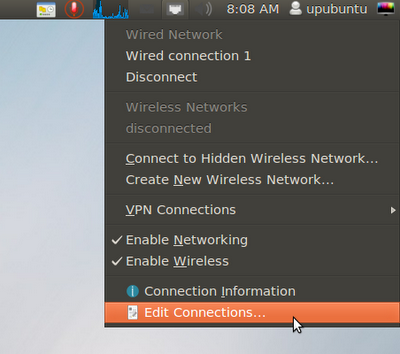
- Click the network icon displayed on the upper panel of Ubuntu and select "Edit Connection":


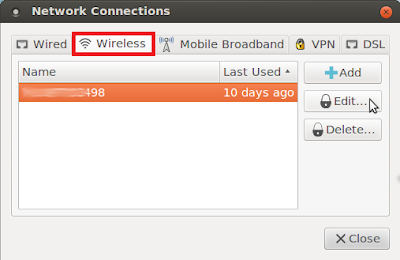
- Open the "Wireless" tab, select your wifi connection and click Edit:

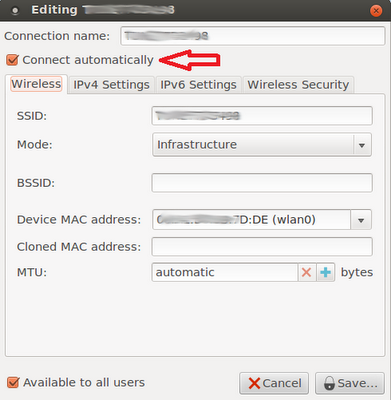
- Make sure now that "Connect automatically" is checked on:

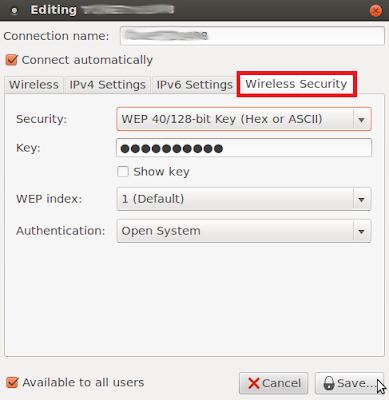
- Next, open the "Wireless Security" tab and enter these details, then click Save:

Security:   WEP 40/128-bit Key (Hex or ASCII)

Key:   Enter your wifi password

From now on, your wifi password will be remembered whenever you reboot your system.

Friday, September 28, 2012

How To Fix A Computer That Won't Restart On Ubuntu 12.10/12.04/Linux Mint 13


If you can't restart your computer under Ubuntu/Linux Mint and the screen turns black with no response after clicking the Restart button, you can follow this tutorial which may solve your reboot issues. This problem is common for owners of laptops or netbooks due to hardware/BIOS problems.

Getting Started

Open the terminal and edit this file under Ubuntu 12.10/12.04/Linux Mint 13:

sudo gedit /etc/default/grub

For Linux Mint, run this command:

sudo pluma /etc/default/grub

Find now this line:

GRUB_CMDLINE_LINUX=""


Replace it with this one:

GRUB_CMDLINE_LINUX="reboot=efi"


Save your file and close, then update Grub with this command:

sudo update-grub

Reboot your system, then try to restart your system to see if it works or not. If this is not working for you, repeat the same steps and try one of these lines instead:

GRUB_CMDLINE_LINUX="reboot=bios"

or

GRUB_CMDLINE_LINUX="reboot=acpi"

or

GRUB_CMDLINE_LINUX="reboot=pci"

If you have more solutions for reboot issues, please mention them in the comment form listed below.

Makagiga 4.4 Released, Installation For Ubuntu/Linux Mint Available


Makagiga is a cross-platform portable application that combines many tasks in a single window like todo listing, reading rss feeds, text editing, and basic image editing & viewing. Makagiga 4.4 is the latest version which brings more features, improvements and changes.


 Here are some of the changes in this latest release taken from the changelog of version 4.4:

* Fixed: Undo support for task color/repeat rule changes
* NEW: Color Chooser Dialog: Bookmarks
* Fixed document tool bar "crash" caused by a recently disabled plugin
* Forms: Auto select all text on field focus
* Font Chooser: Text autocompletion in font name filter box
* Basic Haiku OS support
* Improved Security Manager
* Updated Polish translation
* Various minor updates, bugfixes, and optimizations
* Fixed all compiler warnings
* Updated Eclipse project
* Fixed errors reported by Eclipse IDE
* Replaced @Deprecated API
* Compile with -Werror option
* Added "ui/history" icon

Makagiga 4.4 Installation

To install Makagiga 4.4 in Ubuntu 12.10/12.04/11.10, Linux Mint 13 or older, open the terminal and run the following commands:

cd /tmp

wget -c http://goo.gl/1p6rs -O makagiga_4.4-1_all.deb

sudo dpkg -i makagiga_4.4-1_all.deb

Makagiga requires Java 7 to run. If you have installed Java 7 and you receive this error when launching the application:


You can fix it by running this command from the terminal:

sudo update-alternatives --config java

And set Java 7 as the default Java launcher by entering the correct number:


Makagiga Home Page

Ubuntu 12.10 Beta 2


The second and final beta release of Ubuntu 12.10, code name "Quantal Quetzal", is ready for testing: "The Ubuntu team is pleased to announce the final beta release of Ubuntu 12.10 Desktop, Server, Cloud, and Core products. Some of the new features available since beta 1 are: Quantal beta 2 includes the 3.5.0-15.23 Ubuntu Linux kernel which is based on the 3.5.4 upstream Linux kernel; Unity has been updated to version 6.6 which contains the new default web application in the launcher, a new shopping lens, improvements to the dash and multiple bug fixes; GNOME has been updated to 3.5.92 for most components (some to 3.6.0); accessibility is turned on by default." Read the release announcement and release notes for more information. Download (SHA256): ubuntu-12.10-beta2-desktop-i386.iso (751MB, torrent), ubuntu-12.10-beta2-desktop-amd64.iso (756MB, torrent). Updated CD and DVD images for Kubuntu (download, release notes), Xubuntu (download, announcement), Lubuntu (download), Edubuntu (download) and Ubuntu Studio (download) are also available.

Wednesday, September 26, 2012

How To Install Conky Box On Ubuntu 12.10/12.04/Linux Mint 13


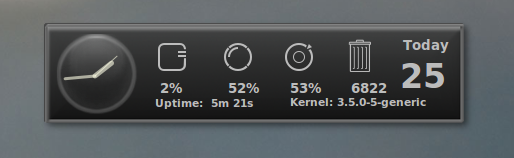
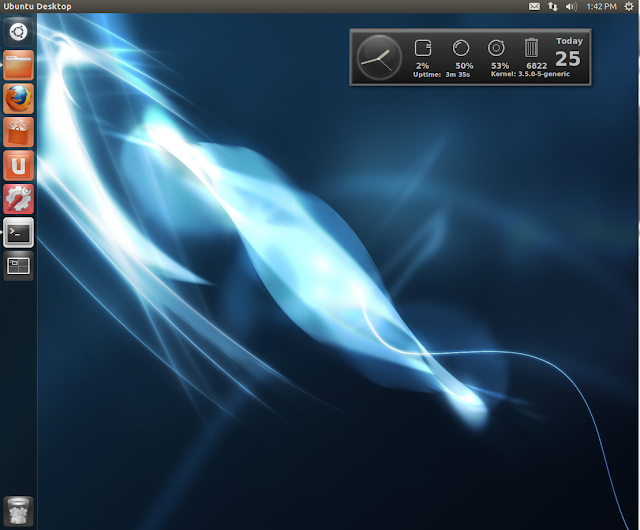
In this tutorial we will see how to install Conky Box under Ubuntu/Linux Mint. This amazing conky script will display on your desktop the clock, date and some system information. You can find its author here.


Conky Box Installation

Install Conky under Ubuntu 12.10/12.04 or Linux Mint 13 with this command:

sudo apt-get install conky-all

Install now Conky Box with these commands:

cd /tmp

wget -c http://goo.gl/MSqme -O conky_box.zip

unzip conky*.zip && cd Conk*

cp Box.png ~/

cp *.lua ~/

mkdir -p ~/Conky_Box

cp conkyrc ~/Conky_Box

To start now Conky Box, run this command:

conky -c ~/Conky_Box/conkyrc

Here is a screenshot of it under Ubuntu:


You can start it automatically by adding it to Startup Applications.

How To Easily Mount ISO Images From Right-Click Menu On Kubuntu 12.04 (KDE 4)


In this tutorial we will see how to use the context menu (right-click menu) to mount iso images without the need to use the terminal or third-party software under Kubuntu 12.04.

Getting Started

Open Konsole and run the following commands:

wget -c http://goo.gl/Ogkf8 -O mount-iso.desktop

sudo mv mount-iso.desktop /usr/share/kde4/services/ServiceMenus/

Right-click now any iso file, then head to the Actions entry to be able to mount it:


Select a folder where you want to mount your image file:


Finally, submit your user password to mount the iso file.