Friday, November 23, 2012

How To Boot From Live USB in VMware Player/VirtualBox - Ubuntu/Linux Mint


In this tutorial, we will show you a way for making VirtualBox or VMware Player boot from live USB devices since this feature hasn't been implemented yet natively in both software. The trick we will use will rely on the Plop boot manager which allows via a live iso to boot from USB devices.


We will show you how to use the Plop boot manager with both VMware Player and VirtualBox under Ubuntu/Linux Mint (12.10/12.04/Mint 14/13, etc.).

Downloading the Plop Boot Manager

You can download the Plop iso file from here. Or Open the terminal and download the Plop iso image to your home directory with this command:

cd && wget -c http://goo.gl/sJoKf -O ploplinux-4.2.2.iso

1. Boot from Live USB in VirtualBox

We assume you have already created a VM (virtual machine), double click it to start it. Mount the USB stick (live USB) to VirtualBox by opening Devices >> USB Devices >> Your USB Device:


 If it is not available, then you may need to run this command from the terminal to be able to mount USB devices under Ubuntu/Linux Mint (replace username with your own user account name):

sudo adduser username vboxusers

Once your USB device is mounted in VirtualBox, look at the bottom of the VM's window, you will see a small CD icon, right-click it and select "Choose a virtual CD/DVD disk file":


Select now the plob iso file (ploplinux-4.2.2.iso) that you have downloaded:


Press Right CTRL+R to reset the VM and wait for Plop boot menu. If it didn't show up, reset the VM again and press F12 to bring up the boot menu, press c to boot from CD-ROM:


In the Plop boot menu, use your arrow keys to select the "Plop Boot Manager" option and press Enter:
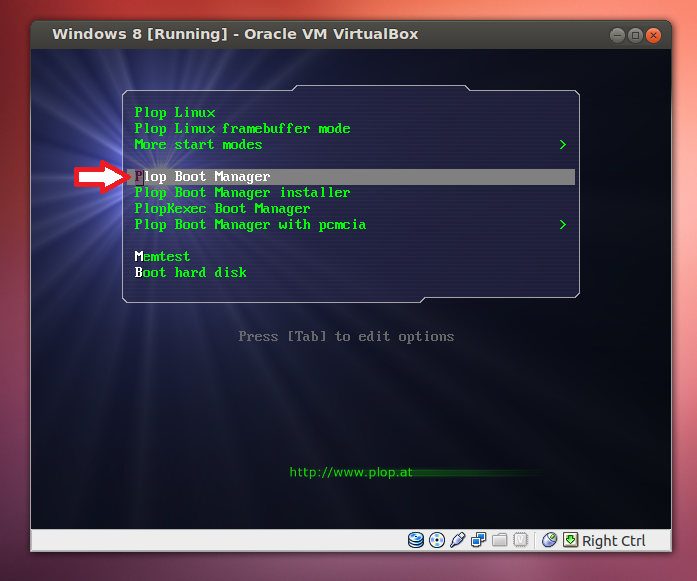

Another menu will show up, select USB and press Enter to boot from the USB device:


2. Boot from Live USB in VMware Player

To boot from a live USB in VMware Player, we will also use the Plop boot loader. Start VMware Player, select any VM of your choice, then click "Edit Virtual machine settings":


Select the "CD/DVD (IDE) option, then in the right side, select "Use ISO image" and click the Browse button:


Open the Plop iso file and click Save:


Start now the VM and wait for the Plop boot menu. When it shows up, select Plop Boot Manager and press Enter:


In the next menu, select USB and press Enter to boot from the USB device:


Thursday, November 22, 2012

Bio-Linux 7.0.3


Tim Booth has announced the release of Bio-Linux 7.0.3, an Ubuntu-based Linux distribution with specialist software for use in the field of bioinformatics: "Bio-Linux 7 is a full-featured, powerful, configurable and easy-to-maintain bioinformatics workstation. Bio-Linux provides more than 500 bioinformatics programs on an Ubuntu Linux 12.04 LTS base. There is a graphical menu for bioinformatics programs, as well as easy access to the Bio-Linux bioinformatics documentation system and sample data useful for testing programs. Bio-Linux 7 adds many improvements over previous versions, including the Galaxy analysis environment. There are also various packages to handle new generation sequence data types. You can install Bio-Linux on your machine, either as the only operating system, or as part of a dual-boot setup which allows you to use your current system and Bio-Linux on the same hardware." Visit the project's home page to read the release announcement. Download: bio-linux-7.0.3.iso (2,692MB, MD5).

Wednesday, November 21, 2012

Linux Mint 14


Clement Lefebvre has announced the final release of Linux Mint 14, code name "Nadia", in MATE (version 1.4) or Cinnamon (version 1.6) editions: "The team is proud to announce the release of Linux Mint 14 'Nadia'. For the first time since Linux Mint 11, the development team was able to capitalize on upstream technology which works and fits its goals. After 6 months of incremental development, Linux Mint 14 features an impressive list of improvements, increased stability and a refined desktop experience. We're very proud of MATE, Cinnamon, MDM and all the components used in this release, and we're very excited to show you how they all fit together in Linux Mint 14." For more information please visit the following pages: release announcement, what's new and release notes. Download (SHA256) links: linuxmint-14-mate-dvd-32bit.iso (966MB, torrent), linuxmint-14-cinnamon-dvd-32bit.iso (884MB, torrent), linuxmint-14-mate-dvd-64bit.iso (968MB, torrent), linuxmint-14-cinnamon-dvd-64bit.iso (881MB, torrent).

Vyatta 6.5


Stephen Harpster has announced the release of Vyatta 6.5, an updated version of the project's specialist distribution for firewalls and routers: "I'm pleased to announce that Vyatta Core (VC) release 6.5 is now available for download. Release 6.5 of the Vyatta Network OS adds significant enhancements including: support for Microsoft Hyper-V; Policy-Based Routing (PBR) which allows incoming packets to be forwarded based on policies, rather than just on the destination address; Virtual Tunnel Interface (VTI) which is a way to represent policy-based IPsec tunnels as virtual interfaces; BGP Multipath enables the installation of multiple BGP paths to a destination into the IP routing table; IPsec support for IPv6 using Internet key management protocol IKEv1; the VRRP (Virtual Router Redundancy Protocol) operational mode commands have been modified to improve usability...." Read the rest of the release announcement for further details. Download (MD5): vyatta-livecd_VC6.5R1_i386.iso (213MB), vyatta-livecd_VC6.5R1_amd64.iso (223MB).

How To Install The PHP-Nuke 8.2 CMS Under Ubuntu 12.10/12.04/Linux Mint 13


In this tutorial, we will see how to install PHP Nuke 8.2 locally in a system running Ubuntu/Linux Mint. The tutorial is also workable for other Debian-based systems. PHP Nuke is a popular CMS (Content Management System) that gives the administrator full control over his websites (portals). The latest version (8.2.4) comes with more bug fixes and security improvements. You can find here the added features for PHP Nuke 8.2.4.

Getting Started

      1. Installing The LAMP Server

To be able to run PHP Nuke on your system, we need to install first a web server. For this tutorial, we will use the LAMP web server, but it's your choice to select another web server (XAMPP for example). To install LAMP on Ubuntu 12.10/12.04/11.04 or Linux Mint 13, open the terminal and run this command:


 sudo apt-get install lamp-server^

For more help about the installation of the LAMP server, check this article. Also, PHP Nuke requires GD graphics support. You can install it with this command:

sudo apt-get install php5-gd

      2. Downgrading From PHP 5.4.x To PHP 5.3.x

Magic Quotes GPC has been dropped from PHP 5.4.x. The only solution to make PHP-Nuke work under Ubuntu/Linux Mint is to downgrade from PHP 5.4.x to 5.3.x. To do this, you can use a simple script that will automatically downgrade your current PHP version to 5.3.x. You can run it with the following commands from the terminal:

cd /tmp 
wget http://dl.dropbox.com/u/47950494/upubuntu.com/php5_4_downgrade_5.3.sh 
chmod +x php5_4_downgrade_5.3.sh 
sudo sh php5_4_downgrade_5.3.sh

      3.  Creating MySQL Database & User

After installing the LAMP server and downgrading to PHP 5.3.x, we need now to create a MySQL database and user to use with PHP Nuke. If you have phpMyAdmin installed, you can easily do this with just few actions. But, if you want to create these details from the terminal, the run this sequence of commands and replace text highlighted in red with your own settings:

- Sign in to the MySQL server with this command:

 mysql -u root -p

- Create now a MySQL database for PHP Nuke with this command:

create database phpnuke;

- Create a user with this command:

CREATE USER 'phpnuke-user'@'localhost' IDENTIFIED BY '12345';

Replace phpnuke-user & 12345 with any other username and password of your choice.

- Grant now this user access to your database with this command:

GRANT ALL PRIVILEGES ON phpnuke.* TO 'phpnuke-user' IDENTIFIED BY '12345';

- Exit now the MySQL server with this command:

exit

We have now created these MYSQL details:

  • Hostname: localhost
  • Database Name: phpnuke
  • Database User: phpnuke-user
  • Database User Password: 12345
      4. Installing PHP NUKE 8.2

You can download and place the PHP NUKE files in the /var/www/ directory with these commands:

cd /tmp 
sudo mkdir /var/www/phpnuke 
wget -c http://goo.gl/iWxAv -O phpnuke-release-8.2.4.zip 
unzip -q phpnuke-release-8.2.4.zip 
sudo cp -r phpnuke-release-8.2.4/phpnuke/html/* /var/www/phpnuke 
sudo chmod 777 -R /var/www/phpnuke 
sudo /etc/init.d/apache2 restart

Open now this link to start the installation of PHP Nuke:

http://localhost/phpnuke/install/

Note: You can replace localhost with your own server IP address.
Then follow setup instructions via your web browser:


When you finsih the installation of PHP Nuke, remove the install directory with this command:

sudo rm -rf /var/www/phpnuke/install

Here are the screenshots of the default home page and admin area:


PHP-NUKE Home Page

Tuesday, November 20, 2012

How to Install Dockbar Removed AWN PPA on Ubuntu 12.10


Avant Window Navigator – better known as the AWN – has been (and I think still is) one of the most dockbars popular among Linux users, thanks to its numerous applets and to its numerous configuration possibilities. Unfortunately, however, the development of AWN is still well over a year, which is why Ubuntu developers have seen fit to remove the package installer on the dockbar by repository of Ubuntu 12.10 Quantal Quetzal.

Fortunately there is help Andrew @ Webupd8 who created – within their repository – a package installer latest version of Avant Window Navigator for Ubuntu 12.10 Quantal . Since the development of the dockbar is still a lot ‘of time, however, it is likely that some applets crashino often or even refuse to work. AWN dockbar is still a very useful and well done : worth trying!

AWN (Avant Window Navigator) – Installation on Ubuntu 12.10 Quantal

With repository Webupd8 the process is easy! All you have to do is open a terminal, and type
sudo add-apt-repository ppa: nilarimogard/webupd8
sudo apt-get update sudo apt-
get install avant-window-navigator
On Ubuntu 12.04, 11.10 and earlier find AWN in the system repository.