Thursday, December 20, 2012
SparkyLinux 2.0.1
Paweł Pijanowski has announced the release of SparkyLinux 2.0.1, a lightweight Debian-based distribution featuring a customised LXDE desktop and plenty of games: "SparkyLinux 2.0.1 'GameOver'. No, it's not the end of the project. It's brand new release. This idea was waiting in my Tomboy for the whole year. Finally I got back to work and three weeks later it's ready to go. It was built on the latest release of SparkyLinux 2.0 and it's designed for games players. Many applications have been removed from the system and replaced by games. The main system is based on Debian 'Wheezy' and has LXDE as the default desktop. All packages has been synchronised with Debian's 'testing' repositories as of 2012-12-12. What's under the hood: Linux kernel 3.2, LXDE, Iceweasel, VLC, Leafpad, Pidgin, Transmission, XChat, Flash, Java, multimedia codecs, VLC plugin for Iceweasel...." See the release announcement for a full list of included games and a screenshot. Download: sparkylinux-2.0.1-gameover-i386.iso (3,913MB, MD5).
Stream Video and Music from PC/Laptop to Android - Ubuntu/Linux Mint
In this tutorial, we will explain how to make it easy streaming music and video from a PC or laptop to an Android device (smartphones, tablets, etc.) over a wireless network. We have previously done a tutorial for streaming videos from PC to iOS devices, you can check it here.
We will use under Ubuntu or Linux Mint (13.04/12.10/12.04, Mint 14/13 or older) the VLC Media Player, and in the Android device we will use VLC Direct Pro which allows to stream media contents from your computer to Android, it can be also used to control your VLC media player remotely.
Getting Started
1. Installing VLC Media Player & Configuration (Ubuntu/Linux Mint)
Let's first install the non-free-codecs package under Ubuntu/Linux Mint to be able to play media files on your Android device. To do this, open the terminal and issue these commands:
sudo -E wget --output-document=/etc/apt/sources.list.d/medibuntu.list http://www.medibuntu.org/sources.list.d/$(lsb_release -cs).list
sudo apt-get update
sudo apt-get -y --allow-unauthenticated install medibuntu-keyring
sudo apt-get update
sudo apt-get install non-free-codecs
Install now VLC Media Player with these commands:
sudo add-apt-repository ppa:videolan/stable-daily
sudo apt-get update
sudo apt-get install vlc
Start VLC and enable the web interface by opening View >> Add interface >> Web:
Minimize the VLC window, then check your IP address of your wireless (wifi) internet connection in the network manager, or run simply this command from the terminal:
ifconfig wlan | grep inet
Your wireless IP address will be listed after "inet addr":
This IP address will be used later with VLC Direct Pro on your Android-based device.
2. Installing VLC Direct Pro Free & Configuration (Android)
Search 'VLC Direct Pro Free' in Play Store and install it:
Launch the app now and in the setup wizard, don't tap "Next", just tap the "menu" button on your Android device and select Settings:
Tap now "Manual Configuration":
Tap "VLC Host":
Enter now the IP address of the wireless internet connection of your computer/laptop as explained above:
Leave VLC web interface port as is (8080).
Move back to the 'Preferences' menu and tap "Automatic Connection Wizard":
Tap "Start":
The app will now scan your computer or laptop to see if VLC Media Player is running. Once detected, tap the Target icon (top left corner) and change it to Android, then tap the Computer icon and browse your computer/laptop hard drive to locate the folder containing your media files to play them:
Your audio/video file will be now streamed to your Android device:
Enjoy!
Tuesday, December 18, 2012
Transmission 2.74 Released! Install on Ubuntu Enhancements for IPv6
And ‘now available a new update of the Transmission BitTorrent client, that give program version 2.74. For those who does not know, efficient BitTorrent client Transmission is a feature-rich use rather simple, which comes preinstalled in the desktop environment gtk-based (in particular Transmission is the manager torrent default Ubuntu). This release, in particular, is oriented towards strong improvements both for the integration of the program with the IPv6 protocol for the management of so-called “magnetic link”. But there is much more: just read the changelog is included below for realizing it!

All Platforms
- Fix a bug That prevented IPv6 addresses from being saved in dht.dat
- Better handling of magnet links That Contain ‘tr.x =’ parameters
- filtering of addresses used for uTP peer connections
- Whether or not a peer supports uTP connections
Mac
- Auto-grouping will not apply until torrents are demagnetized
- Tweak the inspector’s and add window’s file lists to avoid auto-hiding scrollbars overlapping the priority controls
- Fix potential crash When downloading and seeding complete at the same time
- Fix bug where stopped torrents might start When waking the computer from sleep
Web Client
- Fix a multi-file selection bug
- Fix bug where the upload and download arrows and rates would not Appear for downloading torrents
- Fix bug tracker When displaying the list
Install Transmission 2.74 on Ubuntu 12.04/12.10 (PPA and procedure manual)
If you want to use the PPA, below find the instructions to import and update Transmission. At the time of this writing, however, they are still outdated:
sudo add-apt-repository ppa: transmissionbt / ppa sudo apt-get
update sudo apt-
get install transmission
Since the PPA still pointed to the old version of Transmission,
proceed with the installation manual by source. Before proceeding,
however, I want to remind you that you can safely wait Transmission is
updated within the Ubuntu repositories and update the system easily
using the command
sudo apt-get
update sudo apt-get dist-upgrade
If you’re like me, and want to get programs from your system
immediately up-to-date , follow the instructions below! First install a
little ‘dependencies (yes, we’ll need it) and download the source
tarball of Transmission, with the commandsAt this point, let us go into source directory, compile the program and …. use checkinstall to install it, so you can comfortably manage in the future by USC / gdebi / dpkg / apt-get / aptitudesudo apt-get install automake build-essential autoconf libtool pkg-config libcurl4-openssl-dev intltool libglib2.0-dev libevent-dev-dev libminiupnpc libminiupnpc libappindicator-dev-dev checkinstall
cd / tmp wget
http://download.transmissionbt.com/files/transmission-2.74.tar.bz2
xvjf tar transmission-2.74.tar.bz2
cd / tmp/transmission-2.74
. / configure
make
sudo checkinstall
At this point we do not need the source directory (which will be
deleted automatically when you restart the system), but it is a good
idea to keep a copy Package. deb, so you can easily reinstall if
necessary. I will put on my desk!
cp / * tmp/transmission-2.74/transmission. deb ~ / Desktop /
Enjoy!
Etichete:
IPv6,
Linux,
Torrent,
Transmission
Monday, December 17, 2012
Zim Text Editor 0.58 Allows Now To Export LaTeX Equations - Ubuntu/Linux Mint
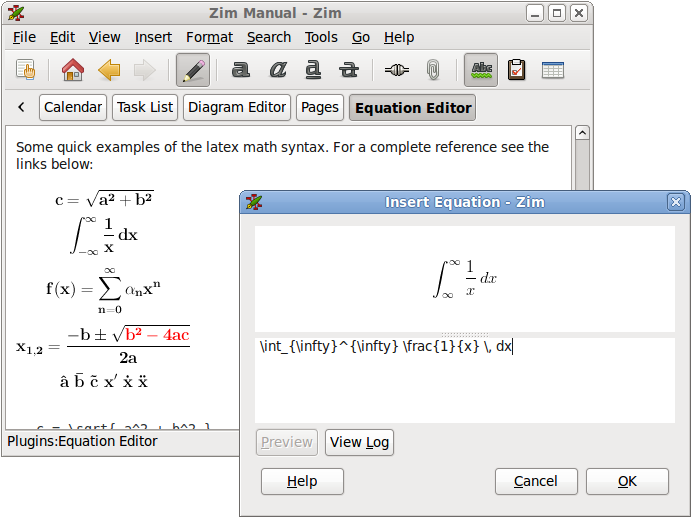
Zim has been updated recently to version 0.58 bringing more bug fixes, especially for the bug that prevented the application to start after crashing. This new release allows users to export LaTeX equations and interwiki links are now working fine.
If you have no idea about Zim, it's a graphical (WYSIWYG) text editor written in Python and GTK+ developed by Jaap Karssenberg who wants to bring the concept of a wiki to your Linux desktop. Zim is also considered a personal journal or to-do list.
It can also serve as a distraction-free writing tool that, for example, helps users write novels, short stories, or complex LaTeX equations for Math projects using the 'Equation Editor' plugin.
Zim allows simple formatting or markup for typed text (italics, numbered list, checkbox list, bullet lists, headings, etc.), insert/attach images, link to other wiki pages, etc. Here is a video explaining basic use of Zim:
For more information and features about Zim, click here.
In this article, we will see how to install Zim from PPA under the following Ubuntu/Linux Mint distributions:
- Ubuntu 13.04/12.10/12.04/11.10 (or older)
- Linux Mint 14/13/12 (or older)
Open the terminal and install it with the following commands:
sudo add-apt-repository ppa:jaap.karssenberg/zim
sudo apt-get update
sudo apt-get install zim
For bugs encountered while using this software, please report it here.
Zim Removal
To remove this text editor from your system, run the following commands:
sudo apt-get remove zim
sudo add-apt-repository --remove ppa:jaap.karssenberg/zim
sudo apt-get update
Friday, December 14, 2012
Install MultiBoot USB from PPA under Ubuntu 12.10/12.04 and Linux Mint 14/13
MultiBootUSB (aka Multi Boot USB) is a tool with GUI (user interface) written in Gambas that allows users to install and boot various Linux distributions from a single USB flash drive (USB key). Supporting 145 Linux distros including Ubuntu and its derivatives, Multi Boot USB can detect iso Images automatically with the possibility to delete any Linux distro whenever you want. You can visit the tool's home page here for more information.
MultiBootUSB screenshots:
The PPA below is available for these Ubuntu/Linux Mint distributions:
- Ubuntu 13.04/12.10/12.04/11.10
- Linux Mint 14/13/12
To install the latest version of MultiBootUSB from PPA (v6.0-1), open the terminal and issue these commands:
sudo add-apt-repository ppa:upubuntu-com/ppa
sudo apt-get update
sudo apt-get install multibootusbFor any bug encountered, report it here.
MultiBootUSB Removal
To uninstall MultiBoot USB from your system, run these commands:
sudo add-apt-repository --remove ppa:upubuntu-com/ppa
sudo apt-get remove multibootusb
sudo apt-get update
Etichete:
Installation,
Linux,
MultiBootUSB,
USB
Install AMD Catalyst 12.12 from PPA in Ubuntu 12.10/12.04 and Linux Mint 14/13
AMD Catalyst 12.12 has just been released, coming with more bug fixes and is based on fglrx 9.01. We don't know much about this new release, but it generally improves support for more AMD graphics cards and Steam client for Linux.
In this tutorial, we will see how to install AMD Catalyst 12.12 from PPA or manually via the driver's .run file as shown below. The PPA is available for the following Ubuntu/Linux Mint distributions:
- Ubuntu 13.04/12.10/12.04
- Linux Mint 14/13
1. Automatic Installation
Open the terminal and issue these commands:
sudo add-apt-repository ppa:xorg-edgers/ppa
sudo apt-get update
sudo apt-get install fglrx-installer
It's recommended that you remove the xorg-edgers PPA to avoid installing unwanted packages on your system. You can remove it with these commands:
sudo add-apt-repository --remove ppa:xorg-edgers/ppa
sudo apt-get update
2. Manual Installation
Before installing a new AMD driver, we need first to uninstall the current one. To do this, run these two commands from the terminal:
sudo sh /usr/share/ati/fglrx-uninstall.sh
sudo apt-get remove --purge fglrx fglrx_* fglrx-amdcccle* fglrx-dev* xorg-driver-fglrx
For manual installation of the AMD Catalyst 12.12 driver, issue this sequence of commands:
sudo apt-get install unzip
cd /tmp && wget -c http://goo.gl/ytSAn -O 9.01-121106a-150335C-EDG_Direct.zip
unzip 9.01*EDG*.zip
chmod +x amd*9.01*.run
sudo sh amd*9.01*.run
When you finish the installation, run these commands:
sudo aticonfig --initial -f
sudo reboot
Etichete:
AMD Catalyst,
Install,
Linux
Subscribe to:
Posts (Atom)