Wednesday, July 4, 2012

Blizzard Is Not Banning Diablo III Linux Players

In spite of some rumors that Blizzard is banning people running Diablo III on Linux platform, emulated through Wine, it appears that this is not the case.

The whole shenanigan was started on Blizzard's official forums by some gamers complaining about being banned after playing Diablo III on Linux.

Blizzard has replicated the setups described by the users and tested their own system, and Linux clients were not banned. The company has said plainly that they are not banning the Linux players, only cheaters.

“We’ve extensively tested for false positive situations, including replicating system setups for those who have posted claiming they were banned unfairly.”

“We’ve not found any situations that could produce a false positive, have found that the circumstances for which they were banned were clear and accurate, and we are extremely confident in our findings.“

“Playing the game on Linux, although not officially supported, will not get you banned – cheating will,”
a Blizzard statement said through their forums.

Calibre Plugin of the Week:FanFictionDownLoader


Calibre is one of the best eBook management software available right now, but its strength lies in the abundance of plugins available for it.

This week we’ll take a look at an interesting extension called „FanFictionDownLoader." According to the developer, this plugin brings the functionality of FanFiction Downloader to Calibre.

FanFictionDownLoader can download FanFiction stories and books from over 50 different sites into ebook format, has support for downloading images in the story text, and many other features.

It can be easily installed from the Preferences menu or from the official forum, and it needs version 0.8.30 or higher of Calibre. A comprehensive tutorial about its usage can also be found on the above forums.

You can also check out our review of Calibre.


Download Calibre 0.8.58

Updates to Gnome-Calendar


Erick Perez Castellanos announced in his blog yesterday that Gnome Calendar is moving forward!
There is still a lot of work to be done, but the development of various aspects has been re-started. The most important is the implementation of the event-view that is missing functionality, but the widgets part is almost done.
Below you can see some screenshots that show the month-view and the even-view. There is still a lot to be done, like the addition of more elements and the use of some symbolic icons etc, but you can get the idea from these “skeletal” designs.

How to Take a Screenshot from Terminal on Ubuntu/Linux Mint


In this tip, we will see how to use the terminal under Ubuntu 12.04 or Linux Mint 13 to take screenshots. There are many applications with GUI available for Debian-based systems for taking screenshots, and the list keeps growing. However, in this tutorial we will try to use the CLI mode for taking screenshots.

Method 1

Open the terminal under Ubuntu and take a screenshot with this command:

gnome-screenshot

To take a screenshot after xx seconds, you can use this command:

gnome-screenshot -d 3

or

sleep 3; gnome-screenshot

For Linux Mint, you can use this command:

mate-screenshot

To delay it, use this command:

mate-screenshot -d 3

or

sleep 3; mate-screenshot

Method 2

You can also use imagemagick to take screenshots under Ubuntu/Linux Mint. You can install it with this command:

sudo apt-get install imagemagick

Then take a screenshot with this command:

import screenshot.png

Method 3

Scrot can also be used to take screenshots. Install it with this command:

sudo apt-get install scrot

Use now this command:

scrot screenshot.png

Method 4

This command also allows to take screenshots under Ubuntu or Linux Mint:

DISPLAY=:0.0 import -window root screenshot.png

If you have something to add, please do using the comment form below.

The less command


The "cat" command is one of the most popular linux commands. It is used to display a file in the terminal. However, one problem is that when using "cat" to read a big file, it will display the whole file in the terminal so you will have to scroll up a huge wall of text to read the file. The "less" command is somewhat similar to "cat", it is also used to read a file but "less" displays only a part of the file instead of the whole file. To read files with "less", you just need to scroll up and down. The real advantage of "less" is that because it doesnt read the entire file so with very huge files, "less" will start faster than "cat" or any text editor like vi.

The usage of "less" is simple like this:

 less filename

"less" displays the beginning part of the file only, to scroll up and down, you can use the keys "j" and "k" or the arrow keys, you can use the "enter" key to scroll down as well.

Here are some tips you can use with "less":

- Display line numbers

To display line numbers before each line, the command is:
 less -N filename

- Open multiple files

You can open multiple files with "less", the command is:
 less filename1 filename2 filename3
With this command, only the first file will be displayed in the terminal. To move to the next file, you just need to type this command in the terminal:
 :n
To move back to the previous file, the command will be:
 :p
You can also replace "n" with "p" in the above commands with a certain number N and the N-th file will be displayed.

To remove the current file, the command will be:
 :d

 - Bookmark scrolling

When opening a huge file, there will be some certain lines you need  to check again. Instead of remember the line numbers, you can bookmark the line with this command:
m &

Just replace "&" with any letter you want and keep scrolling down to read the file. When you want to go back to the bookmarked line, the command will be:
 ' &

(Replace "&" with the letter you picked before.)

- Search

You can search forward through the file with this command:
 /search-term

 The command to search backward is:
 ?search-term

- Quiting

To quit less, you can just hit the letter "q" or hit "Shift + zz"

To know more about "less", just run:
 man less

Unity News Lens Gets Local News With Geolocation, More

 
Unity News Lens lets you search Google news from Dash and it currently supports 61 countries. The lens was updated recently, and it now includes local news, topics and top stories with up to 100 results.

The updated News Lens uses geolocation for local news to define the language used based on your country, but you can also use your session language by selecting Language > Current from the Unity News Lens filter.

The lens will fallback to English and world news for countries not supported by Google News, but the news will be as local as possible, according to the Unity News Lens changelog.

unity news lens


To install Unity News Lens in Ubuntu 12.04 or 12.10, use the following commands:
sudo add-apt-repository ppa:scopes-packagers/ppa
sudo apt-get update
sudo apt-get install unity-lens-news
Once installed, log out and log back in.

How To Install Grub Customizer (2.5.7) On Ubuntu/Linux Mint/openSUSE/Fedora


In this tutorial, we will explain the installation of Grub Customizer 2.5.7 under Ubuntu 12.04 or older, Linux Mint 13, Fedora 17, and openSUSE 12.1. Installation from source is also explained below. As a reminder, Grub Customizer is an application with GUI that allows to configure the settings of the GRUB2 boot loader. You can find here more information about Grub Customizer.


Grub Customizer (2.5.7) Installation


For Ubuntu 12.04/Linux Mint 13, you can easily install Grub Customizer with the following commands:

 sudo add-apt-repository ppa:danielrichter2007/grub-customizer
 sudo apt-get update
 sudo apt-get install grub-customizer

For openSUSE 12.1 or older, run the following commands:

(openSUSE 32-bit)

wget -O grub-customizer-2.5.7-i686.rpm http://goo.gl/vE2Ev
su
zypper in grub-customizer-2.5.7-i686.rpm

(openSUSE 64-bit)

wget -O grub-customizer-2.5.7-x86_64.rpm http://goo.gl/1GL6B
su
zypper in grub-customizer-2.5.7-x86_64.rpm

For Fedora 17 or older, you can install with these commands:

(Fedora 32-bit)

wget -O grub-customizer-2.5.7-i686.rpm http://goo.gl/vE2Ev


sudo yum install grub-customizer-2.5.7-i686.rpm

 (Fedora 64-bit)

wget -O grub-customizer-2.5.7-x86_64.rpm http://goo.gl/1GL6B


sudo yum install grub-customizer-2.5.7-x86_64.rpm

You can also install Grub Customizer  2.5.7 from source with the following commands:

sudo apt-get install cmake g++ libgtkmm-2.4-dev gettext libssl-dev


wget -O grub-customizer_2.5.7.tar.gz http://goo.gl/N6ujy


tar -xzvf grub-customizer_2.5.7.tar.gz && cd grub-customizer-2.5.7


cmake . && make


sudo make install

That's it!

Porteus 1.2


Jay Flood has announced the release of Porteus 1.2, a Slackware-based minimalist live CD set with a choice of KDE 3 (Trinity), KDE 4, Xfce and LXDE desktops: "The Porteus community is proud to announce the release of Porteus version 1.2. Major changes from Porteus 1.1 include: Linux kernel bumped to version 3.4.4; KDE upgraded to 4.8.4; Trinity upgraded to 3.5.13.1 (R14); LXDE upgraded to the latest stable components; Xfce (4.10) editions have been added for both architectures as standalone ISO images; Firefox upgraded to version 13.0.1; replaced wicd with NetworkManager; new and improved applications to handle system configuration; optimized boot time - with current implementation of rc scripts Porteus is one of the fastest booting live linux distros out there...." Read the rest of the release announcement which includes links to full changelogs. Download: Porteus-v1.2-i486.iso (251MB, MD5), Porteus-v1.2-x86_64.iso (262MB, MD5), Porteus-XFCE-v1.2-i486.iso (206MB, MD5), Porteus-XFCE-v1.2-x86_64.iso (202MB, MD5).

Nautilus eXtreme Makeover ;)


The following designs are extremely tentative art and things are probably going to change. But it is always nice to have a look to the uncertain future ;) 
First off a quick look in some minor changes for Nautilus 360. Compact view is gone, extra panel is gone and tree view will be replaced by a list view.  But all these are just details of what is coming next. Nautilus is gonna merged to Content Selection pattern, and if you don’t know what content selection is, you better check this before you continue reading.. or at least check it after, decision is totally up to you ;)
McCann uploaded the latest Nautilus designs for 3.8 most likely, but unfortunately in a very bad quality. Anyway here there are..

Enjoy :)

All our files
Our home folder
A second drive if we have
Our pictures folder
Select content view. If you read the link above you should be familiar with it
Our file preferences, which is currently empty. It needs more design I guess..
..and design just came. Damn Gnome development goes fast ;)
Set our file permissitions
And some advanced options like show hidden files, enable direct delete etc. This is really nice!
Set grid view preferences that we can modify the size of icons and the sort order
And the list view options, we can select what information will be visible and sort the files display order
And some folder options, permissions, selecting default applications for files etc
This is how we will interact with our files in the future. The five buttons on bottom make totally clear that you gonna use your finger on them ;)
I will re-review on this when I get newer and better quality images.

Install Blender On Ubuntu – Free 3D Modeling Application + Tutorials


Blender is a free suite of 3d content creation applications openly available on most operating systems including Ubuntu. You can download Blender through the software manager or by clicking this link, if all else fails you can just type the following in your terminal.
sudo apt-get install blender

Install Blender On Ubuntu   Free 3D Modeling Application + Tutorials
Blender Render (Source: Blender.org)
For some blender tutorials check out the links below:
If anyone else has some links to tutorials or related information about Blender feel free to comment, I will also approve links to personal blogs that have tutorials or other goodies for Blender.

Get A Dark Panel With The Radiance Theme For Ubuntu 12.04/11.10


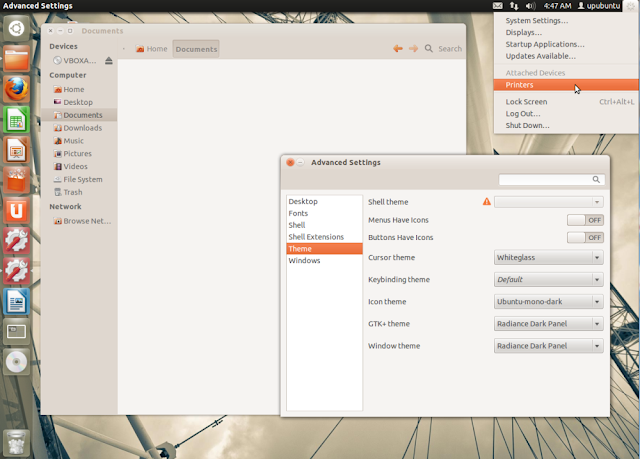
Radiance Dark Panel is a theme derived from the default Ubuntu Radiance theme. What has been changed from the original is that users will get a dark upper panel instead of the bright one. Here is a screenshot of Radiance Dark Panel under Ubuntu 12.04:


The theme can be installed manually from this link, or you can use our custom PPA below. The PPA currently supports Ubuntu 12.04/11.10.


Radiance Dark Panel Installation

To install Radiance Dark Panel under Ubuntu 12.04/11.10, open the terminal and run the following commands:

sudo add-apt-repository ppa:upubuntu-com/themes
sudo apt-get update
sudo apt-get install radiance-dark-panel

Enable it now with these commands:

gsettings set org.gnome.desktop.interface gtk-theme 'Radiance-Dark-Panel'


gconftool-2 --set --type string /apps/metacity/general/theme 'Radiance-Dark-Panel'

Enjoy!

Build your own linux hosting server on the cloud


There are all kinds of Linux hosting servers. The most complicated of these require you to be a Red Hat Certified Engineer (RHCE). Many of them require you to do more than download a distro, burn a CD, and install and boot up your new bare-bones servers. But, say you have a particular job for a server and the boss wants it done yesterday, what do you then? Well, one excellent choice is TurnKey Linux.

With TurnKey Linux the only hardware you need is any device that can support a Web browser and a credit card. That's because, while you can run TurnKey Linux on an ordinary dedicated server or on VMWare, OpenStack, or OpenVZ, the mindlessly simple and fast way to do it is to spin up your own server on the Amazon Elastic Compute Cloud (EC2).

Here's how it works.

TurnKey Linux, until recently, was built on Ubuntu Linux 10.04. Now, the core TurnKey Linux is in the process of being migrated to old, but rock solid Debian Squeeze (6.0.4) Linux distribution. But, you as someone who just needs a server Right Now don't need to worry about what's happening in the background. No, all you have to do is pick the appropriate TurnKey Linux server.

Read the rest of the article on ITworld.com

Valve Confirms Steam for Linux, Blizzard Bans Linux Users

Here are two interesting gaming news for Linux users, as Valve director confirmed Steam for Linux, and Blizzard started banning Diablo III users who use Linux.

In the short video posted above, Valve's managing director, Gabe Newell, is interviewed by the Norwegian site DagBladet.no at E3 2012, talking briefly about their upcoming plans with Steam and support for the Linux platform.

Thanks to Michael Larabel from phoronix.com we already knew that Steam will be available for Linux users by the year's end.

In other news, it appears that lots of Linux users, who installed the Diablo III game via Wine or PlayOnLinux apps, are getting banned from the Battle.net system.

Contacted by lots of angry Diablo III owners, Blizzard response was negative: we will not un-ban accounts and we won't issue a refund to users.

Calculate Linux 12 Beta


Alexander Tratsevskiy has announced that the first public beta release of Calculate Linux 12, a Gentoo-based distribution for desktops and servers, is available for testing: "We're happy to announce that Calculate Linux 12 has entered its final phase - a beta-testing version is now available. Main features: network client-server solutions via SOAP/WSDL are supported; both console and graphical interfaces are implemented; multiple installations are supported - you can install CL on several storage media at once, locally as well as remotely; system settings can now be configured either from the command line or in a graphical environment; the Xfce edition has a better appearance with the new Adwaita theme." See the release announcement for further details and screenshots. Quick links to download the desktop editions with KDE (CLD) or GNOME (CLDG); for other flavours please see the mirror list: cld-20120702-i686.iso (2,164MB, MD5), cld-20120702-x86_64.iso (2,332MB, MD5), cldg-20120702-i686.iso (1,740MB, MD5), cldg-20120702-x86_64.iso (1,904MB, MD5).