Showing posts with label Terminal. Show all posts

Saturday, January 19, 2013

How to Exit the Terminal after 'n' Seconds of Inactivity - Ubuntu/Linux Mint


In this tip, we will see how to force the terminal to close after n seconds of inactivity (idle). I tested this tip in Ubuntu 12.10 and may work in older versions of Ubuntu and this includes Linux Mint.

Getting Started

Open the terminal and edit /etc/profile with this command:


sudo gedit /etc/profile

At the end of the file, enter these lines:

# Exit Terminal
TMOUT=900
export TMOUT


In TMOUT, I have set the terminal to exit after 900 seconds (15 min), set your own time in seconds. After saving your file, run this command to apply the new changes without the need to log out and log back in:

source /etc/profile

Sunday, December 30, 2012

20 Useful Terminal Commands and Tools that you May Need in Ubuntu/Linux Mint


Terminal is a text-based interface that grants users direct access to the UNIX system. You can use Terminal to run some specific commands, create files/folders, change system settings, and any other features that aren't available via programs with GUI.

In this article, I have collected 20 tools and commands that can be useful for Ubuntu/Linux Mint users. If you have more interesting commands or tools, you can mention them below.

1. Make An ISO From A Folder

If you want to make an iso file from a directory containing other files and sub-directories via the terminal, you can use the following command:


mkisofs -o image.iso -R /path/to/folder/

If you wish to backup the home folder, use this command:

mkisofs -o image.iso -R $HOME

2. Remove Non-Empty Folder

To remove a non-empty folder from the command line, you can use this command:

rm -rf /path/to/folder/

3. Checking Current CPU Architecture (32-bit or 64-bit)

To list your processor architecture in Ubuntu/Linux Mint, use one of these commands:

uname -m

or

arch

or

 file /bin/bash | cut -d' ' -f3

4. Generate Random Passwords

To generate random passwords via the terminal, you can use the following commands:

   a - makepasswd

makepasswd is a command line tool for generating passwords in Ubuntu/Linux Mint. Install it with this command:

 sudo apt-get install makepasswd

To generate a password with 20 characters, enter this command:

makepasswd --chars=20

b- OpenSSL

You can also use OpenSSL to generate random passwords using this simple command:

openssl rand -base64 20

5. Check Uptime

To check for how long your computer or laptop has been running since you powered it on, issue this command:

uptime

To monitor system uptime in real-time, use this command:

 watch -n 1 uptime

6. Check Information About Your Video Card

To list information about your graphics card (Nvidia, AMD, Intel, etc.), enter this command:

 lspci -v -s `lspci | awk '/VGA/{print $1}'`

7. Download And Extract Tar Files In One Command

If you want to extract an archive file after being downloaded in a single command, you can use the following command for tar files:

 wget URL-To-TAR-File -O - | tar xfz -

Here is an example:

 wget http://garr.dl.sourceforge.net/project/multibootusb/MultiBootUSB_4.7.tar.gz -O - | tar xfz -

8. Block/Unblock Wifi/Bluetooth

To disable wifi or Bluetooth in Ubuntu/Linux Mint, we can simply use the rfkill command line tool. To deactivate wifi, enter this command:

rfkill block wlan

For Bluetooth:

rfkill block bluetooth

To unblock WiFi, enter this command:

rfkill unblock wlan

For Bluetooth:

rfkill unblock bluetooth

9. Check CPU Temperature

To get the current temperature of your processor, issue this command:

acpi -t

To check CPU temp in real-time, run this command:


watch -n 1 acpi -t

10. Change Read Speed Of A CD/DVD

Let's first get the maximum read speed of your optical drive with this command:

eject -X

To increase/decrease read speed of a CD/DVD inserted into your optical drive, enter this command followed by the desired speed:

 eject -x 4

For more than one optical disc drive, use this command:

 eject /dev/cdrom -x 4

11. Check RAM Speed

To check memory speed from the command line, run this command:

 sudo dmidecode -t 17 | awk -F":" '/Speed/ { print $2 }'

12. Read/Write Speed Of A Hard Disk

To check read/write speed of your hard drive on the terminal, use this command:

sudo hdparm -tT /dev/sda

13. Monitor Network Usage

IPTraf is a command line utility that allows to monitor network activities in real-time. Install it in Ubuntu/Linux Mint with this command:

 sudo apt-get install iptraf

Start monitoring using this command:

sudo iptraf

14- Downloading Websites

If you want to download an entire website via the terminal, enter this command:

 wget --recursive  --page-requisites --convert-links www.domain.com

15. Check Gmail Unread Messages

To check for unread messages in your Gmail account, use this command:

curl -u GMAILUSER --silent "https://mail.google.com/mail/feed/atom" | perl -ne 'print "\t" if //; print "$2\n" if /<(title|name)>(.*)<\/\1>/;'

16. Monitor HDD Temperature

Use hddtemp to monitor hard disk temperature on the terminal. Run these commands:

sudo apt-get install hddtemp 
sudo hddtemp /dev/sda

17. Force Kill Apps

To force close an unresponsive software, run xkill from the terminal then click the software's window to close it.

18. Screen Recording

To capture your screen and record it in a video, use ffmpeg:

sudo apt-get install ffmpeg 
ffmpeg -f x11grab -s wxga -r 25 -i :0.0 -sameq output.mpg

19. Check Current Kernel Version

You can simply use this command:

uname -r

20. Dtrx

The dtrx tool allows to extract most archive files without the hassle of memorizing the various extraction commands. To install it, run this command:

sudo apt-get install dtrx

Here are some examples:

dtrx file.zip 
dtrx file.tar.gz 
dtrx file.7z

Friday, November 30, 2012

How To Lock/Unlock User Accounts From The Terminal Under Ubuntu/Linux Mint


In a previous article, we have seen how to add/remove user accounts from the terminal under Ubuntu/Linux Mint. Today, we will see how to lock or unlock a specific user account from the terminal using two methods.

Method 1 (Recommended)

To lock a user account, open the terminal and run this command:


sudo usermod --expiredate 1 username

Replace username with the user account name you want to disable. The user account in question will no longer be able to login using its password either locally or remotely. To unlock it, use this command:

sudo usermod --expiredate -1 username

The user account name will now be able to log in to its session.

Method 2

Alternatively, you can use this command to lock a user account:

sudo passwd -l username

Replace username with the user account name you want to lock. If the command is successful, you will get this output:

passwd: password expiry information changed.

However, the user may have access to its account remotely (via SSH). So, the first method is highly recommended. To unlock the same account, you can execute this command:

sudo passwd -u username

Note: You can use this tip under Ubuntu 12.10/12.04 and Linux Mint 14 or older.

Saturday, November 24, 2012

How to Add and Remove Users with Terminal on Linux


On virtually all Linux distributions now there are choices to be made by simple GUI in order to perform many different tasks. Often, however, the old (and in my opinion essential) command line allows us to speed up the process without having to go for a thousand screens and study us hundreds of options. To demonstrate this today we will see the ease and convenience of adding a new user in the terminal and not with the GUI.

Add a User

First open a terminal and give the command to be created a new account (in the guide all the controls are related to the creation of user ” username “, replace this fictitious name with the one you want):
sudo useradd username
Let’s create a home directory for the dear username and assegnamogli a password:
sudo mkdir / home / username
sudo passwd username
Finally, we allow the user ownership of her home:
sudo chown username / home / username
sudo chgrp users / home / username
If you want, then you can assign administrator privileges to the account you just created with the following command:
sudo adduser username sudo

Remove a user

If the goal is to delete a user, the process is even easier, just give these two commands, respectively, delete the user and his home:
sudo rm-r / home / username /
That’s it, yes, that’s all. Beautiful terminal , right?

Monday, November 19, 2012

How To Add/Remove Users Accounts From The Terminal On Ubuntu 12.10/12.04/Linux Mint 13


In this tutorial, we will see how to create/remove user accounts using the terminal under Ubuntu/Linux Mint. We will also show you how to add a specific user to the "sudo" group so that you allow it to run sudo commands, but be careful in using this because granting a user root access implies complete control of your machine.


1. Adding A User Account

- You can add a user account from the terminal with this command:


 sudo useradd username

Replace username with any name of your choice.

- Create the home directory for this new user with this command:

sudo mkdir /home/username

Assign now a password for this user with this command:

sudo passwd username

Grant this user ownership and access to its home directory with these two commands:

sudo chown username /home/username 
sudo chgrp username /home/username

Log out now the current session to test the new user account name.

Grant Root Priviliges To A User Account (Optional)

If you want to give a user account root privileges so that it can execute "sudo" commands, run this command:

sudo adduser username sudo

2. Removing A User Account

Open the terminal and run these commands to delete a specific user account:

sudo userdel username 
sudo rm -r /home/username/

Replace username with the user account name you want to delete.

This tip is compatible with Ubuntu 12.10/12.04/Linux Mint 13 or older.

Wednesday, November 14, 2012

How to Create Empty File (Add Contextual Menu) with Terminal on Nautilus 3.6


To create an empty file there are at least two ways: use the terminal – and the touch command – or open a text file and save it, without content, in the position we want. Up to 3.4 Nautilus was also possible to create a new file via the context menu: enough to give a right click on an empty spot in the current directory / the desktop and select Create New > Blank Document . Too bad this feature has been eliminated in Nautilus 3.6.
So how to regain – in Nautilus 3.6 – the same functionality without using tricks complicated? The methods are two, both valid, and expose them there below.

Method 1 – Create an extension for Nautilus 3.6

This is a very simple method , is to add a ‘ extension in Python for Nautilus 3.6 which is really to change the context menu : via terminal we first create the folder that will contain script , and immediately after, we will create the script itself. Translated into commands that corresponds to
mkdir-p ~ / .local / share / nautilus-python / extensions
gedit ~ / .local / share / nautilus-python / extensions / nautilus-acme.py

Clearly we can replace gedit with our favorite text editor. Inside the new file open, now, let’s write the following:
from os.path import join from
gi.repository import GObject, Nautilus

 class Acme (GObject.GObject, Nautilus.MenuProvider):
def __ init__ (self): pass

final new_empty_file (self, menu, folder):
with open (join (folder.get_uri (). replace ("file :/ /", ""), "new_file"), 'w') as f: f.write
('')
return
final get_background_items (self, window, CURRENT_FOLDER):
AcmeMenuItem = Nautilus.MenuItem (
name = "Acme :: NewEmptyFile"
label = "Create empty file "
tip =" Create a new empty file "
)

AcmeMenuItem.connect ('activate', self.new_empty_file, CURRENT_FOLDER)
return [AcmeMenuItem]

Save the file and restart Nautilus, with the command
nautilus-q
Done! Now, clicking the right mouse button on a blank part of our desk / a Nautilus window, we will directly support the “Create empty file.”

Method 2 – Use templates

This method is even easier: simply create an empty file in the folder ~ / Templates for always have it available. Then open a terminal and type
touch ~ Templates / File_Vuoto
after that restart Nautilus 3.6, with the command
nautilus-q
Done! We can now create a new empty file with the context menu of Nautilus, through Right click> Create Document> File_Vuoto.
thanks to webupd8 & askubuntu4c940  p 89EKCgBk8MZdE How to Create Empty File (Add Contextual Menu) with Terminal on Nautilus 3.6

Friday, November 9, 2012

How To Use RAR To Compress, Decompress, And Split Files From Terminal - Ubuntu/Linux Mint


In this tutorial, we will learn some basic commands for handling rar formats under Ubuntu or Linux Mint. We will see how to use the terminal to compress and decompress rar files. We will also see how to compress large files and split them in small chunks using the rar compression.

1. Installing RAR

To be able to compress/decompress rar files under Ubuntu/Linux Mint, you need to install RAR packages with this command:


sudo apt-get install unrar rar

2. RAR Uses

- To extract the contents of a .rar file, run this command:

unrar e file.rar

or

rar e file.rar

- To extract an archive file and keep full path intact, run this command:

 rar x folder.rar

- To compress a file into a rar file, run this command:

 rar a file.rar file.ext

Replace ext with your file format you want to compress (txt, exe, avi, ogg, etc.)

- To compress a folder, run this command:

rar a -r folder.rar path/to/folder/

- To compress and split the file into fragments, run this command:

rar a -v20000 file.rar file.mp4

or

rar a -v20000 -vn file.rar file.mp4

The commands above will compress file.mp4 and split it into many files, each one has a size of about 20MB.

For more help about the use of the rar format, run this command:

man rar

Wednesday, August 1, 2012

How to permanently disable menubar in Gnome Terminal


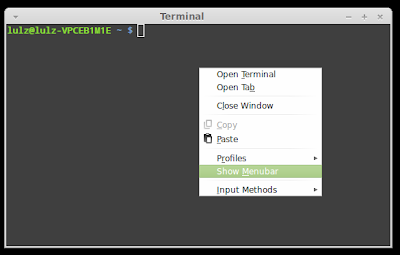
Normally, when you right click on the Gnome terminal, there will be the option to turn on/ off the Menubar. When you click on this option, the menubar in the Gnome terminal will disappear.


However, if you close this terminal and start another one, the menubar will appear again and you will have to turn it off once more.

In this article, I will show you how to permanently disable this menubar.

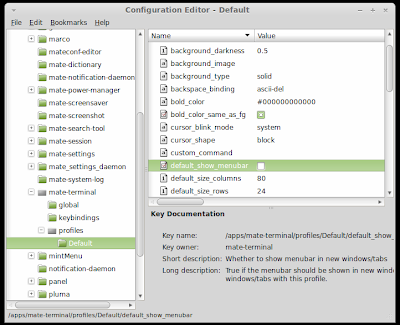
If you use Linux Mint MATE, just hit Alt + F2 then type "mateconf-editor" to open the configuration window. After that, go to apps > mate-terminal > profiles > Default then uncheck the "default_show_menubar" option and everything is done:


If you are using Ubuntu or Linux Mint Cinnamon, you will have to install gconf-editor first, just open the terminal and run the following command:
sudo apt-get install gconf-editor

After that, hit Alt + F2 and typ "gconf-editor" to open the Configuration Editor window and go to apps > gnome-terminal > profiles > Default and uncheck the "default_show_menubar" just like what you would do in MATE. And next time you open the Gnome terminal, you wont see the menubar again.

Thursday, July 26, 2012

Use "free" to monitor memory usage continuously


The "free" command is used to display the memory usage info of your computer. But with the normal "free" command, you get the info only once. To use "free" to display the memory usage of your computer continuously, you can use the "-s" option with the "free" command. For example, to display the info every 2 seconds, you can use the following command:

free -s 2

With this command, the memory usage will be printed continuously in the terminal after every 2 seconds.


Another way you can try is to combine the "watch" command with "free". For example, to get the memory usage info every 2 seconds using "watch" and "free", the command you can use is:
watch -n 2 free

And you will have an output like this:


Thursday, July 19, 2012

How to run multiple commands in the terminal


Sometimes you may want to run multiple commands in the terminal. Here is how to do it:

If you want to run multiple commands in the terminal respectively, just add a semicolon (;) between two commands. For example:

command1; command2; command3

With this syntax, it does not matter if a command returns to error, all the commands you use will be executed eventually.

If you want to run multiple commands in the condition that the previous command must complete successfully first before running the next command ( in other word, if the first command returns to error, the next commands wont be executed), 2 and symbols (&&) will be used in lieu of the semicolon. For example:
command1 && command2 && command3

If you want to run multiple commands in the condition that the next command will be executed if the previous one fails ( if the first command runs successfully, the next commands wont be run), the syntax will be:
command1 || command2 || command3


Friday, July 13, 2012

Use "pushd" and "popd" for quick switching between directories


When using the terminal, sometimes you will need to switch to and fro between two directories. When the path to a directory is too long, to save time, you can use the two command "pushd" and "popd" for a quick switching between these two directories without the need to re-typing the directory path.

The "pushd" command function is to save the current working directory in memory so it can be returned to at any time. "pushd" is also used to change to a new directory so you can use it instead of the "cd" command. The "popd" command returns to the path at the top of the directory stack.

The way you use "pushd" and "popd" is very simple. When you are in a certain directory and want to switch to another directory, instead of "cd", you can use "pushd":

pushd /path/to/new/directory

With this command, you will move to the new directory and the original directory is saved in the memory. After finishing work in the new directory, to return to the original directory, just type
popd

And you will move to the first directory.

Monday, June 25, 2012

How to record terminal activities and outputs to a log file


In today's tip, I will show you how to record everything you run in the terminal and the outputs into a text file. This can very handy for you, especially when you are an administrator of a linux dedicated server, to analyze problems or seek help on forums or irc channels if you messed around with the commands and it resulted to troubles.

The command to record activities in the terminal is "script", before executing any other thing, you just need to run the following command to make a log file:

 script log.txt  

After that, everything you run afterward in the terminal and the outputs will be recorded into this log file.

If you dont want to record the activities anymore, you just need to hit Ctrl +D. To start recording again to the same log file, you can run this command:


 script -a log.txt