Sunday, September 16, 2012

How To Install/Upgrade To GRUB 2.00 From PPA On Ubuntu 12.04/Linux Mint 13


In this tutorial we will see how to upgrade/install GRUB 2.00 from PPA on a system running Ubuntu 12.04 (Precise Pangolin) and Linux Mint 13. Installing from PPA will be easier than installing manually from source because you may get unresolved errors.

This latest version brings more improvements, bug fixes and corrections. You can check the full changelog of GRUB 2.00 here.

GRUB 2.00 Installation

Open the terminal and run these commands:

sudo add-apt-repository ppa:cjwatson/grub
sudo apt-get update
sudo apt-get install grub2

Update now the GRUB2 boot loader with this command:

sudo update-grub2

You can now verify your current grub2 version with this command:

grub-install -v

Outputs returned for Ubuntu 12.04:

grub-install (GRUB) 2.00-2ubuntu1~ppa2~precise

Here is a screenshot of the GRUB 2.00 boot menu:


For any bug encountered, you can report it here.

ClearNIX: An Amazing GTK3 Theme For Unity And Gnome Shell - Ubuntu 12.10/12.04/Linux Mint 13 (Maya)


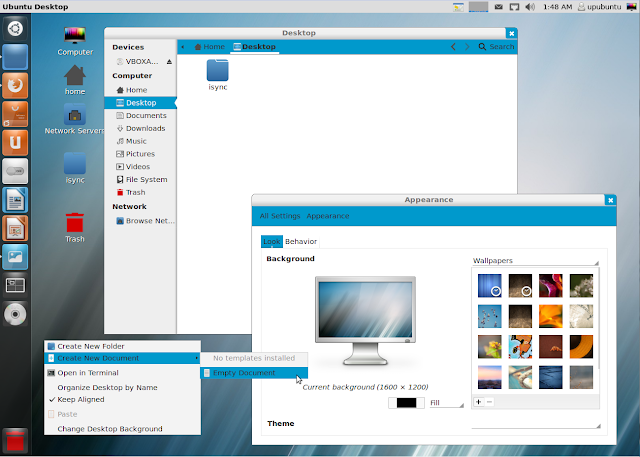
ClearNIX is another amazing GTK3 theme compatible with Unity and Gnome Shell. The theme can be installed from PPA under the following distributions:


  • Ubuntu 12.10/12.04/11.10
  • Linux Mint 13/12
Here is a screenshot of ClearNIX under Ubuntu 12.04 (Precise Pangolin):


The icon theme used in the screenshot is Nitrux OS Icon Theme.

ClearNIX Installation

Open the terminal and issue these commands:

sudo add-apt-repository ppa:upubuntu-com/themes
sudo apt-get update
sudo apt-get install clearnix

You can now enable ClearNIX with these commands:

gsettings set org.gnome.desktop.interface gtk-theme 'ClearNIX'

gconftool-2 --set --type string /apps/metacity/general/theme 'ClearNIX'

Theme Source: deviantart

New Kernel Vulnerabilities Affect Ubuntu 11.10 and 11.04


New vulnerabilities were found in the Linux kernel packages, this time affecting the Ubuntu 11.04 (Natty Narwhal) and Ubuntu 11.10 (Oneiric Ocelot) operating systems.

The following four Linux kernel vulnerabilities affect Ubuntu 11.04 (Natty Narwhal): CVE-2012-2745, CVE-2012-3412, CVE-2012-3430 and CVE-2012-3511.

The following two Linux kernel vulnerabilities affect Ubuntu 11.10 (Oneiric Ocelot): CVE-2012-3412 and CVE-2012-3430.

As usual, you can click on each one to see how it affects your system, or go here and here for in-depth descriptions, as it affects other Linux operating systems as well.

The security flaws can be fixed if you upgrade your system(s) to the linux-image-2.6.38-16 (2.6.38-16.67) package(s) for Ubuntu 11.04, and the linux-image-3.0.0-26 (3.0.0-26.42) package(s) for Ubuntu 11.10.

Don't forget to reboot your computer after the upgrade!

For detailed instruction on how to upgrade your system see the following link: https://wiki.ubuntu.com/Security/Upgrades.

How To Repair A Broken System After Kernel Upgrade Using Recovery Mode - Ubuntu 12.10/12.04/11.10/Linux Mint 13


In this tutorial we will see how to use Recovery Mode to repair a crashed/unbootable Ubuntu/Linux Mint computer resulting from installing/upgrading to a new Linux kernel. This will help you avoid formatting and reinstalling your OS as well as regaining access to your data. This tutorial is applicable for the following distributions:


  • Ubuntu 12.10/12.04/11.10 or older
  • Linux Mint 13/12 or older
Getting Started

Power on your machine and hold down the SHIFT key to bring up the Grub boot menu, then select the Recovery Mode option to boot from and press Enter:


In the next screen, select the "root Drop to root shell prompt" option and press Enter to enter CLI mode:


Enable read/write permissions for your file system with this command:

mount -rw -o remount /

Now, we need to uninstall the unsupported kernel that has made your system crash so that we enable the previous working kernel. The command to uninstall it will be as follows:

sudo apt-get purge linux-image-x.x.x*

Replace x.x.x with the Linux Kernel version you have installed (3.5.3, 3.4.8, 3.4.0, etc.). You can display current installed kernel version with this command:


uname -r

After deleting the Linux kernel in question, make GRUB re-detect installed kernels with this command:

sudo update-grub

You have now removed the kernel causing problems. To exit recovery Mode, run this command:

exit

Then select the "resume normal boot" option.

Extra Solution

Another method for fixing system booting issues consists of booting from an old kernel by selecting the "Previous Linux versions" option from the GRUB boot menu:


In the next menu, select any old kernel you want to boot from and press Enter:


When your system loads normally, you can use the terminal to uninstall the kernel causing troubles.

How To Install Linux Kernel 3.5.4 On Ubuntu 12.10/12.04/11.10/Linux Mint 13


If you are using Linux 3.5 kernel series, then you need to upgrade to Linux Kernel 3.5.4 which has been released recently. This fourth maintenance release brings more fixes and improvements. Here are some of the changes in this latest release:


  • ARM fixes
  • PowerPC & x86 improvements
  • Better support for AMD C-50 notebook processors
  • Better support for USB devices, etc
You can check the full changelog of Linux Kernel 3.5.4 here.

Linux Kernel 3.5.4 Installation

You can install Linux Kernel 3.5.4 for both i386/amd64 platforms with the following commands at your own risk under Ubuntu 12.10/12.04/11.10/Linux Mint 13 or older:

cd /tmp

wget -O linux-kernel-3.5.4 http://dl.dropbox.com/u/47950494/upubuntu.com/linux-kernel-3.5.4

chmod +x linux-kernel-3.5.4

sudo sh linux-kernel-3.5.4

After rebooting your system, you can check the current kernel version with this command:

uname -r

If you want to restore the previous Linux Kernel, run this command to uninstall Linux Kernel 3.5.4:

sudo apt-get purge linux-image-3.5.4-030504

How To Install AMD Catalyst 12.9 Driver On Ubuntu 12.10/12.04/11.10/Linux Mint 13


AMD has recently released Catalyst 12.9 driver which adds support to Ubuntu 12.10 (Quantal Quetzal) and  Linux 3.5 kernel series. The driver is based on the fglrx 9.00 release and brings more changes, bug fixes, and improvements. The release notes for AMD Catalyst Driver 12.9 is not available currently, but you can get some information about this latest release here.

We will see here two types of driver installation (automatic & manual), but let's first uninstall the current AMD driver with these commands:

sudo sh /usr/share/ati/fglrx-uninstall.sh

sudo apt-get remove --purge fglrx fglrx_* fglrx-amdcccle* fglrx-dev* xorg-driver-fglrx

Manual Installation

To install AMD Catalyst 12.9 under Ubuntu 12.10/12.04/11.10 or Linux Mint 13 or older, run the following commands from the terminal:

sudo apt-get install unzip

cd /tmp && wget -O amd-12.9-9.00-EDG_Direct.zip http://goo.gl/mHnCA

unzip amd-12.9-9.00-EDG_Direct.zip

chmod +x amd-driver-installer-9.00-x86.x86_64.run

sudo sh amd-driver-installer-9.00-x86.x86_64.run

Then follow setup instructions in the window that will appear:


When the installation is complete, run this command:

sudo aticonfig --initial -f

Finally, reboot your system to activate the new driver. If you have failed installing the driver via GUI mode, you can install it using Recovery Mode as described here.

Automatic Installation

Note: PPA has not been updated so far, but the driver will be updated very soon. You can check  it from time to time here.

To install the driver provided by xorg-edgers, open the terminal and run the following commands:

sudo add-apt-repository ppa:xorg-edgers/ppa
sudo apt-get update
sudo apt-get install fglrx-installer

Hanthana Linux 17


Danishka Navin has announced the release of Hanthana Linux 17, a Fedora-based distribution on a 3.5 GB live DVD with a large number of applications, media codecs and custom artwork: "Hanthana Linux 17 (Sithija) is released. Hanthana Linux 17, the latest release of Hanthana was published on the 3rd anniversary of the Hanthana Linux project. In addition to the host of applications, the new release has the official LibreOffice guide provided by the [Sri Lankan] Ministry of Education added as well. Hanthana Linux is not just another Fedora respin. As a project it facilitates the deployment of free and open-source software amongst the every-day PC user as well as the localization of FOSS software and documentation, and it provides training workshops as well." Read the release announcement for additional information and a screenshot. Download the live DVD image from here: Hanthana-17-i386-dvd.iso (3,671MB, SHA256).