
Monday, November 26, 2012
OpenELEC 3.0 Beta 1
Stephan Raue has announced the availability of the first beta build of OpenELEC 3.0, a major new update of the project's Linux-based embedded operating system built specifically to run the XBMC entertainment media hub: "The OpenELEC team is proud to release the first beta of OpenELEC 3.0. Internally this is known by the less-catchy name OpenELEC 2.95.1. Shortly after our OpenELEC 2.0 release we are proud to present our first OpenELEC 3.0 beta. With this new version come many exciting updates. Based on XBMC 12.0 Frodo, OpenELEC 3.0 brings official support for our first ARM devices, the Raspberry Pi, Linux kernel 3.6, improved PVR support and of course, the long-awaited audio engine. This new version of OpenELEC also includes many driver updates, including new support for many DVB and wireless devices. The new boot to RAM option allows PXE systems and slow devices to boot even faster than before." Read the full release announcement for a detailed list of new features and screenshots. Download (MD5): OpenELEC-ION.i386-2.95.1.tar.bz2 (103MB), OpenELEC-ION.x86_64-2.95.1.tar.bz2 (106MB).

[How To] Install and Run Chromium OS onto a USB Flash Drive - Ubuntu/Linux Mint
In this tutorial, we will see how to install and run ChromiumOS onto a USB storage device using the OS image created by Hexxeh. The ChromiumOS image will be installed in a 4GB USB stick or higher in persistent mode. You can use the commands given below under Ubuntu/Linux Mint (12.10/12.04/Mint 14/13, etc.) and any other Linux-based system.
Getting Started
Open the terminal and download the ChromiumOS image to your home folder (precisely in the ChromiumOS folder) with these commands:
mkdir ~/ChromiumOS; cd ~/ChromiumOS
wget -c http://goo.gl/ICSpt -O ChromeOS-Vanilla-3274.0.zip
unzip ChromeOS*.zip
mv ChromeOS*.img ChromeOS.img
Let's now identify the USB device by running this command:
fdisk -l
For my system, the USB flash drive is mounted as /dev/sdb1. Unmount the USB device with this command:
sudo umount /dev/sdb1
Note: Replace /dev/sdb1 with your own USB device name.
To create a bootable USB device using the Chrome OS image, run this command (all data in your usb device will be deleted):
sudo dd if=ChromeOS.img of=/dev/sdb1 bs=4M
or
sudo dd if=ChromeOS.img of=/dev/sdb1 oflag=direct
After you finish, boot from the Chromium OS USB flash drive. You can also use the Plop boot loader which allows to boot from USB storage devices. If you fail to create a bootable USB stick, you can download and use the ChromiumOS VM for VirtualBox from here.
Here are some screenshots of ChromiumOS:


Sunday, November 25, 2012
GhostBSD 3.0-RC4

Development Release: GhostBSD 3.0-RC4^Eric Turgeon has announced the availability of the fourth release candidate for GhostBSD 3.0, a FreeBSD-based operating system for the desktop: "A fourth development release candidate for GhostBSD 3.0 is now available for testing. The last development release was too buggy due to some last minute changes. I decide to release another testing release which might contain some bugs and other problems, which have not been discovered during beta tests so we still only encourage you to run it only on non-critical systems. All /home/user file and folder have been fixed (this was causing LibreOffice and other application to fail). We downsized the i386 Openbox image to fit on a CD." Here is the brief release announcement. Download: GhostBSD-3.0-RC4-gnome2-i386.iso (974MB, SHA256), GhostBSD-3.0-RC4-lxde-i386.iso (609MB, SHA256), GhostBSD-3.0-RC4-gnome2-amd64.iso (1,029MB, SHA256), GhostBSD-3.0-RC4-lxde-amd64.iso (663MB, SHA256).
Kalahari Icon Theme 0.3.5 Released, PPA Installation Available For Ubuntu 12.10/12.04/Linux Mint
The Kalahari icon theme has been updated recently with more icons and is compatible with Ubuntu Unity and Gnome Shell desktop environments. The icons are inspired by Humanity, Faenza and Elementary icons. Here are some screenshots for this icon theme under Unity:


Once installed in your system, you will be able to choose from four different styles of Kalahari as described below. The PPA is available for the following distributions:
- Ubuntu 12.10/12.04/11.10
- Linux Mint 14/13/12
Open the terminal and install the Kalahari icon theme with these commands:
sudo add-apt-repository ppa:upubuntu-com/icons
sudo apt-get update
sudo apt-get install kalahari-icons
To enable the default icon theme, run this command:
gsettings set org.gnome.desktop.interface icon-theme 'Kalahari'
For other icon styles, use the following commands:
1. Gelada

gsettings set org.gnome.desktop.interface icon-theme 'Gelada'
2. Kalahari-simple

gsettings set org.gnome.desktop.interface icon-theme 'Kalahari-simple'
3. Kilimanjaro

gsettings set org.gnome.desktop.interface icon-theme 'Kilimanjaro'
Saturday, November 24, 2012
How to Add and Remove Users with Terminal on Linux
On virtually all Linux distributions now there are choices to be made by simple GUI in order to perform many different tasks. Often, however, the old (and in my opinion essential) command line allows us to speed up the process without having to go for a thousand screens and study us hundreds of options. To demonstrate this today we will see the ease and convenience of adding a new user in the terminal and not with the GUI.

Add a User
First open a terminal and give the command to be created a new account (in the guide all the controls are related to the creation of user ” username “, replace this fictitious name with the one you want):
sudo useradd username
Let’s create a home directory for the dear username and assegnamogli a password:
sudo mkdir / home / usernamesudo passwd username
Finally, we allow the user ownership of her home:
sudo chown username / home / usernamesudo chgrp users / home / username
If you want, then you can assign administrator privileges to the account you just created with the following command:
sudo adduser username sudo
Remove a user
If the goal is to delete a user, the process is even easier, just give these two commands, respectively, delete the user and his home:
sudo rm-r / home / username /
That’s it, yes, that’s all. Beautiful terminal , right?
Friday, November 23, 2012
How To Boot From Live USB in VMware Player/VirtualBox - Ubuntu/Linux Mint
In this tutorial, we will show you a way for making VirtualBox or VMware Player boot from live USB devices since this feature hasn't been implemented yet natively in both software. The trick we will use will rely on the Plop boot manager which allows via a live iso to boot from USB devices.

We will show you how to use the Plop boot manager with both VMware Player and VirtualBox under Ubuntu/Linux Mint (12.10/12.04/Mint 14/13, etc.).
Downloading the Plop Boot Manager
You can download the Plop iso file from here. Or Open the terminal and download the Plop iso image to your home directory with this command:
cd && wget -c http://goo.gl/sJoKf -O ploplinux-4.2.2.iso
1. Boot from Live USB in VirtualBox
We assume you have already created a VM (virtual machine), double click it to start it. Mount the USB stick (live USB) to VirtualBox by opening Devices >> USB Devices >> Your USB Device:

If it is not available, then you may need to run this command from the terminal to be able to mount USB devices under Ubuntu/Linux Mint (replace username with your own user account name):
sudo adduser username vboxusers
Once your USB device is mounted in VirtualBox, look at the bottom of the VM's window, you will see a small CD icon, right-click it and select "Choose a virtual CD/DVD disk file":

Select now the plob iso file (ploplinux-4.2.2.iso) that you have downloaded:

Press Right CTRL+R to reset the VM and wait for Plop boot menu. If it didn't show up, reset the VM again and press F12 to bring up the boot menu, press c to boot from CD-ROM:

In the Plop boot menu, use your arrow keys to select the "Plop Boot Manager" option and press Enter:
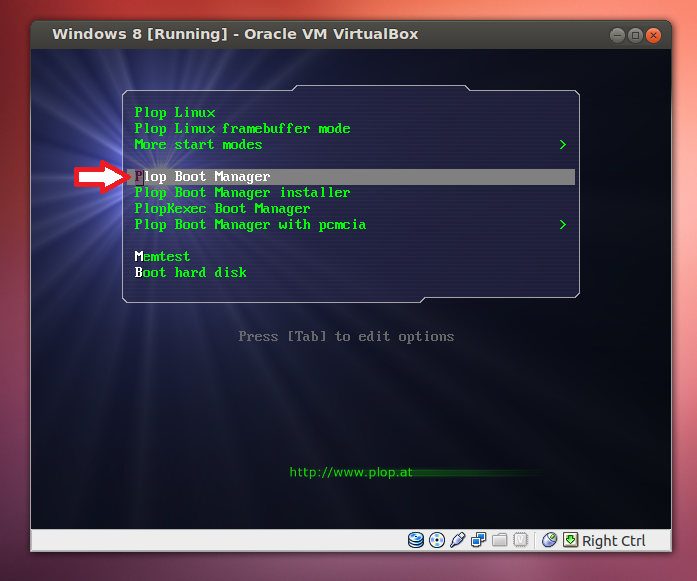
Another menu will show up, select USB and press Enter to boot from the USB device:

2. Boot from Live USB in VMware Player
To boot from a live USB in VMware Player, we will also use the Plop boot loader. Start VMware Player, select any VM of your choice, then click "Edit Virtual machine settings":

Select the "CD/DVD (IDE) option, then in the right side, select "Use ISO image" and click the Browse button:

Open the Plop iso file and click Save:

Start now the VM and wait for the Plop boot menu. When it shows up, select Plop Boot Manager and press Enter:

In the next menu, select USB and press Enter to boot from the USB device:

Subscribe to:
Posts (Atom)