Tuesday, October 16, 2012

How To Change Your Login Screen Wallpaper On Ubuntu 12.10 (Quantal Quetzal)


In this tutorial we will see two ways for changing the default wallpaper of your login screen under Ubuntu 12.10 (Quantal Quetzal). Changing the background image of the logon screen will make it more attractive and meet your taste.


First of all, I want to let you know that I have tried to change the logon screen with Ubuntu Tweak under Ubuntu 12.10, but unfortunately it didn't work due to a bug. The author of Ubuntu Tweak has promised that it will be fixed in the next version of the software. The methods given below are also workable on Ubuntu 12.04 Precise Pangolin.

Method 1

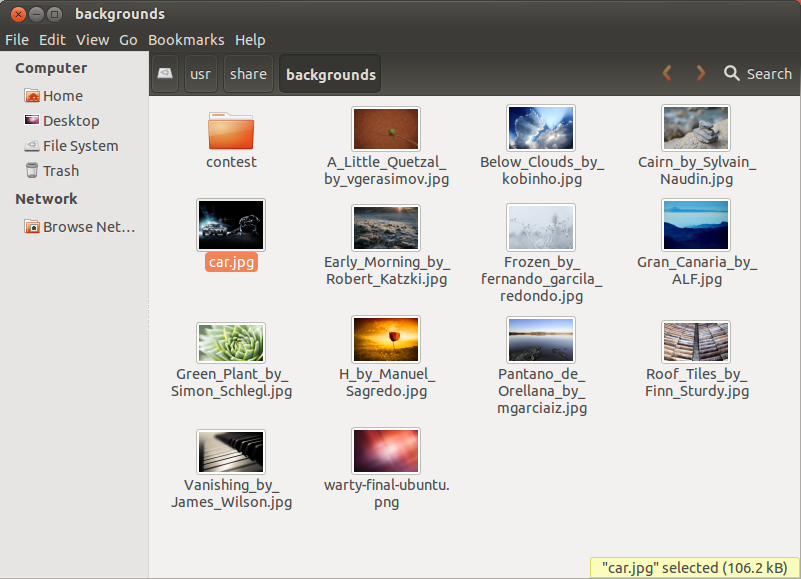
Open the terminal and access the /usr/share/backgrounds/ folder with this command:

gksu nautilus /usr/share/backgrounds/

Place now the wallpaper you want to use in this folder:


Then right-click on an empty space on your desktop and select "Change Desktop Background". In the Appearance window, select "Picture Folder" from the dropdown menu and select the wallpaper you have placed in the /usr/share/backgrounds/ folder:


Log out now to test the login screen. The only drawback with this method is that you can't set a different wallpaper for both desktop and logon screen.

Method 2 (Recommended)

Start the terminal and run this command to get root privileges:

sudo -i

Allow now lightdm to establish a connection with the Xserver with this command:

xhost +SI:localuser:lightdm

Sign in now as lightdm:

su lightdm -s /bin/bash

Disable now "draw-user-backgrounds" and "draw-grid" with these commands:

gsettings set com.canonical.unity-greeter draw-user-backgrounds 'false'

gsettings set com.canonical.unity-greeter draw-grid 'false'

You can now set your custom wallpaper with this command:

gsettings set com.canonical.unity-greeter background '/path/to/wallpaper.png'

Replace "/path/to/wallpaper.png" with the full path to your wallpaper. You can now logout and test your login wallpaper.

If you prefer to restore default settings, run this sequence of commands:

sudo -i

xhost +SI:localuser:lightdm

su lightdm -s /bin/bash

gsettings reset com.canonical.unity-greeter draw-user-backgrounds

gsettings reset com.canonical.unity-greeter draw-grid

gsettings reset com.canonical.unity-greeter background

exit

exit

To Do List After A New Installation Of Ubuntu 12.10 (Quantal Quetzal)


As you know, it remains three days until the final release of the stable version of Ubuntu 12.10 (Quantal Quetzal) which will bring more new features and improvements compared to previous releases. In this article, we will try to give some basic tips that you need to perform after installing Ubuntu 12.10. If you think that we missed something useful in this article, you can mention it below (comment form).

1. Change Repsoitory Server Location

It's recommended that you configure Ubuntu to download, update, or upgrade packages from the main server rather than using location-based servers. You can do this as follows:

- Run this command:

sudo software-properties-gtk

- Set now this option under the "Ubuntu Software" tab:

Download from: Main server


- In the "Other Software" tab, make sure these options are selected:

* Canonical Partners
* Canonical Partners (Source Code)


- Close the window and run an update with this command:

sudo apt-get update

2. Update/Install Device Drivers 

In Ubuntu 12.10, jockey-gtk has been superseded by software-properties for managing third-party driver configuration. So, to access this feature, open the terminal and run this command:

 sudo software-properties-gtk

Open now the "Additional Drivers" tab, then install any detected driver for your keyboard, wireless cards, graphics cards, etc.


For Nvidia graphics cards, it is recommended that you use Nvidia proprietary drivers instead of Nouveau to be able to get better graphics performance in games, HD videos and so on. You can install the latest Nvida driver using the x-swat PPA (stable) with the following commands:

sudo apt-add-repository ppa:ubuntu-x-swat/x-updates
sudo apt-get update
sudo apt-get install nvidia-current nvidia-settings

Using the same PPA, you can also install AMD Catalyst driver with these commands:

sudo apt-get install fglrx-installer
sudo aticonfig --initial -f

For NVIDIA Optimus laptops, you can install the graphics driver with these commands:

sudo add-apt-repository ppa:bumblebee/stable
sudo add-apt-repository ppa:ubuntu-x-swat/x-updates 
sudo apt-get update
sudo apt-get install bumblebee bumblebee-nvidia 

3. Installing Multimedia Packages

To be able to play some restricted media formats (MP3, AVI, DVD, etc.) under Ubuntu 12.10, install the "ubuntu-restricted-extras" package with this command:

sudo apt-get install ubuntu-restricted-extras

4. Installing A Web Server

 If you want to test PHP projects on Ubuntu 12.10, your best choice is the LAMP server which can be installed with this command:

sudo apt-get install lamp-server^

You can find here detailed instructions for installing a LAMP server on Ubuntu.

5. Some Basic Applications You Need To Install

   A. Gimp


sudo add-apt-repository ppa:otto-kesselgulasch/gimp
sudo apt-get update
sudo apt-get install gimp gimp-plugin-registry gimp-resynthesizer

   B.  Wine


sudo add-apt-repository ppa:ubuntu-wine/ppa
sudo apt-get update
sudo apt-get install wine1.5

   C. VirtualBox 


echo "deb http://download.virtualbox.org/virtualbox/debian $(lsb_release -sc) contrib" | sudo tee /etc/apt/sources.list.d/virtualbox.list

wget -q http://download.virtualbox.org/virtualbox/debian/oracle_vbox.asc -O- | sudo apt-key add -

sudo apt-get update

sudo apt-get install virtualbox-4.2

   D. VLC & Mplayer


sudo add-apt-repository ppa:videolan/stable-daily
sudo apt-get update
sudo apt-get install mplayer vlc 

   E. Thunderbird


sudo add-apt-repository ppa:mozillateam/thunderbird-stable
sudo apt-get update
sudo apt-get install thunderbird xul-ext-lightning xul-ext-calendar-timezones

   F. Pidgin Chat Client


sudo add-apt-repository ppa:pidgin-developers/ppa
sudo apt-get update
sudo apt-get install pidgin pidgin-data pidgin-plugin-pack pidgin-themes
sudo apt-get install pidgin-lastfm pidgin-guifications msn-pecan pidgin-musictracker

   G. Skype 


sudo add-apt-repository "deb http://archive.canonical.com/ $(lsb_release -sc) partner"
sudo apt-get update 
sudo apt-get install skype

7. Managing Themes, Cursors, and Icons

To be able to change default theme, icons, and cursors, you need a software like GNOME Tweak Tool. You can install it with this command:

sudo apt-get install gnome-tweak-tool


6. Installing Gnome Shell


Gnome Shell is a desktop environment that you can use on Ubuntu instead of Unity. You can install it with this command:

sudo apt-get install gnome-shell

You can later login to Gnome Shell desktop from the login screen.

7. Desktop & System Configuration Tools

   A. Compiz


sudo apt-get install compiz compizconfig-settings-manager compiz-plugins

   B. Ubuntu Tweak


sudo add-apt-repository ppa:tualatrix/ppa  
sudo apt-get update 
sudo apt-get install ubuntu-tweak

C. MyUnity (Currently unavailable for Ubuntu 12.10)


sudo apt-get install myunity

9. Installing Adobe Flash Player


You can install Adobe Flash Player with this command:

sudo apt-get install flashplugin-installer gsfonts-x11

10. Installing Google Chrome


Via the terminal, run these commands:

wget -q -O - https://dl-ssl.google.com/linux/linux_signing_key.pub | sudo apt-key add -

sudo sh -c 'echo "deb http://dl.google.com/linux/chrome/deb/ stable main" >> /etc/apt/sources.list.d/google.list'

sudo apt-get update

sudo apt-get install google-chrome-stable

11. Installing Conky

To be able to run Conky scripts under Ubuntu, you need to install Conky with this command:

sudo apt-get install conky conky-all

12. Compiling & Installing From Source Under Ubuntu

To compile and install things on Ubuntu from source, you need to install these packages:

sudo apt-get install build-essential checkinstall dh-make fakeroot git devscripts

sudo apt-get install libxml-parser-perl  cdbs avahi-daemon check

For more information about this, click here.

Parsix GNU/Linux 4.0 Test 3


Alan Baghumian has announced that the third public test release of Parsix GNU/Linux 4.0, a Debian-based distribution for the desktop, is now ready for download and testing: "This is the third and last test version of the upcoming Parsix GNU/Linux 4.0 release. Parsix GNU/Linux 4.0 (code name 'Gloria') has been synchronized with Debian's testing repositories as of October 8, 2012 and brings lot of updated packages compared to Parsix 3.7. Parsix Gloria is the project's first release with the GNOME 3 series and it ships with the LibreOffice productivity suit by default. It has a brand new software manager package. Highlights: GNOME 3.4.2, X.Org 7.7, GRUB 2, GNU Iceweasel 15.0.1, GParted 0.12.1, Empathy 3.4.2.3, LibreOffice 3.5.4, VirtualBox 4.1.18 and a brand new kernel based on Linux 3.2.28 with TuxOnIce, BFS and other extra patches." Read the complete release notes for further information. Download: parsix_4.0r0-test-3-i386.iso (1,028MB, MD5), parsix_4.0r0-test-3-amd64.iso (1,025MB, MD5).

Sunday, October 14, 2012

How To Install ImpressCMS On Ubuntu 12.10/12.04/11.10/Linux Mint 13


ImpressCMS is a Content Management System (CMS) that allows users to build and maintain dynamic web sites for personal and business use. The latest version of ImpressCMS is 1.3.3 Final which brings more new features and improvements. You can find its release notes here.

In this tutorial we will explain detailed instructions for installing ImpressCMS in the following Linux distributions:


  • Ubuntu 12.10/12.04/11.10 or older
  • Linux Mint 13/12
  • Also applicable for other Debian-based distributions
1. LAMP Installation

I recommend using the LAMP server to be able to run the ImpressCMS script. You can find here and here two ways for installing the LAMP server on Ubuntu/Linux Mint. After installing the LAMP server, you need also to install php5-gd package with these commands:

sudo apt-get install php5-gd

sudo /etc/init.d/apache2 restart

2. Creating MySQL Database and User

You can create a MysQL database and user either in phpMyAdmin or from command line as follows:

- Login to the MySQL server with this command:

mysql -u root -p

- We will create now a database named "impresscms" with this command:

create database impresscms;

- We will now create a database user and password with this command (set any password of your choice, "1234" is just an example):

CREATE USER 'impresscms'@'localhost' IDENTIFIED BY '1234';

- Grant now the created user all access privileges for the database with this command:

GRANT ALL PRIVILEGES ON impresscms.* TO 'impresscms' IDENTIFIED BY '1234';

- Exit now the MySQL server with this command:

exit

- You have now created the following MySQL details that will be used later while installing ImpressCMS:

  1. Hostname: localhost
  2. Databse Name: impresscms
  3. Database User: impresscms
  4. Database Password: 1234
3. Installing ImpressCMS (1.3.3 Final)

Via the terminal, install ImpressCMS with the following commands:

cd /tmp

wget -c http://goo.gl/iGQBC -O impresscms_1.3.3_final.zip

unzip -q impresscms_1.3.3_final.zip

sudo mkdir -p /var/www/impresscms

sudo cp -R htdocs/* /var/www/impresscms/

sudo chmod 777 -R /var/www/impresscms/

Open now this link to start the installation of ImpressCMS:

http://localhost/impresscms

Note: You can change localhost with your IP address if installing on a server.
In the first page, select a default language and click the next button:


In "Configuration check" page, the script will check server requirements, all details must be marked in green:


In "Paths settings" page, scroll down and change "Impress CMS physical trust path" as follows:

/var/XXXXXXXX

to

/var/www/impresscms/XXXXXXXX

Then click the "Create Trust Path" button:


In the next "Database connection" page, enter MySQL details we have generated above:

  1. Database: mysql
  2. Server hostname: localhost
  3. User name: impresscms
  4. Password: 1234   (set your own password)

In "Database configuration" page, enter the name of the database we have created above (impresscms) and click Next:


When you reach the "Initial settings" page, enter your admin access details and click Next:


Then complete the rest of the installation wizard. The welcome page will be like this if the installation is successful:


Before accessing your admin area, run this command:

sudo chmod 444 /var/www/impresscms/mainfile.php


You can now log in using your admin details. Here is a screenshot of the admin area:


Install Miro 5.0.4 From PPA In Ubuntu 12.04/Linux Mint 13


Miro 5.0.4 has been released recently and PPA installation is available for Ubuntu/Linux Mint systems. Miro is an open source internet TV application that allows users in a single interface to play, convert and share audio and  video contents either locally or online. It also allows to download torrents as well as buying music and applications.


 The PPA is not yet updated for Ubuntu 12.10 (Quantal Quetzal) and can be used to install Miro for the following Linux distros:

  • Ubuntu 12.04/11.10
  • Linux Mint 13/12
Miro 5.0.4 Installation

Open the terminal and run these commands:

sudo add-apt-repository -y ppa:pcf/miro-releases
sudo apt-get update
sudo apt-get -y install miro

Miro Home Page

Slackel 14.0


Dimitris Tzemos has announced the release of Slackel 14.0, a Slackware-based Linux distribution featuring the KDE 4.8.5 desktop and a good collection of KDE-centric software applications: "Slackel KDE 14.0 has been released. A collection of four KDE ISO images are immediately available, including 32-bit and 64-bit installation images as well as 32-bit and 64-bit live images that can be burned to a DVD or used with a USB drive. The software included in live images is exactly the same as that present in the standard Slackel KDE 14.0 installation DVDs. The Slackel live DVD images includes Linux kernel 3.2.29 and were built using SaLT (Salix Live Technology). Slackel KDE 14.0 includes the stable 14.0 tree of Slackware Linux and KDE 4.8.5 accompanied by a very rich collection of KDE-centric software." Read the rest of the release announcement for more details. Download links (MD5): slackel-kde-14.0.iso (993MB), slackel64-kde-14.0.iso (941MB), slackellive-kde-14.0-32.iso (994MB), slackellive-kde-14.0-64.iso (1,003MB).