Friday, September 7, 2012
Kiwi Linux 12.08
Jani Mosones has announced the release of Kiwi Linux 12.08, an Ubuntu-based desktop Linux distribution with many popular extras, such as browser plugins, media codecs, archiving tools, etc, included by default: "After exactly two years of neglect I released a new version of the Ubuntu remix with Romanian, Hungarian, German and English languages included by default. It is based on Ubuntu 12.04.1, and keeping in line with the traditional goals of the project, it targets Linux newbies who find some of the standard Ubuntu applications lacking or who are taken aback by anything too unfamiliar. It also targets lazy people who would otherwise change about the same things on a vanilla Ubuntu install. So it features the Classic GNOME 2 desktop, Chromium, VLC, Pidgin, Flash, multimedia codecs and the rar and p7zip archive format handlers." Read the rest of the release announcement for a few more details. Download (SHA1): kiwi-12.08.iso (700MB).
Wednesday, September 5, 2012
How to Encrypt Ubuntu Home Folder After Installation
The following tutorial will teach Ubuntu users how to encrypt their home folder after installation, for enhanced security.
Given the fact that we live in a virtual word where hackers grow like mushrooms every day, we think that it is essential for every computer user to use secure connections to the Internet, as well as encrypted hard drives.
All supported Ubuntu operating system to date allow the possibility to encrypt your home folder at installation, but if for some reason you forgot or expressly omitted to select this functionality, we now give you the opportunity to enable it after installation.
The following guide will provide you with step-by-step instructions on how to convert your unencrypted home folder to an encrypted one, for enhanced security over your sensitive files.
IMPORTANT: Before we start with the tutorial, please make sure that you have enough free space on the target device, which should be 2.5x the size your current home directory (e.g. if you have 10GB in your home folder, you'll need 25GB for the conversion). If this requirement is not met, the process will fail with "Not enough free disk space" error.
Editor's note: Make a copy of your personal files on an external device before encrypting your home folder. Just in case!
Step 1 - Installing the requirements
First of all, we need to install the package that helps us encrypt our home directory, so open a terminal, either by hitting CTRL+ALT+T or simply open it from the Applications menu or Unity, and paste the following command:
sudo apt-get install ecryptfs-utils
Then we need to add a test user with administrator rights. For this, you will need to go to the System Settings and access the User Accounts entry...
Click the "Unlock" button on the upper right side and enter your password. Then click the + button on the lower left side, type test on both fields and select "Administrator" where it says Account Type...
Click the "Create" button to create the user. Wait a few seconds for the new user to be created and make sure it is selected. In the right side, click on the "Account disabled" button and add a password in the new window that appears...
Click the "Change" button to submit the password and you will see that the "Account disabled" option will disappear and some dots will appear instead.
Reboot your computer!
Step 2 - Migrating your files and encrypting your home directory
When you get back, at the login screen DO NOT LOGIN, instead hit the CTRL+ALT+F1 key combination. This will switch you to a text mode, where you have to login with the test user we've created above and the password. Once logged in, type the following command, replacing USER with your normal username:
sudo ecryptfs-migrate-home -u USER
Enter your password when asked, hit Enter and wait for the process to finish. Encrypting your files will take a while, but if you have many files, it will take a lot of time, so make sure you grab a book or play a game on another machine.
When the process is over, you will be notified with some important notes. Read them thoroughly, as you will have to delete a folder from your home directory!
WARNING: DO NOT RESTART, DO NOT EXIT THE SESSION AND DO NOT LOG OUT. FOLLOW THE NEXT INSTRUCTIONS!
Step 3 – Setting up your passphrase and completing the encryption process
Now hit the CTRL+ALT+F7 key combination to return to the login screen. Log in with your normal user and wait for the encryption passphrase information window to appear. Click the "Run this action now" to record your passphrase, in case you will need to recover your files at a later time. Write your passphrase in your head or somewhere safe!
That's it! You can now safely reboot your machine and log back in into your newly encrypted Ubuntu session.
Editor's note: If everything is OK, please remove the extra folder (the one with some random letters after your name e.g.: softpedia.xzsdyes) in your home directory (you ill need to do that in a terminal with the sudo rm -rf FOLDER command). Also remove the test user created in the first step!
If you encounter problems with the tutorial, do not hesitate to comment below!
Etichete:
Encrypt,
Linux,
Linux Mint,
Ubuntu
Stellarium 0.11.4 Released, Installation From PPA Available For Ubuntu 12.04/Linux Mint 13
Stellarium has been updated recently to version 0.11.4 bringing more features and improvements. Stellarium is a planetarium program that uses OpenGL to display 3D sky images of planets, stars, nebulae, and constellations with the possibility to simulate sunrise and sunset.

Here are some of the new features in this latest release:
- New plugin: Exoplanets
- New plugin: Observability analysis
- Get geometric altitude and azimuth for script engine
- Sky image loading with altitude/azimuth coordinates
- New hotkey for star name labels
- Option to activate/deactivate the Nebula Background Images button via GUI
- Return to user set location and landscape
- Display degrees and minutes for FOV of CCD
- Adding all possible satellites
- Apply atmosphere effect only on bodies with atmosphere
Installation
To install latest version of Stellarium on Ubuntu 12.04/Linux Mint 13, open the terminal and run the following commands:
sudo add-apt-repository ppa:stellarium/daily
sudo apt-get update
sudo apt-get install stellarium
For older version of Ubuntu/Linux Mint, you can install Stellarium 0.11.4 manually as follows:
- 32-bit systems
cd /tmp
wget -O stellarium-0.11.4_i386.deb http://goo.gl/yzNTy
sudo dpkg -i stellarium-0.11.4_i386.deb
- 64-bit systems
cd /tmp
wget -O stellarium-0.11.4_amd64.deb http://goo.gl/c7FP6
sudo dpkg -i stellarium-0.11.4_amd64.deb
Etichete:
Linux,
Linux Mint,
Ubuntu
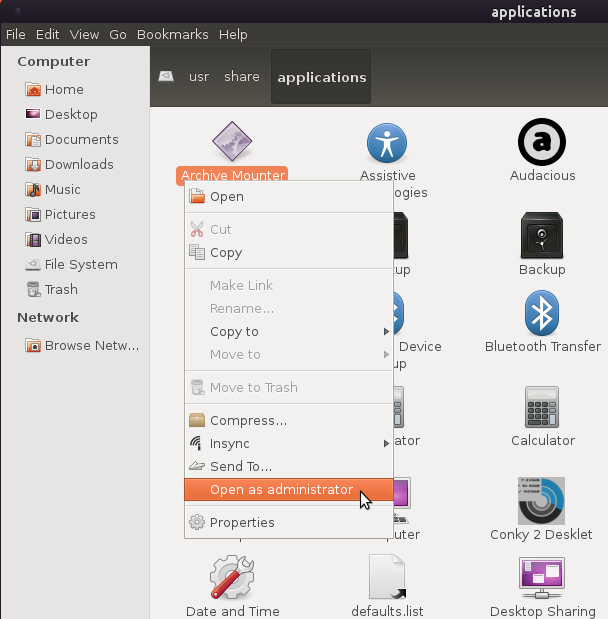
Open Files and Folders As Root From Nautilus Context Menu Under Ubuntu 12.04 Precise Pangolin
Today, we will see a useful tip that will allow us to open files, folders, hard drives and partitions as root from the right-click menu under the Nautilus file manager without wasting your time getting root privileges from the terminal. This will be possible thanks to the "nautilus-gksu" package. Currently, this package is only available for Oneiric or older, but with some modifications, I have updated the package and uploaded it to our PPA so that it can be installed on Ubuntu 12.04 Precise Pangolin.
Installation
To install nautilus-gksu on Ubuntu 12.04, open the terminal and run the following commands:
sudo apt-add-repository ppa:upubuntu-com/ppa
sudo apt-get update
sudo apt-get install nautilus-gksu
Restart now Nautilus with this command:
nautilus -q
You can now right-click any file, folder, or hard disk and you will notice that "Open as administrator" is added to your context menu:

For Ubuntu 11.10 or older, you can install nautilus-gksu with this single command:
sudo apt-get install nautilus-gksu
That's it!
openSUSE 12.2
openSUSE 12.2 has been released: "Dear users, developers, and geekos around the world -- openSUSE 12.2 is ready for you! Two months of extra stabilization work have resulted into a stellar release, chock-full of goodies, yet stable as you all like it. The latest release of the world's most powerful and flexible Linux distribution brings you speed-ups across the board with a faster storage layer in Linux 3.4 and accelerated functions in glibc and Qt, giving a more fluid and responsive desktop. The infrastructure below openSUSE has evolved, bringing in mature new technologies like GRUB 2 and Plymouth and the first steps in the direction of a revised and simplified UNIX file system hierarchy. Users will also notice the added polish to existing features bringing an improved user experience all over." See the release announcement and release notes for further information. Download links: openSUSE-12.2-KDE-LiveCD-i686.iso (671MB, MD5, torrent), openSUSE-12.2-GNOME-LiveCD-i686.iso (671MB, MD5, torrent), openSUSE-12.2-KDE-LiveCD-x86_64.iso (678MB, MD5, torrent), openSUSE-12.2-GNOME-LiveCD-x86_64.iso (680MB, MD5, torrent).
Install Oracle Java 8 In Ubuntu VIa PPA [JDK8]
Oracle Java 8 is expected in summer 2013, but there are some early access builds
available for download already. I've got a request to upload it to the
WebUpd8 Java PPA, and I did so you can now easily install Oracle JDK 8
(includes JRE 8) in Ubuntu / Debian and derivatives.
Oracle Java 8
should only be used for testing purposes and/or by developers. Since
this is a preview release, you'll encounter bugs!
As a reminder, the WebUpd8 Java
PPA doesn't include any Java binaries, just a script that automatically
downloads and install Oracle Java. Everything is done automatically so
you'll get updates through the update manager for JDK8 which includes
JRE8 and the Java browser plugin.
If you want to install Oracle Java 7 instead, see THIS post.
Install Oracle Java 8 (JDK8 and JRE8) in Ubuntu / Linux Mint

Our PPA supports Ubuntu 12.10,
12.04, 11.10, 11.04, 10.10 and 10.04 as well as the corresponding Linux
Mint versions. Add the PPA and install Oracle Java 8 (the package
provides both JDK8 and JRE8) using the following commands:
sudo add-apt-repository ppa:webupd8team/java
sudo apt-get update
sudo apt-get install oracle-java8-installer
Once installed, running "java -version" in a terminal should output something like this:
java -version
java version "1.8.0-ea"
Java(TM) SE Runtime Environment (build 1.8.0-ea-b54)
Java HotSpot(TM) Server VM (build 24.0-b21, mixed mode)
Or, "javac -version":
javac -version
javac 1.8.0-ea
And so on.Install Oracle Java 8 (both JDK8 and JRE8) in Debian
Debian users can install Oracle Java 8 from our PPA repository using the following commands:
su - echo "deb http://ppa.launchpad.net/webupd8team/java/ubuntu precise main" >/etc/apt/sources.list.d/webupd8team-java.list echo "deb-src http://ppa.launchpad.net/webupd8team/java/ubuntu precise main" >>/etc/apt/sources.list.d/webupd8team-java.list apt-key adv --keyserver keyserver.ubuntu.com --recv-keys EEA14886 apt-get update apt-get install oracle-java8-installer exit
Switching between Oracle Java 8 and Java 7
Later on, if you want to switch Oracle
Java 7, use the following command (make sure "oracle-java7-installer"
package is installed):
sudo update-java-alternatives -s java-7-oracle
And, switch back to Oracle Java 8 using:
sudo update-java-alternatives -s java-8-oracle
If you get some warnings when running these two commands, ignore them.
Subscribe to:
Posts (Atom)